Sections of the site
Editor's Choice:
- Lenovo Vibe Z2 - Specifications
- Recovery: what is it and how to use it?
- Factory reset Sony Xperia XA Dual
- How to install the DHT Personalization app
- Firmware for UMI smartphones via ROOTJOY Umi Rome X on Aliexpress: sales, discounts, promotions
- What is an Internet questionnaire?
- How to update Dell BIOS without battery (Successfully)
- Windows XP Installation Instructions
- Entering safe mode through "System Configuration"
- Troubleshooting Mouse Problems
Advertising
| Network capabilities of Epson projectors. Wireless signal transmission for projectors Wireless connection of a projector to a computer |
|
Connecting the projector to a laptop is done by simple manipulations, but, unfortunately, difficulties are often encountered along this path. When devices refuse to pair automatically, this means that the default system settings have been lost, or that these devices simply “do not understand” each other. How to connect a projector to a laptop in this case? The connection is being set up manually: for this in operating system there are certain key sets. In the absence of such, setting parameters is carried out by forcing changes in configurations. A multimedia projector, regardless of model, connects to a computer or laptop via VGA orHDMI cable. For content High Quality HDMI would be preferable.
The connection algorithm is elementary:
In cases where the required connector is not available, you can use special adapter. This can happen when the video card only has a DVI connector, but the projector has VGA or HDMI. Using an adapter slightly reduces the quality of the content. The projector turns on first, otherwise the computer does not see it.
Special adapter Wireless connectionYou can also synchronize devices via the Wi-Fi protocol; today this method is gaining popularity. To activate you need install drivers, but in the case of Windows 7, usually the standard ones are sufficient.
Before you connect the projector to your laptop, you need to install Wi-Fi antennas into the USB connectors of the projector and PC; in appearance they resemble a small flash drive. The green indicator light informs you that the connection was successful.
It is worth noting that not all projectors that supportWi-Fi, they will project video. Some models can only be connected to control equipment; this nuance must be clarified when purchasing. A wired connection is more reliable and practical: the HDMI plug, for example, is designed to transmit excellent quality video without interference. Displaying content in the required modeTheoretically, after connecting the cable to the appropriate connector, the picture should be displayed automatically. In some cases, when the settings are incorrect, the user must make the necessary changes to display the content. It is known that each version of the operating system has its own characteristics, therefore there is no uniform procedure for action.  Then, the user has access to four picture display modes connected projector.
Useful tips for Power PointOffice Power program Point is “tailored” for presentations; it is often used because it is simple and convenient. This has its own operating features, for example, you can display slides on a large screen, and the text of a report or lecture on a PC display. The settings do not take much time: after synchronizing the projector with the PC, go into the program and top panel We look for “Slide show” - “Show presentation”. Check the box next to “Projection equipment”. Here you can find “Speaker Mode”, if you activate it, various auxiliary tools for conducting lectures will be displayed on the screen - additional buttons or notes.
Manual image debuggingSometimes pictures or letters become blurred or “float” - this happens when the settings on the PC are set to incorrect parameters monitor resolution. To maximize quality, set your computer's resolution to match the projector's specifications. In this case, the projector settings do not change. How to change settings on a computer/laptop (for the platform Windows 7/Vista):
OptionsWindows 10 slightly different, here the “Resolution” item is located in the screen settings section. Click "Start" and find the "System" tab, on the right side of the window, scroll to the bottom of the page and open " Extra options screen." Then everything is simple: select the desired value and save the settings. This completes the task of how to connect a projector to a computer. After connection, the user can select a convenient output mode for holding a presentation or watching a video at home.
01.06.2015 Wireless transmission signal from projectors With development modern technologies The ways to reproduce a signal through a projector are becoming more and more inventive and flexible. The traditional way of transmitting the signal is to use a cable between the source and the projector, usually used VGA cable or HDMI, or for high-performance projectors - a network cable. Using a wired cable provides the most stable data transfer or video signal transmission, however, in a number of circumstances, using a wired connection is not convenient or possible. In today's flexible world, wireless data transmission is increasingly becoming the new standard for video playback. Every day this question becomes more and more relevant. There are several ways to stream content wirelessly to your projector: To choose the right method or device, you need to understand the features of these devices and select best option to solve your problems. The most common methods and devices for transmitting content wirelessly to a projector: Wi-Fi adapters Wireless HDMI Kit Wi-Fi adapters for projectors If your current projector or the projector you are considering purchasing has a USB Type A input, chances are that projector will be compatible with an optional Wi-Fi dongle from the manufacturer. Usually it is an additional accessory to the projector. Rarely, but still happens, it comes with a projector (for example, BenQ projectors). Not all manufacturers offer additional Wi-Fi adapters (Wi-Fi dongles), but brands such as Benq, NEC, Vivitek and Hitachi definitely have them. Typically, the cost of a Wi-Fi adapter (Wi-Fi dongle) for a projector does not exceed $100. This form of wireless transmission is most suitable for transmitting data such as documents Microsoft Word, Excel, PDF, photo, PowerPoint presentations, web surfing and short, non-capacious videos. To fully transmit a high-quality video signal and watch movies in high resolution, you should choose a Wi-Fi adapter (Wi-Fi dongle) with Full HD support. To use wireless content transfer via a Wi-Fi adapter (Wi-Fi dongle), you need to install software from the manufacturer on your computer (a disk with the software is usually included in the kit, or you will need to download it from the manufacturer’s website). Then the Wi-Fi adapter (Wi-Fi dongle) is inserted into the USB type A port on the projector. Next, you need to establish a WiFi connection between your computer and the WiFi dongle in the projector. This is done by selecting the SSID from the list of available Wi-Fi networks on your computer that matches the WiFi adapter (WiFi dongle) in the projector. Once connected, simply launch the already installed wireless content sharing software, it will find the projector and display the contents of the computer screen on the projector. It is worth keeping in mind that there is a slight delay when using wireless content transfer between the projector and the signal source due to the processing time and interpretation of the data over wireless network. This has very little effect on most speakers, but when creating animations in PowerPoint slides, as well as video streaming, is worth keeping this in mind. What about security when using Wi-Fi adapter for projector? You may have heard concerns about wireless technology security and information privacy. This is a completely natural concern. What if your competitor is sitting outside the building with a laptop? Can he download a presentation over a wireless network and get inside information? Luckily, you can encrypt the signal. This is a function software projector. You can usually choose 64-bit or 128-bit encryption. However, while this protects your data, it also slows down your screen refresh rate a bit. And the laptop and projector work in enhanced mode, encoding and decoding the signal. Although protecting information is sometimes a prerequisite for making a presentation. Coverage of Wi-Fi adapter for projector Typically, wireless transmission via a Wi-Fi adapter (Wi-Fi dongle) is limited to 10 meters, but this figure can vary significantly depending on environmental factors, strength and speed WiFi signal between the source and the projector.
Apple TV is an accessory measuring 9.8 x 9.8 x 2.3cm (small enough to fit in the palm of your hand) that connects to the projector using an HDMI cable. Everything on your iPhone, iPad or Macbook can be streamed in up to 1080p resolution to Apple TV using Airplay. Airplay lets you wirelessly stream 1080p Full HD content that's on your iOS device to a projector or "mirror" (that's what's displayed on the projector screen). Wirelessly stream photos, stream videos, spreadsheets, presentations, and the web. pages onto the projector from Apple devices possible with Apple TV. To wirelessly stream content, your Apple TV and iOS device must be connected to the same Wi-Fi network. Apple TV coverage Like additional WiFi adapters (WiFi dongles), wireless signal transmission distance will vary depending on environmental factors, settings and WiFi signal. Wireless HDMI Kit
The wireless HDMI kit allows you to send content using WHDI technology. Currently, using WHDI technology, it is possible to transmit streaming video over a radio channel with a resolution of 1920 × 1080 (Full HD) at a frequency of 60 frames/s over a distance of up to 30 m at a speed of up to 145 Mbit/s. Wireless HDMI kits can A wireless HDMI kit consists of a transmitter and receiver, which require separate power connections for each unit. The transmitter has two HDMI inputs so you can connect multiple sources. The HDMI output on the transmitter displays the selected source on the local screen. The receiver is connected to the projector using an HDMI cable. Most wireless HDMI kits support infrared data transmission. If the source device has a remote control remote control, such as BluRay or HD SKY, you can use the remote control for these devices in the receiver. Corporate or consumer? With its expanded resolution range, 128-bit encryption, and advanced functionality, this wireless HDMI kit is suitable for professional AV applications in conference rooms and boardrooms. It can also be used in offices, schools and homes to receive signal transmission without the use of cables. Wireless HDMI Kit Coverage Modern wireless HDMI kits have a coverage range of up to 30 meters. Wireless sets typically uses dynamic frequency selection (DFS) to select an available channel for transmission. Wireless transmission of uncompressed Full HD video is perfectly possible using the BenQ Wireless Full HD Kit WDP01 wireless HDMI kit. To install the Wireless Full HD kit you only need a few simple steps. After correct installation, the transmitter and receiver will automatically connect to the projector. By the way, the receiver that is installed on the right side of the projector (W1070+, W1080ST+) does not require an additional power outlet. You won't have any connection problems. Please follow the instructions below if you have one of the following BenQ projector models: W1070+, W1080ST+ or W1350. If you purchased a projector that is not on the above list, you will find information on how to connect the receiver to the projector in the user manual. Devices for wireless content transmission can be purchased from Inter Systems. Our managers will provide you with qualified advice on wireless devices and will help you choose the right one based on your tasks and requirements. 08/24/2014. 41 comments We display the image over the air from a tablet or phone (Android) to a TV using Miracast technology (wireless). Using the example of an Asus tablet and an LG TVadminThere is an opportunity to prepare a very useful and relevant article on setting up a wireless screen on tablets and phones that run on the Andriod operating system. Using Miracast technology, we will display the image from the tablet to the TV. All this will work over the air, that is, without wires. Nowadays, a large number of modern TVs that have Smart TV functions and are able to connect to the Internet via Wi-Fi also have the ability to work as wireless screens via Intel technologies WiDi or Miracast. You can read about these technologies in more detail in a separate article. But, there I wrote more about theory, but in this article there will only be practice. So, this means that the TV can receive images over the air. And our tablets and smartphones that run on Android are most likely able to transmit this image using Miracast technology. In the settings this is called a wireless screen. What does all this give us? We can connect our tablet or phone to the TV and everything that happens on the screen of the mobile device will be displayed on the TV. And all this without wires. In this way, you can display a photo or video on a large screen. Watch online videos, or play games on your tablet and display it all on your TV. There are some nuances, which I will write about below, but all this can be done, and now I will show you how. I just took photos, screenshots, tested everything, checked it and now I’ll share it all with you. Everything is based on a real example, as always! What do we need?
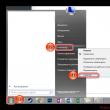
I will show using the example of a TV LG 32LN575U and tablet Asus MeMO Pad 10 . To set up such a connection, Wi-Fi router is not needed compared to setting up the transfer of medical content. We connect the tablet and TV for wireless image transmissionAll we need to do is turn on Wi-Fi on the tablet, turn on Miracast on the TV and connect the devices. Enable Miracast/Intel WiDi on LG TV I will show the example of an LG TV. If you have a TV from another brand, this function may turn on a little differently. In the menu, it may be called differently. Turn on the TV and press the button on the remote control SETTINGS to go into settings. In settings go to the tab Net and select Miracast/Intel's WiDi.
Enable “Wireless Screen” on your tablet or Android smartphone We take our tablet (in my case) and go to settings.
In the settings, immediately turn on Wi-Fi and go to the Screen (Display) tab. On the right, select the item Wireless screen (Miracast).
To turn off broadcasting images to TV, simply click on the TV name again and select OK.
Reconnect according to the instructions. Using wireless image transmission in practiceI played around a little and tried to understand what this technology could actually be used for. The problem is that with such image transmission, there is a slight delay. That is, on the tablet the page has already opened, but on the TV it appears in a second, roughly speaking. Perhaps, on more expensive equipment, this delay will be less, but it will most likely exist. This connection is perfect for displaying photos on a large screen. Everything is wireless, just the way we like it. You can browse websites, or, for example, watch online videos.
I tried playing games, but the lag is a little annoying.
An excellent technology that allows you to display the image you see on your tablet or phone on a large screen without any wires. Everything connects without any problems and works without failures. At least I didn't notice any problems. The only downside is the delay in updating the image on the TV. It’s a little difficult to play games, but you can look at photos or videos. Displaying some kind of presentation on TV is no problem at all. I will be glad to see your feedback and opinions about this technology. How does everything work for you, what application have you found? Share in the comments! Best wishes! There was a time when manufacturers of smartphones and other mobile gadgets tried to include a projector in the functionality of their devices. Then it might seem that you won’t need to constantly look for a projector for your smartphone. For example, in the famous model Samsung Galaxy Beam was provided with a built-in projector for mobile phone. But the phone itself has long been discontinued. Of course, such attempts were made further, but they could not provide a truly high-quality picture. Therefore, a reasonable question arises: how to connect your phone to a projector, which we will talk about in more detail. Why do you need a portable projector for a smartphone - there are different situationsSituations can be completely different - an urgent presentation, an interesting video, a useful seminar for your colleagues or friends. After all, we all strive to optimize our lives, so we no longer always take a laptop on the road - often you can limit yourself to a tablet computer or phone. Their functionality allows you to always stay in touch, solve the most urgent problems and quickly receive necessary information. And the problem of watching videos and presentations on the big screen is also fading into the background - today there are effective ways for connection and mobile devices. We connect the projector for mobile devices as standard - using cables. The simplest and most affordable option is to connect using a cable. Projectors have an HDMI input, and tablet computers usually have a corresponding output. If we talk about phones, here you can use an adapter from microUSB to VGA - in the worst case it will cost 100 rubles, but it will make life much easier.
How to connect a projector to a mobile phone wirelessly is more difficult, but more interesting. Increasingly, modern models support connecting laptops and. A very convenient option when there is no opportunity or desire to work with wires. But it still requires more time and patience compared to a direct wired connection.
This is where our efforts end - these four simple steps should be enough to fully demonstrate films or. It should be added right away that depending on the specific brand of the manufacturer, you can download thematic applications to your smartphone. For example, Casio calls it “C-Assist”, Epson calls it “iProjection”, etc. They will allow you to connect faster and provide additional functionality for setting up image display on the screen. During presentations, a situation may arise during which a wireless connection between the projector and PC becomes essential. Sometimes the cord is not long enough, and sometimes there is no way to stretch it at all. And this solution looks much nicer than a lot of wires, because the projector only connects to an outlet. Practice: Three Steps to a Wireless Projector In this material, using the example of one of the newest projectors from Sony, the VPL-CX75 model, we will analyze in detail what wireless data transmission is in relation to a projector - what it allows and what it does not, what it may be needed for and how to work with it . True, to the question of whether AirShot (that’s the name of the company’s proprietary technology) is worth the money, unfortunately there will be no answer - in model range Sony does not have a similar projector without the ability wireless connection. So, first things first. |


 Next, turn on Miracast. Simply set the switch to On.
 That's it, you can leave the TV for now. But don't turn it off.
 Turn on Miracast by setting the switch at the top to On Below, your TV should appear. Its name will be there. To start wirelessly transferring images to your TV, simply click on the TV's name.
 We return to the TV. There should be a request to connect the device. Simply confirm your connection by selecting Yes. If you want this device to be connected in the future without a request, then check the box next to “Connect automatically without prompting”.
 Next will be the connection status, check and devices will be connected. The image from the tablet will appear on the TV.
 All is ready! You can use it.
 By the way, I launched the video on the tablet, it appears well on the TV. Although there is a delay, the sound is synchronized with the video. Sound, by the way, is also transmitted.
 Afterword
New
- Recovery: what is it and how to use it?
- Factory reset Sony Xperia XA Dual
- How to install the DHT Personalization app
- Firmware for UMI smartphones via ROOTJOY Umi Rome X on Aliexpress: sales, discounts, promotions
- What is an Internet questionnaire?
- How to update Dell BIOS without battery (Successfully)
- Windows XP Installation Instructions
- Entering safe mode through "System Configuration"
- Troubleshooting Mouse Problems
- Speeding up your laptop


