Sections of the site
Editor's Choice:
- Outputting part of an image html sprite
- Setting up additional details and additional information for 1c nomenclature additional details and information differences
- What to do when there is no registration data
- Request for data selection (formulas) in MS EXCEL Excel selection by condition macro
- Temporary temporary one-time email Temp Email, mail sites, social media registration
- What to do if the computer does not see the phone via the USB port
- How to install Windows on Mac?
- Asus rt n16 setup firmware
- How to find out the bitness of the operating system and processor in Windows
- How to turn off the Windows Firewall: complete deactivation and disabling for individual programs How to completely disable the Windows 7 firewall
Advertising
| How to secure wires: various ways to mount them on the wall. Influence of base material. Method of fastening electrical wiring in a groove with alabaster |
|
In most cases, when installing electrical wiring, it is hidden under a layer of plaster. This method is safer and more reliable: after all, wires embedded in the wall are reliably protected from mechanical stress, moisture and corrosion. This method of laying also has disadvantages - it will be impossible to move it to another place, and it will be difficult to determine the location of the cable in the absence of a diagram. What comes first, plaster or wires?When to do the electrical wiring - before or after plastering? - This is a dispute between an electrician and a plasterer. It is more convenient for everyone to first complete their part of the work without any interference. But if you do the repairs yourself, or one technician does it, then the procedure will be as follows:
But there is one point in favor of the fact that all electrical work should be carried out after the walls are plastered. If grooves are laid in the walls, then it is much easier to do this over a layer of plaster, for example, on the second or third day, when it has not yet completely dried. Drilling concrete or brick will take longer, and there will be more dust. Electrical installation rules
Compliance with generally accepted building codes and requirements is the key to the safety and durability of electrical wiring. Therefore, before preparing wall stubs for cables, you need to familiarize yourself with the rules for electrical installations (PUE). The location of the wiring is determined by the following points:
This also applies to television cables. It is better to purchase wires in coils. In this case, the cables will be solid, and there will be no need to lay spliced and insulated connections under the plaster. Electrical wires are laid hidden in walls, floors or corrugated pipes. When laying in a non-combustible surface, including plaster, the absence of corrugation is allowed. According to the PUE, aluminum wires can only be used with a cross-section of 16 mm2 or more. Smaller sections - only copper. This is due to the fact that aluminum has higher electrical resistance than copper. Under heavy load, it heats up and can melt. Depending on the laying conditions, the brand of wire used is:
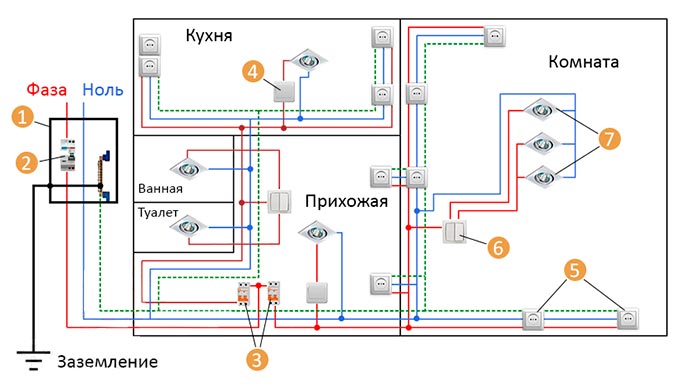
In old wiring, a 2-wire cable is used, and in new wiring, a 3-wire cable is used. Chandeliers with two-key switching require 4 wires. Chasing walls for hidden wiringBefore starting work, a diagram of the location of all switches, power appliances, sockets for them and distribution boxes is drawn up, and the location of the lines along which the gating will be carried out is determined. Such a diagram must be stored in paper or electronic form, so that in case of redevelopment, moving switches and sockets, installing hanging structures (shelves, sconces, hangers), etc., the wiring will not be damaged.
Marking begins with the locations of panels, sockets, switches and lamps, and then a route for the wires is outlined. All pipes must run strictly horizontally and vertically. Marking for them is done with chalk, pencil or marker using a plumb line, laser or regular building level. Inclined lines are allowed only in attics and stairs, provided that they run parallel to the inclined surface. In this case, searching for damage on straight lines will take a minimum of time, and the likelihood of accidental damage to the cable, for example, when driving nails for shelves or pictures, will be minimized. A wall chaser is a fairly expensive tool, so the grooves for wiring are usually made with a grinder and a hammer drill. First, two grooves are prepared using a grinder with a diamond wheel, and then the excess plaster is chipped off between them using a hammer drill. The size of the groove is determined according to the dimensions of the wiring; usually 20 mm is sufficient.
The use of junction boxes in typical wiring of private houses and apartments is not mandatory. They are installed for convenience when dividing lines into separate groups. The distribution boxes are attached to the gypsum mortar so that they slightly protrude beyond the thickness of the future plaster layer. For the socket boxes, recesses are made, which are partially filled with gypsum mixture to fix the wires. Their ends are tucked in, and the excess is trimmed so that 10-15 cm remains. It is more convenient to install socket boxes in blocks at once. It looks more aesthetically pleasing, and they are more convenient to use. For their installation, latches (cable channels) are used. The holes are drilled in one row with a distance of 1-2 mm, the partitions between them are then removed. Socket box covers are installed last, only after finishing is completed - wallpapering or painting. In rooms with high humidity, moisture-proof sockets with grounding are used. How to secure a cable in a grooveAll cables must be firmly secured before plastering. This can be done using dowel brackets for which holes are drilled in advance using a hammer drill in the grooves. The dowels should fit in freely, but it is more difficult to pull them back out, since their clamps become wedged.
According to SNiP 3.05.06-85, the distance between the fastening points of bundles of wires is made at least 0.5 m, single cables - 0.9 m. When covered with dry plaster - up to 1.2 m. When turning the route and at the end points, they are additionally secured on both sides of the bends. You can also secure the wire in the groove with ordinary putty. To prevent it from sagging and falling out until the mixture hardens, it is temporarily fixed with pieces of corrugation, inserting them across the channel as a spacer. For more information about this method, watch the video: How to cover the grooves
After laying the cable in the grooves, they are covered with a solution so that the electrical wiring is completely hidden. This option is acceptable for brick houses and slab buildings. For wooden houses made of logs and timber, this method is undesirable, as it is a fire hazard. Cover the grooves the better the same mortar that will be used for plastering. In a new building without finishing, use cement plaster. It will securely secure wires in concrete, aerated concrete or brick walls. So, let’s look at the sequence in which I seal the grooves after laying the wiring:
How to find wiring under trim
Sometimes when making repairs you need to know where the electrical wiring runs under the plaster. For example, if you are going to drill a wall and are afraid of damaging the cable. Or you need to find damage to the wiring. Also, when you are going to move the location of sockets and switches, a wiring diagram will help you locate the wires. But if the diagram has not been made before, then you can determine where the hidden wires are in several ways:
To determine the location of cable damage, there is effective method. This video shows you how to find a place short circuit using a radio receiver. Depending on how you decide to conduct electrical wiring in the rooms: open or in a hidden way, select the method of attaching the wires to the wall. Next, we will look at all the existing fastener options, and also provide the advantages and disadvantages of each technology. Outdoor wiringTo do this, you need to secure the cable over the decorative wall decoration. Usually, this option electrical installation is used in wooden houses and garden buildings, for example, in a garage or outbuilding. Cable ducts, clips, or special porcelain insulators can be used to attach wires to walls. Let's consider the features of using each option. Cable channelsToday, fastening wires and cables in special plastic channels is most often used. This is due to the fact that they have an attractive appearance, low cost, and most importantly, they allow you to quickly secure a group of conductors in one place. To do the fastening yourself using this method, just secure the plastic box to the wall using self-tapping screws. If you need to connect several elements in one line, you can use special connections provided by the manufacturer. After the cable channel is secured, you can put all the cables into it and close the front cover (it is latched). We talked about this in more detail in a separate article. Video instructions for installing a cable channel with your own hands
ClipsFastening wires and cables with clips is used only when, and also if the conductor will be additionally protected by a corrugated pipe. In this case, attaching the wiring to the wall and ceiling is very simple. If the surface is wooden, all you need to do is secure the clip with wood screws. In a concrete wall or ceiling, you need to pre-drill holes using a hammer drill, then drive in dowels, and then fix the clips themselves. The entire installation technology is clearly shown in the video example: Correct fastening inside the house
By the way, clips can be attached not only indoors, but also outdoors. This method is suitable if you decide to conduct street electrical wiring along cinder blocks or brick walls of buildings. How to attach corrugation on the street
InsulatorsFastening wires to the wall on an insulator is most often used in bathhouses. First, you must secure the porcelain barrels themselves, which are fixed to the wooden sheathing or frame using self-tapping screws, then twist the wires into a tight bundle and thread it onto the insulator as shown in the photo below: In order not to twist the wires yourself, you can buy special antique wiring that is already twisted. Read about that in the corresponding article. Nail staplesThis mounting method is suitable for television and telephone cables, as well as Internet lines. There are flat and round plastic brackets that can be easily attached to the wall using the small nails included in the kit. Hidden electrical installationWhen installing electrical wiring in a hidden way (in a groove under the plaster), there are more options for attaching wires and cables to the walls. Let's consider from the most simple and effective to the least convenient. Dowel clamps, in fact, like dowel ties, are very convenient to use. These fasteners are low cost and also allow for quick electrical installation. Ties, of course, are more practical and versatile, so we recommend choosing them for fastening wires in a groove. All you need to do is drill a hole in a concrete, brick or wooden surface, insert a special dowel tie into it, and then drive in a special expansion peg. Attaching a dowel clamp to the wall is even easier. You just have to drill a hole and then hammer the cable tie into it, as shown in the picture below. To attach the wire to drywall, we recommend using a special butterfly dowel into which the fasteners are already screwed (second picture). By the way, if you already have electrical wiring along the walls and you need to attach another cable to it, you can use ordinary plastic clamps. For fastening in this way outdoors, it is recommended to use black clamps that are resistant to ultraviolet radiation! Technology for fastening dowel clamps and clips
Using special ties
Quick drying solutionIn order to quickly fasten wires and cables in the groove, you can use a quick-drying solution: alabaster or gypsum. In this case, you need to act hastily, because... the finished solution hardens very quickly, and you may not have time to fix the entire selected area in the wall. As a rule, the cable needs to be “frozen” in the prepared groove every 40 cm, as shown in the photo.
Advantage this method fastening the wire is that you don’t need to spend a lot on material and, moreover, you can do without nails and without drilling walls. The main disadvantage is that the solution hardens quickly, so you need to dilute plaster or alabaster in small volumes. In addition, attaching more than two conductors to the wall will be very difficult. Homemade staplesFastening the cable to the wall using brackets will ensure reliable gripping of the conductor, and will also allow you to secure several groups of cables in one route. In order to attach conductors with brackets, you must first make these fasteners yourself. In this case, you will need either thin galvanized steel, cut into strips, or PTPZh aluminum wire. The length of each staple should be from 6 to 7 cm. You need to cut the material into suitable pieces, and then drill a suitable hole in the center of each. Then everything is simple - the wall is drilled in suitable places, after which the dowel is driven in and “quick installation” is carried out. You can also hammer the staples with nails if the fastening is carried out on wooden walls. The choice of accessories that make life easier for craftsmen of all kinds is simply enormous today. The market segment intended for the hard work of electrical installation workers was no exception. Depending on the method of laying the wires, the fasteners for the electrical wiring also differ. In this article we will try to cover the entire modern range as fully as possible, so it will be useful both for working craftsmen and for those who prefer to do everything with their own hands. Having secured it so that later, when plastering or sealing grooves, it will be securely fixed and not interfere? To do this, it is important to remember two rules: place the wires geometrically correctly in the places recommended for this and use reliable fastenings. We will look at which of them are intended for hidden installation in this chapter. Dowel clampThis mount is one of the most common. It is quite easy to install and provides reliable fixation, and the price of this product will not greatly burden your wallet. There are several varieties of this fastening, differing from each other not only externally, but also functionally.
So:
How to properly install wiring in the house
Cable clamps
The following is a fastening made in the form of a clamp. This design is more durable than a dowel-clamp, since a metal screw is used for spacers, thanks to which, if necessary, the entire structure can be easily dismantled and moved to another location. The wire is fixed simultaneously with installation to the wall. It is important that the diameter of the cable being fastened clearly corresponds to the diameter of the clamp, which is necessary in order to avoid sagging or squeezing of the wire insulation. PP type fastenings
Another type of fasteners is a PP type dowel. It has several varieties, differing from each other in shape and size, which are determined based on the type of wire being fixed. Installation is similar to the installation pad or “bracket”, the only difference is that the cable is pressed directly against the wall. Also, using this fastening, you can install pipes. If necessary, this connection can be easily dismantled.
Homemade fasteners
If at the right time you don’t have a single staple on hand, and the hardware store is far away, then don’t rush to get upset, because making a homemade analogue won’t take much effort and time. For work you will need: regular dowel-screws or dowel-nails, as well as two-core wire or galvanized iron plates. We cut the wire (iron) into pieces 5–7 cm long. We make a hole in the middle and insert our dowel there. Everything is ready, you can clearly see the result in the next photo.
It is also possible to use single-core wire (wire) - in this case, the dowel must be wrapped with wire at the base of the cap. A quick-hardening gypsum solution is ideal for fixing the cable in the groove. This method requires a certain skill, since the time before hardening is very short, and you need to work it out very quickly. Therefore, mix the plaster in small portions.
To make the task easier, we will offer one original way secure the wire until the mixture hardens. If the groove has smooth edges, then use pieces of corrugation that will serve as spring spacers. This is quite enough to hold the cable. Surface mounting bracketsIf the electrical work in the house is carried out after renovation, then the open wiring method is used for this. It is simpler to implement, but due to the fact that the wires remain visible, it requires greater care during installation, and the fastenings used here, in addition to the main function, should add some aesthetics. Cable channels
One of the most convenient, beautiful and at the same time inexpensive methods of open installation is fastening using cable channels. It is a rectangular pipe with a removable front panel, which is attached to the wall using ordinary self-tapping screws, dowel screws or nails. After installation, a group of wires is placed inside and closed with a lid. You can easily choose the right color scheme and even texture, thanks to which this mount will seamlessly fit into the interior of your room.
There are more complex options, one of which is shown in the diagram above. Most often they are presented in the form of electrical skirting boards. To install such a system, certain qualifications will be required. Clips
This type of connection is intended for fastening cables placed in an additional insulator - a polymer corrugation. Due to its rough appearance, it is most often used in inconspicuous places and technical rooms; it is also perfect for installation outdoors. To install the clips, use self-tapping screws or dowel screws, and then simply snap the corrugation into them. The resulting connection will be very reliable and practical. Insulators for retro style
Today, when creating an interior in a “retro” style, they often use the open installation method, which was used at the dawn of the age of electrification, for which modern manufacturers They produce special wires and fasteners. Such wiring looks very beautiful in wooden houses. The cable is fixed using a ceramic insulator, which provides a safe gap between the conductor and the wooden base. During installation, be careful not to overtighten the screw to avoid damage to the insulator. Staples
In the photographs above you can see the types of brackets for direct mounting of wires to the surface. Their installation is simple and intuitive, but due to the danger of direct cable contact with the wall, use this fastener only if the wires are double or triple insulated. Most often they are used to fix television cables. Installation site
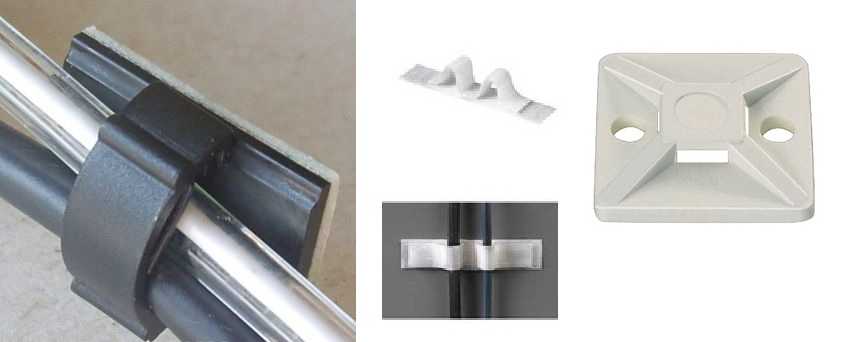
If you need to secure the wire in places where damage to the surface is undesirable (furniture, tiles), then use mounting pads. They come in different shapes and colors, but they have the same function - you just need to glue such fasteners in the right place, and you can stretch the wire.
Specialized mountsHow to properly conduct wiring in a house if it is not possible to drill the surface in the places where the cables are located, or if the type of conductor has unusual specifics? To do this, rare, but no less useful installation devices will come to your aid.
So:
The reader who has read this article will probably understand how to properly conduct wiring in a house and what devices will suit him best. However, we strongly recommend that you watch the video presented on this page. Perhaps you will discover something new. When installing or repairing wiring, you have to install wires and cables. Also, if it is necessary to install a new powerful household appliances Sometimes you have to draw a separate line from . In any case, you have to somehow mount the wires to the walls or ceiling. We will further examine what the cable fastening may be like for each of these cases. General rulesWhen installing cables hidden or open, indoors or outdoors, there are several general rules: Basically, that's all the recommendations. They are versatile and uncomplicated. The distance can be reduced if necessary. For example, at turns of the route, the fasteners are installed on a short distance from the bend point - 5-10 cm. The task is to ensure reliable fixation and prevent sagging. Methods of attachment to different surfacesWalls and ceilings are made from various materials with different structures and densities. Depending on this characteristic, the method of fastening changes:  Actually, these are all the surfaces that are encountered inside the house when laying wiring. But sometimes the cable also needs to be attached to a pole, for example, when the electricity supply from the pole to the house stretches, or to a pipe - when the cable rises along a flammable wall. To a concrete pillarThe cable is secured to the reinforced concrete pole with long black plastic ties. They last about 5 years.
You can use clamps to install sewer pipes, but you need to drill holes for them, which is very difficult. Another option is if there is a grounding wire on the pole - a round wire with a diameter of 5-6 mm, then you can attach it to it with ties. Another option is to attach strips of metal to the pole - make something like clamps, and attach the cable to them. In a metal pipeIf the cable runs up the wall of a house in a metal pipe, it is simply run inside. Since quite solid cables are used for external wiring, its rigidity is usually enough to more or less stay inside the pipe.
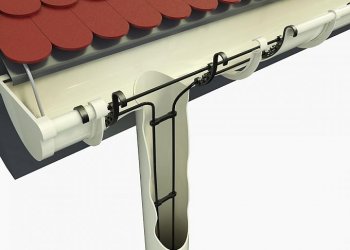
The pipe is closed at the top and bottom with some kind of plug (can be cut out of foam plastic and then painted along with the pipe). This plug will additionally fix the position of the cable (do not press it to the edge), and so that it does not move inside the pipe, it is attached to the wall at the exit from it. To the cableTo attach the cable to the cable, special metal and plastic hangers are used. They consist of two parts - there is a hole for the cable and a larger one for laying cables.
Which is better - metal or plastic? Metal ones are more durable, but take longer to install - you need to tighten the screw. Plastic ones will last about 5 years, but they are installed quickly - the “tail” is pulled into the corresponding hole and tightened. That's all. Fastening for cables and wires: types and varietiesFor any type of installation of electrical wiring and cables, the same types of fasteners can be used. It is selected based on the existing conditions, capabilities and tastes of the owners. The main task is to ensure high-quality fixation and not to disturb the insulation either during installation or during further work and operation. And you select the type of fastening from possible options. There are quite a lot of them - there are special ones that are produced specifically for cables, there are those borrowed from other areas, and there are homemade ones.
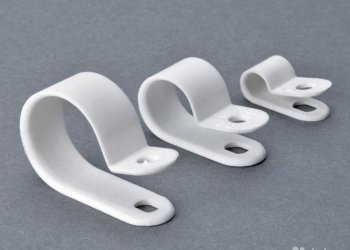
Clips for cable fasteningUsing clips, you can secure the cable to the wall, ceiling, or floor. You just have to choose the right design, and there are many of them. Fastening the cable with clips is a very popular method - it can turn out very neatly and almost imperceptibly. This is if open wiring is assumed. Clips for cable installation are available in metal and plastic, and in different shapes. The simplest ones look like a bow, which has holes for screws or dowels on one side and the other. They are all good, but installation requires drilling two holes, which takes a lot of time. There is an option that allows you to maintain a fire gap when installing the power cable on combustible surfaces (pictured on the left). This fastener is fixed to the surface with one self-tapping screw. The good thing about it is that, if necessary, you can add threads to the same fastener. To do this, you do not have to remove it; you will need to unscrew the screws holding the upper part of the clip.
The third option is a kind of loop made from a strip of metal. To install it, you first need to insert the cables inside, then align the holes and secure them to the surface. All these clips can be used both on the wall and on the ceiling. But when laying a large number of threads on the ceiling, they are inconvenient - too many holes are required for installation. They are made of metal, some of them are then painted so that when installed externally, the fasteners stand out less.
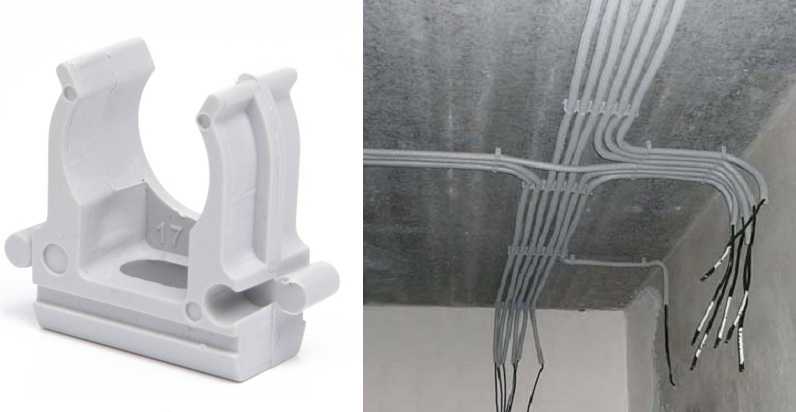
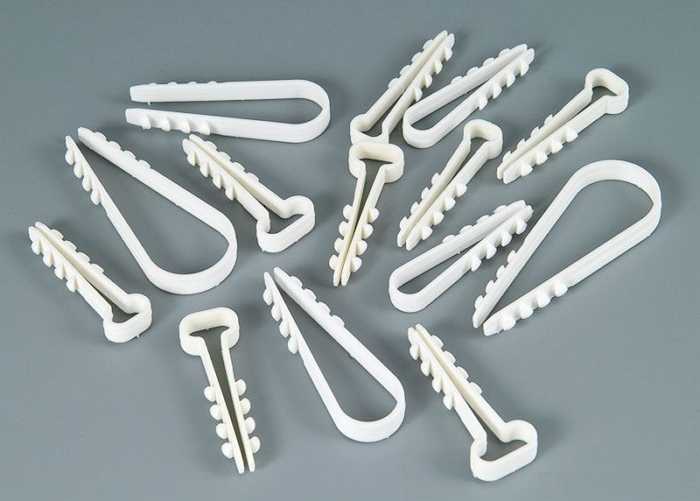
Plastic clips are used mainly for fastening cables in corrugated hoses. They are there different sizes for different corrugation diameters. They can be installed individually or assembled in lines - for more accurate installation of large wiring bundles. This type of clips is used mainly for hidden installation, but if the corrugation is laid outside, then it is more convenient to fix it with their help. Dowel clipA dowel-clip is more invisible during installation. This is a curved strip of plastic with characteristic branches at the ends, which, due to elastic force, will hold the fasteners in the wall or ceiling material. The shape of these products is available for round and flat cables of different sizes. But you can’t secure serious cables with them—they’re too small. But they look very neat on conductors of small cross-sections, including television, telephone and Internet.
They are installed simply: a hole of a suitable diameter is drilled, a conductor is inserted into the clip, the ends are tucked into the hole and inserted there with force. It’s a really good option - it’s quick to install and looks neat. Mainly used for open wiring. Dowel tieAnother option for quickly attaching the cable is a dowel tie. It is made from non-flammable, self-extinguishing plasticizers and allows for quick installation of cable lines. Can be used for both open and hidden installation.
A dowel tie is a quick and convenient way to secure a cable to concrete, brick and other surfaces There is a coupler with a detachable and permanent lock. The detachable lock allows you to change the number of wires if necessary. The installation method is the same as for a regular dowel. The difference is that the dowel here is also plastic. Cable ties with dowel platform (KSP)Another option for quick installation. It consists of a dowel with a thread and a platform with a tie attached to it. First, a dowel is installed, and a platform with a screed is screwed onto it. Wires are attached to the finished route.
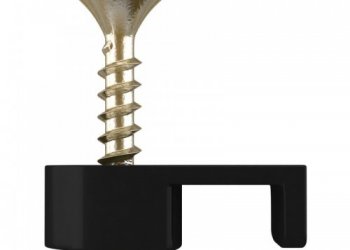
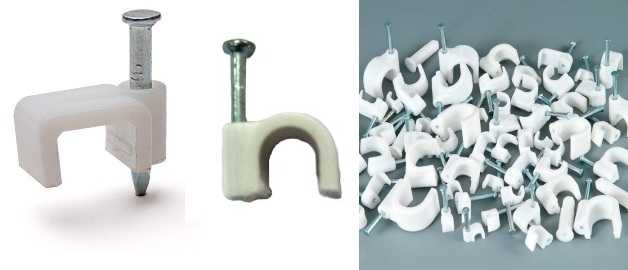
KSP - cable tie with mounting platform for dowel Material: non-flammable plastic, color: grey, temperature of use: from -45°C to +85°C. Can be mounted on concrete, brick and wooden surfaces. Clips (staples) with a nailAn excellent option for attaching cables to dense surfaces - wood and its derivatives, plaster. There is a hole on the side of the plastic bracket into which a nail is inserted. The shape of the brackets is round and rectangular - for different shapes of conductors.
Fastening the cable with such brackets is quick and unobtrusive. Most often they also attach small sizes wires - television, telephone, for the Internet. U-shaped staples from a staplerEven the smallest staples and clips are still quite noticeable. There is a way to make fasteners virtually invisible, at least in some cases. If there are wires connected to wooden surfaces or plaster, telephone cables can be secured with special brackets. They have long legs and a rounded back. There are special stapler staples designed for installing cables with plastic stops (middle picture). They do not allow the wire to be crushed, which happens when working with conventional staples if too much force is applied to the trigger mechanism.
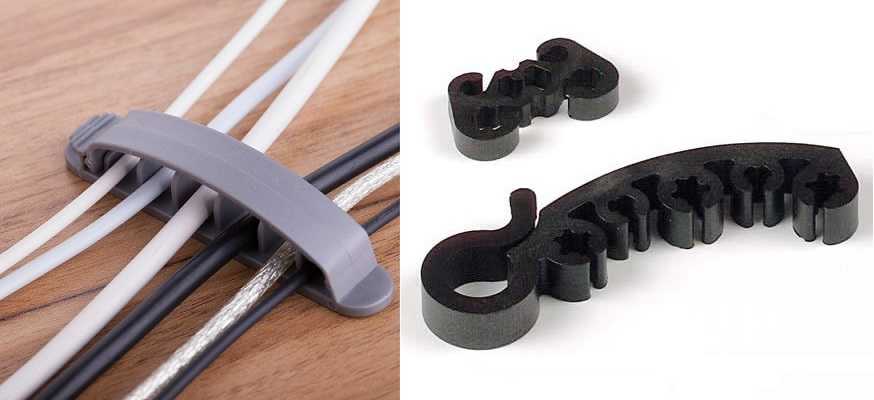
A good method is high speed - just one click on the stapler lever and the staple is already installed. In an hour you can record a decent amount of footage. Another positive point is that the fasteners are hardly noticeable; when dismantled, very small holes remain in the wood, which are also practically invisible. With plaster and chipboard, OSB is somewhat more complicated - the damage may be greater, however, it is still less noticeable than from nails, even the smallest ones. The disadvantage of fastening cables with a stapler is significant size limitations. Such staples are not big. The maximum size for the width of the staple is 12.5 mm, and even then not in all types. This is more than enough for installing a telephone “noodle”, Internet cable or other similar conductors, but it is not always possible to secure the NYM in this way. In addition, these cables have more rigid insulation, which requires more frequent installation of staples. Fasteners for organizing a bundle of conductorsWires do not always need to be fixed permanently. In some cases, you just need to arrange the bundles so that they don’t get confused. For example, there are usually quite a few wires running to the desktop. There is no point in fixing them rigidly - after a while, alterations may be required, and the driven nails leave holes that can no longer be masked on the table. There are various devices for these purposes. They are more often called wire or cable holders.
For example, the same staples, but of a different structure. On the right side of the photo above you can see a cable clip with double-sided adhesive tape attached to the back. This is very convenient for attaching to furniture or plastic panels - the glue can then be washed off, and the surface remains undamaged. In the center is the second option with the same idea, and on the left is the so-called mounting area for attaching cable ties. First, these pads are attached to the surface - they also have Velcro on the back. The bundle of wires is then secured to the holes with a regular plastic tie. Not so convenient and neat (the tails of the ties will stick out), but can also be used.
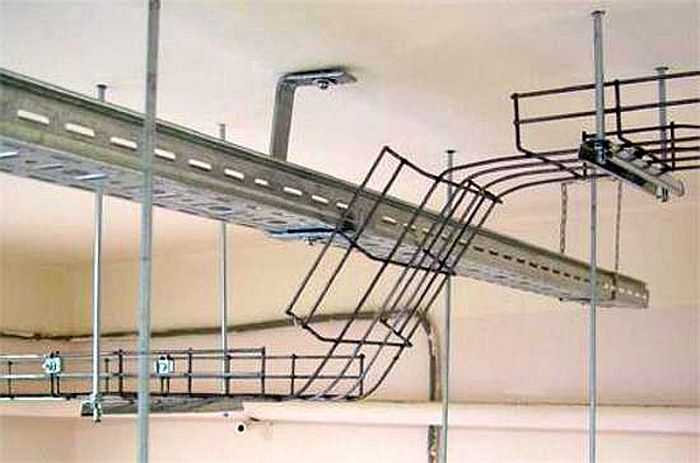
Plastic cable holders on the table You can see several more options for attaching the electrical wiring harness in the photo above. The essence is the same, the methodology is different. Cable trays - for hidden laying of large bundlesWhen installing, you have to lay a large number of wires, and they have to be fixed to the ceiling. When it comes to apartments, the floors are most often a concrete slab. Drilling a lot of holes in it is difficult and time-consuming; attaching wires individually or in small groups is not much easier. For such cases, suspended cable trays are used. They are usually made from galvanized wire or perforated metal.
They come in different sizes, there are several different types fastenings - on studs attached to the ceiling, on “T” or “L”-shaped hangers. The installation procedure is as follows: first, the structure is assembled and mounted on the ceiling, then the cables are thrown into it. If desired, they can be secured with zip ties to the grilles, but this is usually not necessary. In addition, there are metal trays made of perforated and non-perforated metal. The latter are necessary when laying cables inside combustible walls - for example.
The same trays can be used when laying cables in underground spaces. But then you can use the perforated version. It will also provide excellent protection from rodents and accidental damage.
Homemade cable fastening devicesMany factory-made fixtures have a relatively low price, but when hundreds of them are required, the cost adds up to a considerable amount. And if the wiring is hidden, you need, for example, to secure the cable in a groove, why wall up extra money if you can get by with improvised means. Here's what a homemade cable mount is made from: These are the main types of cable fasteners that you can make yourself. Surely there are other options - the imagination of craftsmen is inexhaustible, but these are the most common. Concealed installation fastenersIf cables are laid during the renovation stage, they increasingly resort to laying them inside walls, floors or ceilings. Since the result of the work is invisible, minimal attention is paid to aesthetics. But a lot of attention is paid to reliability and safety - access for alterations is very, very complicated. Therefore, when laying cables inside the wall, ceiling, or under the floor, reliable fasteners are chosen. It can be:  To lay large bundles of wires on the ceiling, it is more convenient and faster to use trays, but you can still use the same fasteners. The only bad thing is that you have to drill a lot of holes to install fasteners in concrete or brick. This is especially inconvenient when working on the ceiling. Below you will find out how best to optimize the work in this case. If the presence of false walls or a finished floor is not expected, recesses are made for the wires - grooves. The wires are laid in them, then they are covered with a solution and then the finishing is done. From an aesthetic point of view, the option is ideal. From an operational point of view, it is problematic, since it is almost impossible to replace or repair wiring without breaking the walls. Nevertheless, wiring is done exactly this way, simply trying to lay high-quality cables, and even with at least some reserve in terms of power or number of pairs.
According to safety rules, in combustible walls (wooden, panel and frame) the cable is laid in a non-combustible sheath or in an all-metal tray. If we are talking about a non-flammable shell, then it is usually a corrugated pipe made of non-flammable plastic. In this case, the sheath itself is attached, inside which the cable is located. This does not particularly affect the choice of fastening type, but it does affect the selection of fastener sizes - it is simply necessary that the fasteners be able to cover the shell. Laying cables inside combustible walls is difficult: the requirements are very stringent. They can be done in frame or panel houses, but in timber or log houses it is very difficult. It is necessary to lay all-metal trays in the walls. In this case, it is necessary to remove a large amount of wood, which does not improve the thermal characteristics and it is not possible to make the appearance ideal. Therefore, in wooden houses they often resort to an open installation method - on top of the walls. Fasteners for open cable routingWhen laying cables externally, more stringent requirements are imposed on the fasteners in terms of appearance. Since everything is in plain sight, it is necessary to select the most inconspicuous options or, conversely, the most decorative ones, such as retro wiring. This is a broad topic and it is described in detail. Other options:  There is a choice, but all methods are imperfect, so everyone decides for themselves how and with what to attach the cable. Attaching cables to the ceilingThere is a need to attach cables to the ceiling mainly when installing or installing drywall. In the case of plasterboard, everything is somewhat simpler: there is a system of hangers to which you can fasten wiring harnesses with plastic ties. In other cases, everything is somewhat more complicated: you have to drill a large number of holes for fasteners, because they use the same clips and brackets, and under each you need to install a dowel (if the ceiling is made of a concrete slab).
There are several ways to speed up installation:
The increase in the number of devices for which it is necessary to install a connection point inside an industrial or residential building has led to the development of many ways to attach the cable to the wall, both at the construction stage and in a long-term and firmly inhabited room. In various situations, you have to choose how to mount the wires on the wall so that they do not spoil the interior with their appearance, comply with electrical safety rules, and are protected from external influences environment and accidental damage. A significant aspect is the rational consumption of material and cost savings. Types of wiringThe need to attach the wire to the wall is first considered from the point of view of the expected service life. Power cables coming from wire distribution boxes are intended for long-term use. Communication lines and TV connections They are of the temporary type, capable of changing their position if necessary. Based on this, there are 2 types of laying electrical communications:
If the hidden laying of the wire is made in corrugated or smooth pipes, then in these areas a subsequent quick replacement of the electrical wiring is possible.  An example of installation in smooth PVC pipes is shown in a series of photos: In technical rooms, such wiring may remain uncovered by a layer of plaster; in residential apartments, it is located under a layer of finishing.
Influence of base materialAnother factor influencing the choice of methods for attaching the cable to the wall will be its design and materials of manufacture. Load-bearing and internal walls of the building are erected in the following options:
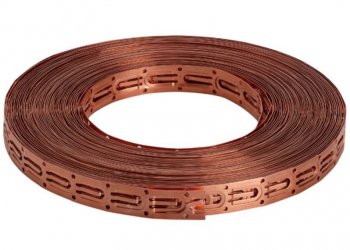
BrickworkThe diagram and method of how to secure the cable to a brick wall are chosen based on the available tools and materials. As a rule, masonry is not left without a protective coating of plaster, so the wiring will be of a closed type. If the volume of work is large, you will need a hammer drill and a grinder to align the groove channel. Short sections can be completed by hand with a chisel and hammer.  An example of wiring on a brick wall is visible in the photo: You can reliably fix the connection of the wires to the wall in simple ways, which do not require the expense of special fasteners: quick-drying mortar (alabaster, plaster, glue), wire to driven nails/screws, strips of tin + nails. The main condition is reliable fastening without the possibility of displacement or sagging.
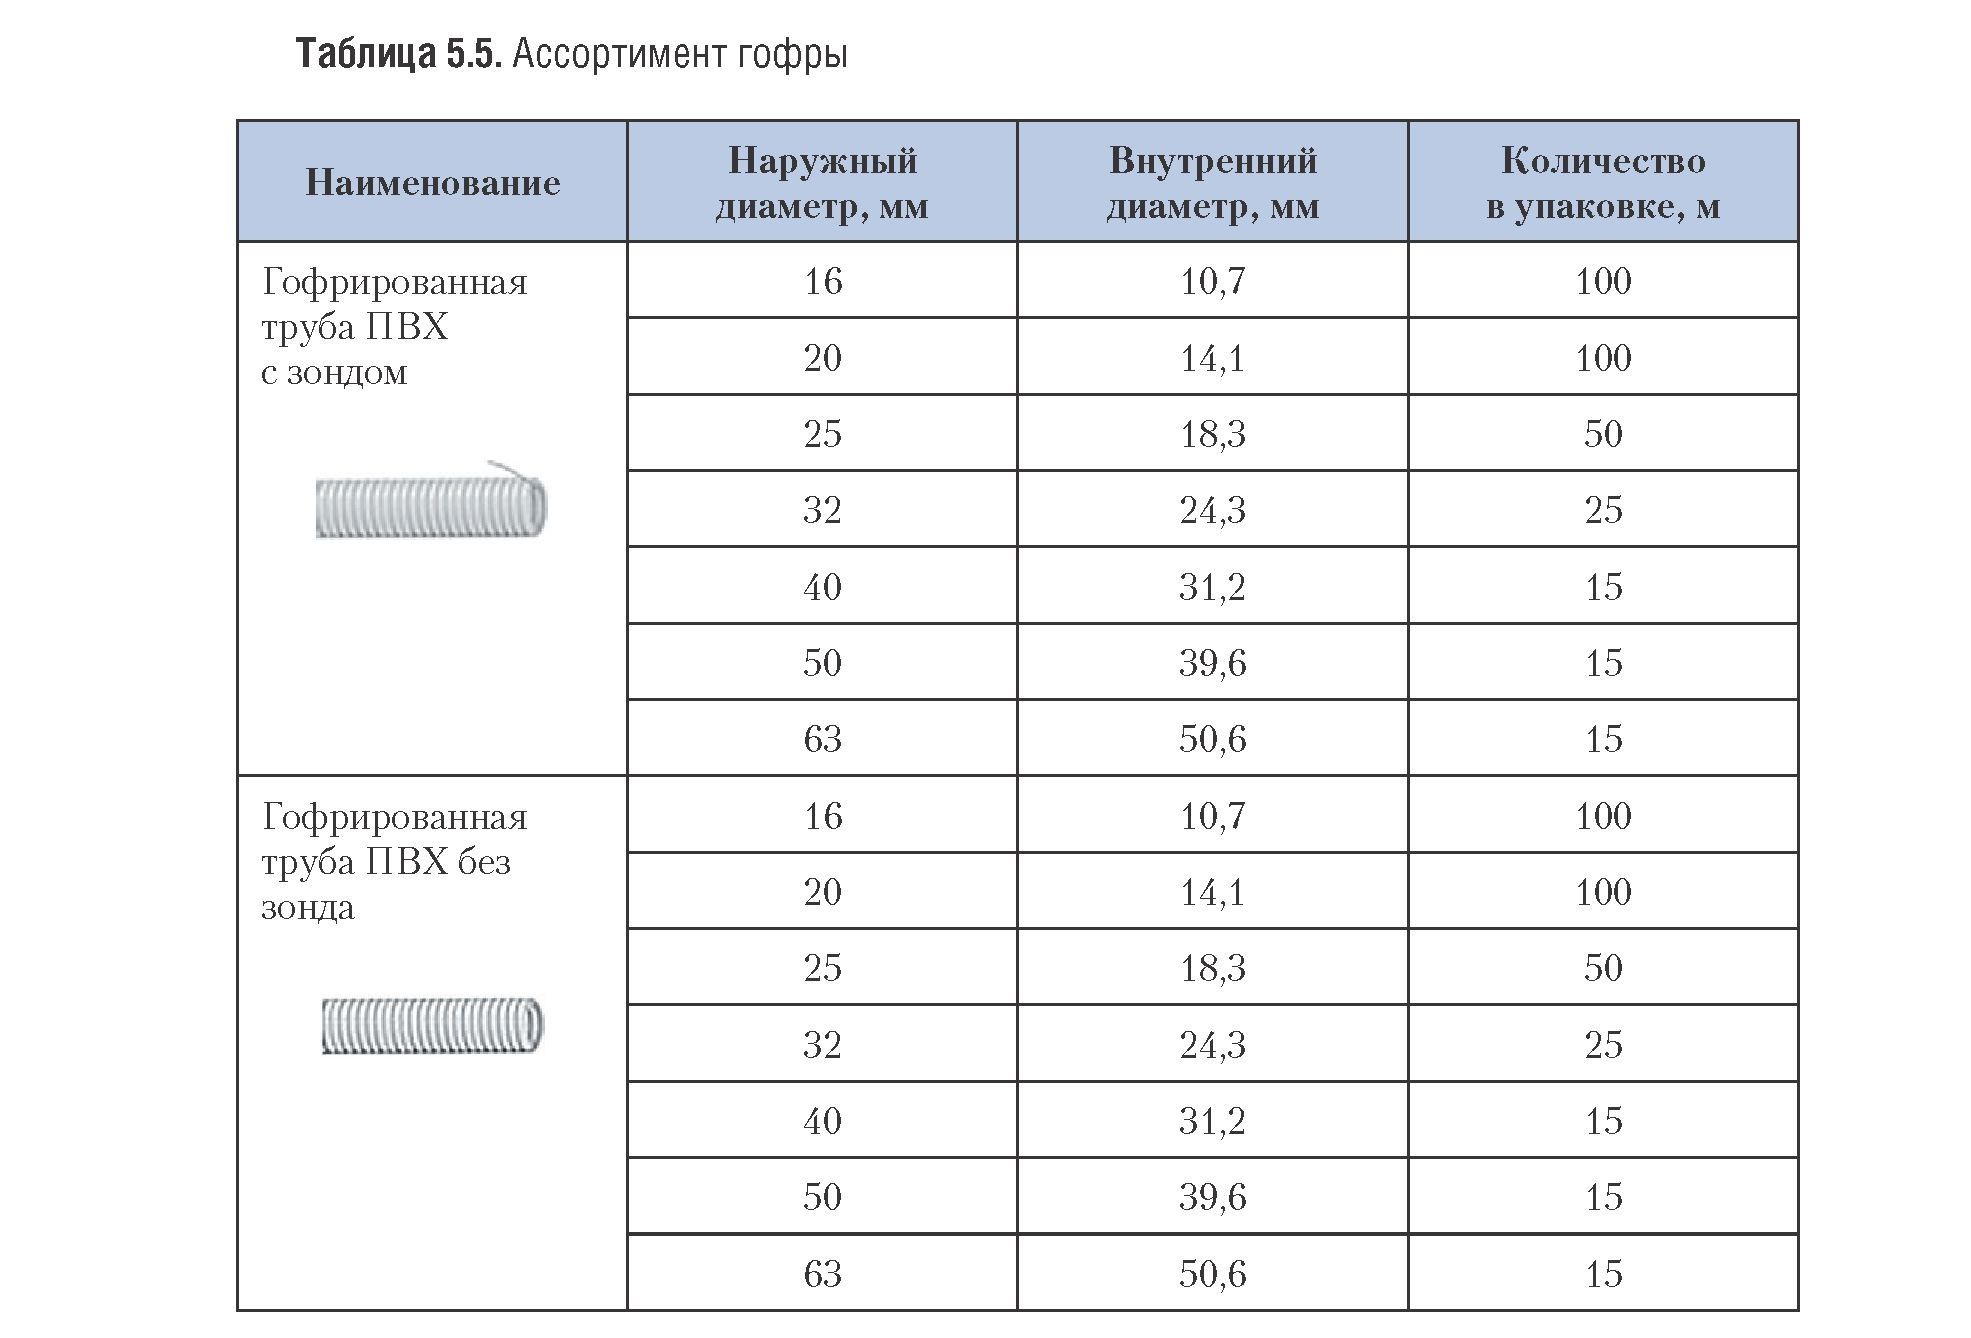
Monolithic solid surfacesThe wires are attached to the concrete wall with dowels using a mounting gun or manually drilling holes for installing a plastic sleeve, to which a fixing bracket or clamp is screwed.  A version of what the plastic fastener looks like is shown in the photo: Depending on the diameter of the cable (bundle of wires), staples, perforated metal tape of industrial production and home-made are also used as fasteners. The use of a mounting gun on various types of cable and corrugated concrete fastenings is demonstrated in the video: Laying in pipesMonolithic concrete surfaces are not grooved; wires are fastened on trays, in pipes or using corrugations. The wiring can remain open, be mounted inside the wall during its construction, or be hidden under the finishing trim. Sometimes, to simplify the work, channels are cut into the slabs of permanent formwork, but this solution leads to disruption of the uniformity of the thermal insulation protection of the house in the places where the polystyrene foam board material is removed. The feed-through Ø of various standardized products allows you to select the material in which the appropriate number of supply wires can be laid. The characteristics of corrugated PVC pipes for laying power networks are presented in the table:
Before installing the corrugation according to the design diagram in the self-leveling wall, you need to thread a soft wire into it, so that later you can easily insert the wires. If you need to lay several cables in one tube, diverging in different directions in intermediate fittings (tees, elbows, crosses), then thread required quantity wires in directions, and the corresponding ends are marked in different colors (paint, colored electrical tape). If such preparation for pulling the soft core is not made in advance, then you will have to use a cable (approximately Ø 3 mm), which confidently passes into the pipe at a distance of 3 - 4 m. The end of the cable must be closed with soldering or a round nozzle so that it does not fluff up in the narrow corrugation , did not get stuck, did not damage it when feeding forward with scrolling. In conditions that do not require a strict aesthetic approach, in technical rooms, to reliably protect external wiring, a more rigid metal hose is used connecting distribution boxes (also metal). The principle of attaching it to the wall is no different from the plastic corrugation and is shown in the diagram:
Walls of different densities Depending on the brand of wire and the material in which it will be installed, the mount for wires on the internal wall may have a different design. In sufficiently strong plaster, when there is no need to attach the corrugation, you can drill holes and hammer in staples - dowels with a wire pre-inserted in them. An example of such fasteners is visible in the photo: On surfaces made of wood, pressed from sawdust slabs, various types of staples and clamps are installed (as on concrete monoliths), in which screws and nails act as fasteners. Installation is carried out quickly by hand, and a construction gun replaces an electric screwdriver. Thin wires for the Internet and telephone can be attached to the tree. This is a special screw that is partially screwed into the wall, and a thin conductor is screwed onto the protruding part in a knot. For soft bases such as gypsum board sheets, plastic staples and clips are used, which are simply nailed with small nails. The fastest way in this case will be to use special U-shaped staples and a construction stapler. Such brackets are designed for quick installation of wires and have plastic stops so as not to crush the current-carrying conductor. They hide the wiring in the apartment using plastic skirting boards, which have internal cavities covered with a decorative cover. All that remains is to mount the baseboard and make exit points to the sockets. A popular method of fastening cables, combining the ease of laying open wiring and not being conspicuous for viewing in a closed type, is plastic cable ducts. A bundle of wires in a box covered with a lid is always available for inspection and switching changes. The channel is attached to the walls with screws, the conductors inside it with plastic ties. Boxes and distribution boxes for them are available in different sizes; you can always choose the appropriate brand for a specific network diagram. By appearance Such boxes on the walls of an office or home have become familiar and do not cause discomfort in the perception of the situation. |


 A very convenient installation option, which is used to unnoticedly run the cable over the baseboard in a house or apartment.


Popular:

New
- Setting up additional details and additional information for 1c nomenclature additional details and information differences
- What to do when there is no registration data
- Request for data selection (formulas) in MS EXCEL Excel selection by condition macro
- Temporary temporary one-time email Temp Email, mail sites, social media registration
- What to do if the computer does not see the phone via the USB port
- How to install Windows on Mac?
- Asus rt n16 setup firmware
- How to find out the bitness of the operating system and processor in Windows
- How to turn off the Windows Firewall: complete deactivation and disabling for individual programs How to completely disable the Windows 7 firewall
- Powerful converter of HTML files to Doc, PDF, Excel, JPEG, Text Using the Total HTML Converter program


