Sections of the site
Editor's Choice:
- What is an MTS trust payment?
- Aeroflot Bonus program: how to accumulate miles and what can you spend them on?
- How to find out which drive is on your computer: SSD or HDD How to find out which ssd is on your computer
- Testing Fractal Design Define R5 Fractal Design Define R5 - Quiet, spacious
- How to speed up Android smartphone and tablet?
- Flood Control VKontakte: we tell you why the problem occurs and how it can be removed. So flood control
- Charger based on an ATX power supply Laboratory power supply based on a 3528 PWM controller
- What to do if the wire does not charge your iPhone
- Virtual machine for Mac Virtual windows on mac os
- About Tele2 service How to enter payment confirmation to number 312
Advertising
| How to extract bios file from exe. An alternative way to modify the AMI BIOS to support LGA771 processors |
|
Actually, the original method, equipment and microcodes can be found (directly the AMI instructions), and in most cases, using this method does not pose any problems and has no pitfalls, but in my practice I regularly encountered the following problem: Those. there was a banal lack of free space inside the image. When you modify the BIOS for yourself for a specific processor, you can ignore this, because You can always load just one microcode specifically for your processor, or delete some old microcode to free up space, but when you modify with a stream, you need to look for another solution, a compromise.
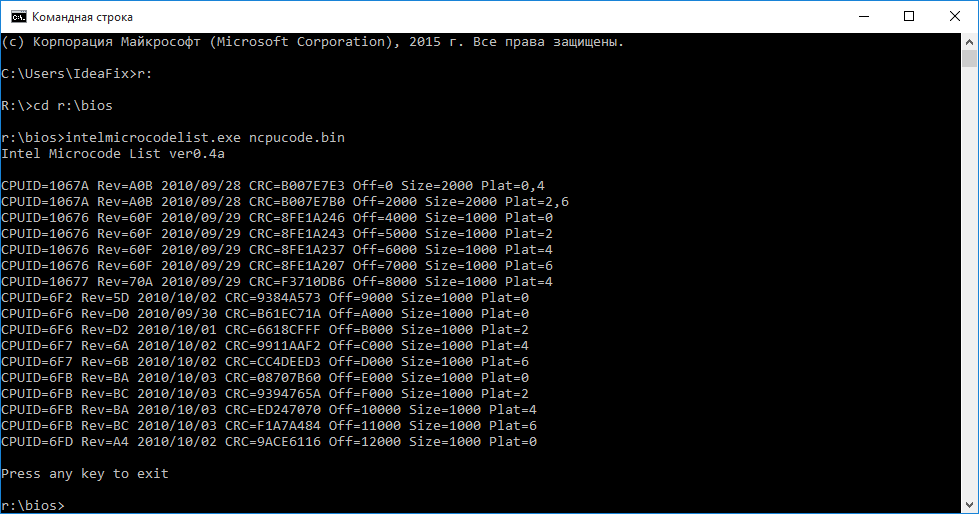
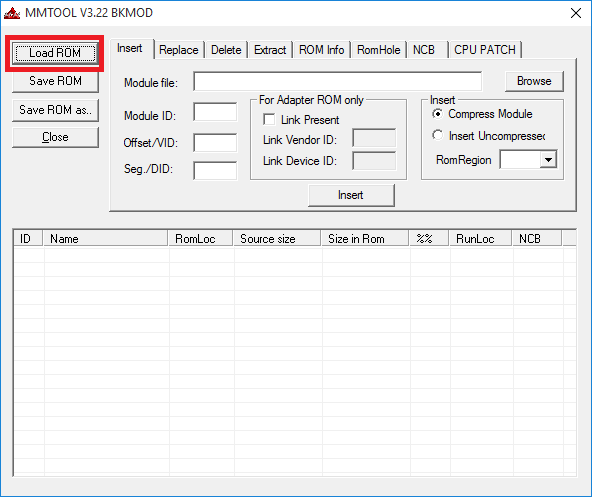
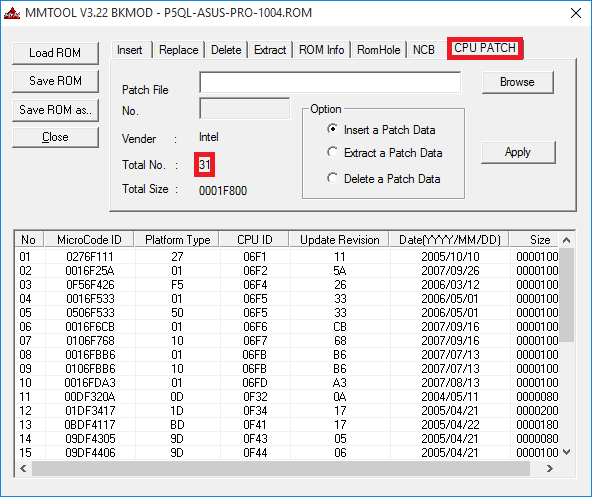
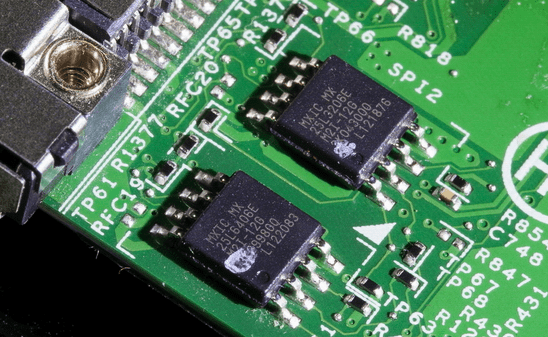
The volume of this set is only 76 kilobytes. This file was obtained by combining these files: cpu00010676_plat00000001_ver0000060f_date20100929.bin The modification procedure itself has also changed a little and has become, if not easier, then faster: Step 1— open the BIOS image in the MMTool program: Step 2— to check, go to the last tab (CPU PATCH) and look at the number of microcodes. Here, for example, there are 31 of them: Step 3— go to the Replace tab and look for the “P6 Micro Code” item on it: Step 4— having selected the “P6 Micro Code” item, press the Ikshtsyu button, select the ncpucode.bin file described above and replace it with the Replace button: Step 5— to check, go to the last tab (CPU PATCH) and look at the number of microcodes. After replacing the microcodes, 17 remained, the latest version: There is no fundamental difference with the modification procedure described on delidded.com. In most cases, the output is certainly not the same, but the processor receives the necessary microcode. Of the subjective positive aspects, I would only like to draw attention to the fact that the microcodes for all current processors are guaranteed to be updated, be it “civilian” or “server”, and there is practically no risk of receiving a message about lack of space. Although, in my practice, even for such a set of microcodes there was not enough space a couple of times, this was with the BIOS for the ECS P4M900T-M and ECS P4M900T-M2 boards, which are generally compatible with the Xeon E5450. By tradition, I publish a link to the archive with tools - (zip, 234KB). The archive contains an executable file MMTOL.exe(version 3.22 BKMOD), file with microcodes for all 45/65nm processors of the core/xeon generation ncpucode.bin, as well as two files 45nm.bin And 65nm.bin with microcodes only for 45nm processors and only for 65nm. The use of these files can be useful in cases where it is necessary to free up additional space in the BIOS, for example, for new firmware of some controller, network, disk, etc. !NB: Neither the ncpucode.bin file nor the 45nm.bin/65nm.bin files support Pentium 4, Celeron (without letter suffixes), Pentium D, Celeron D and Xeon W processors (Xeon 5080 for example). These are NetBrust generation processors. Oh, guess the riddle: standing there, the hive is buzzing. But there is no smoke coming out of the chimney, because this is not a native factory, but a computer on which the BIOS is damaged. And he hums because that’s all he can do now. Without the BIOS, it's just a bunch of lifeless hardware. Is this worth worrying about? Of course not. After all, now you have a great bedside table! System unit as a bedside table? Well, I do not! We know how to make it work. Today we’ll talk about how to restore the BIOS if it crashes. What causes the BIOS firmware to crash?B IOS and its “descendant” UEFI, with which modern motherboards are flashed, are special computer programs necessary for the initial setup and management of PC devices until the operating system starts. They are stored in special flash memory chips on the motherboard, one of which is shown in the picture above. It seems like a good storage place, reliable, but sometimes the BIOS gets uncomfortable there and runs away. More precisely, it becomes damaged and ceases to perform its tasks.
There are not too many reasons for BIOS damage; in some cases they are obvious, in others they are not. Here is a list of the most common:
How BIOS damage manifests itselfIn most cases, the BIOS firmware is partially damaged, so the symptoms of the failure may vary:
There is no image on the screen. Even the manufacturer's screensaver does not appear.  There are also other forms of damage to the BIOS, more precisely, to its area that stores the configuration of the ME controller (an integral part of the chipset) on boards that work with Intel processors - the so-called ME region. If there is a problem in this area, the computer or laptop may:
Eliminating such failures involves reading a BIOS dump, replacing the ME region with a clean one, and re-flashing it using a programmer. Since this is usually done by repairmen, and not by computer owners, we will not dwell on this. It’s better to do what can be done at home without special equipment and the risk of finally sending your “iron pet” to the kingdom of eternity. Restoring the BIOS without a programmer is only possible if you save the boot loader. It is sometimes possible to determine whether it has been preserved or not by indirect signs: blinking of the screen backlight, sound signals from the system speaker, the reaction of the motherboard to turning on without RAM (with sound or blinking indicators), etc. If the BIOS bootloader is intact, the first moments of operation computers run fine, the failure appears a little later. How to restore functionality to a motherboard with a crashed BIOSAsusMany Asus desktop motherboards support the technology USB Flashback, which is designed to quickly update and restore the BIOS in the event of a failure. This does not require anything other than a USB flash drive with a capacity of up to 4-16 GB and the BIOS file itself, which must be downloaded from the manufacturer’s website from the section about your motherboard model.After downloading the firmware you need to rename it. For example, the file “Sabertooth X79” (model name) is renamed to “SABERX79.ROM”, the file “Sabertooth Z77” is renamed to “Z77ST.CAP”. Information on what the firmware file for your model should be named is most likely on the Asus website, but if you don’t find it, check on the forums or in support. Next, save the renamed BIOS on a flash drive formatted in FAT32 and connect it to the USB port marked “ Flashback" or " ROG Connect" It is advisable to turn off the computer before this, this will increase the chance of successful recovery.
After connecting the flash drive, turn on the PC and press the “ BIOS" Hold it down for about 3 seconds until the indicator light on the board starts flashing. Blinking indicates that the file has been successfully read and is being flashed into memory. When the firmware process is completed, the indicator will turn off. If your board is from the budget segment or is not very new, that is, it does not support USB Flashback, most likely you can restore it in another way. If your computer has a floppy drive or optical drive, write the renamed BIOS file to the root directory of a blank floppy disk or CD, place it in the drive, turn off and then turn on the PC. The firmware will be completed when the drive indicator goes off. If there is no drive, use a flash drive. GigabyteOn Gigabyte boards with Dual (double) BIOS, failures rarely occur, since in the event of damage to the firmware in the main chip ( M ain_ BIOS) the dump is copied into it from the backup one ( B ackup_ BIOS). As long as the main flash memory is healthy and contains the firmware, even if damaged, the board remains operational.
Problems with starting a board with Dual_BIOS are possible in the following cases:
Some Gigabyte motherboards can boot from backup flash memory and use it as the main one. Another group of boards from this manufacturer uses a dedicated area on the hard drive as BIOS backup media. This is a less reliable option, but still better than nothing. Restoring the Gigabyte BIOS from a backup is usually performed automatically, but if this does not happen, try turning off the computer from the outlet, wait a little and turn it on again. MSI and othersMost motherboards manufactured by Micro-Star use a firmware recovery technology very similar to ASUS’s - using a flash drive, floppy disk or CD. Copy the BIOS onto a blank medium, connect it to the PC, press the power button for 4 seconds, and press the combination on the keyboard leftCtrl +Home(or Alt+Ctrl +Home) and, without releasing the keys, turn on the computer. The start of the firmware process can be judged by the flashing of the flash drive or drive indicator. BIOS on MSI board. On the right is the JSPI1 port for flashing firmware on the programmer BIOS on MSI board. On the right is the JSPI1 port for flashing firmware on the programmer On motherboards from MSI and some other brands that are more than 8-10 years old, flashing the BIOS is done from a floppy disk. The instructions for AWARD and AMI BIOS are slightly different. To restore the AMI BIOS, do the following:
To restore AWARD BIOS:
By the way, some motherboard manufacturers post BIOSes on their websites only in exe format - in “one bottle” with a firmware program for updating from Windows. Sometimes such a file can be unpacked as an archive, but users often do not understand which of its contents is firmware. There is no universal solution for such problems. In order not to aggravate the problem, it is better to consult specialized forums or the manufacturer’s technical support.
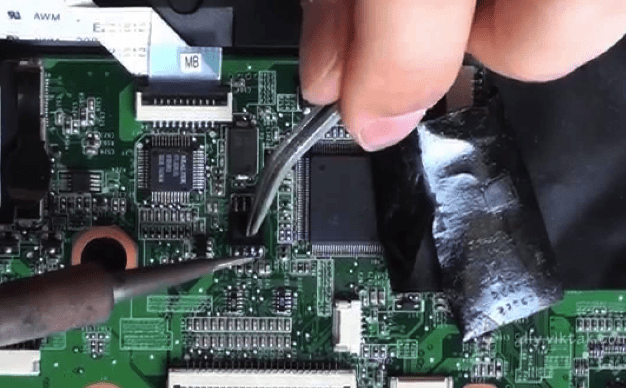
On some boards, before restoring the BIOS, you also need to remove the real time clock (RTC) battery from the socket or reset (remove) the CMOS clear jumper. It is important to clarify these points before starting the procedure. Features of BIOS recovery on laptopsOn laptops, as well as on Gigabyte boards, the BIOS is also often stored in two flash memory chips. But this is not Dual and it does not have backups. Both chips contain different parts of the firmware, or one contains the main BIOS, and the other contains the multicontroller program. To prevent the device from turning on, it is enough to damage the microcode in at least one of them.
The method for restoring a crashed BIOS on laptops is approximately the same as on desktops. The firmware file and flashing program downloaded from the manufacturer’s website (the latter is not always needed) are placed on a clean flash drive formatted in FAT32/16, connected to a de-energized device (simply turning off the laptop is sometimes not enough, you need to disconnect the power supply and remove the battery), insert a charged place the battery in place, turn on the device and press the key combination. Different laptops use different keyboard shortcuts for this, for example:
The main job is to unpack and rename the BIOS files. Again, there is no single rule here. In most cases, you have to get the firmware from exe files, but! Many manufacturers include BIOSes for different revisions of one platform or a whole series of platforms, and choosing the only necessary file from them can be very difficult. To avoid mistakes, read the instructions for flashing the firmware of your particular model and platform revision on specialized forums. And don't be shy to ask questions. In this article, I deliberately do not provide instructions for restoring BIOSes by flashing firmware on a programmer with or without soldering, closing various contacts, hot-swapping removable flash memory, etc., since all these methods are unsafe and require certain knowledge. However, there are probably some readers who have done something similar on their PC and got good results. It would be great if you describe your actions in detail in the comments to the article. Stories about negative experiences are also welcome so that other readers, thanks to you, can avoid mistakes. In the comments, be sure to include the model name and revision of your motherboard, as well as the BIOS version you worked with.How to extract Dell BIOS files? Copy the BIOS.exe file to drive C: cd\ » bios.exe is a file downloaded from the Dell website. " The unpacked bios file will be copied to drive C:! Unpacking the new Dell BIOS.
cd\ It should look like the photo below.  And in the folder with Python (usually C:\Python27), the file biosupdate.exe_decompressed.hdr will appear.
PFSExtractor biosupdate.exe_decompressed.hdr It will turn out like in the photo below.  And the folder biosupdate.exe_decompressed.hdr.extracted will be created, inside which there are all extracted files from which you can collect a dump for flashing the firmware on the programmer. Ready! |


Popular:

New
- Aeroflot Bonus program: how to accumulate miles and what can you spend them on?
- How to find out which drive is on your computer: SSD or HDD How to find out which ssd is on your computer
- Testing Fractal Design Define R5 Fractal Design Define R5 - Quiet, spacious
- How to speed up Android smartphone and tablet?
- Flood Control VKontakte: we tell you why the problem occurs and how it can be removed. So flood control
- Charger based on an ATX power supply Laboratory power supply based on a 3528 PWM controller
- What to do if the wire does not charge your iPhone
- Virtual machine for Mac Virtual windows on mac os
- About Tele2 service How to enter payment confirmation to number 312
- Working with internal memory EEPROM Eeprom erasing


