|
For those who are not yet aware or have simply forgotten what a screenshot is, we remind you that it is an instant screenshot. It may be needed so that, for example, you can capture some moment happening on the screen of your phone (smartphone).
Taking a screenshot on a computer or laptop is not at all difficult - you just need to press the Print Screen button on the keyboard. How can I do it on a device that only has a virtual keyboard? There is a way and you don’t need any keyboard.
Those users who prefer iPhone or iPad are well aware that a screenshot on Apple devices is taken by simultaneously pressing the “Power” and “Home” buttons. In the case of Android, the situation is different. Since there are a great many versions of Android firmware, and all devices are different, manufacturers use different key combinations. However, for most devices, including those that operate on a standard Android firmware, the screen can be taken as follows: you need to simultaneously press the “Power” key and the volume down button. After about a second, a characteristic click will be heard, and you will see a corresponding notification at the top of the screen. For example, you wanted to save a picture on the screen. As soon as you click, a notification will appear at the top of it:

And if you pull out the curtain, it will say that the screenshot has been saved:

Of course, on your device you may need to hold down other keys to take a screenshot. Here are all the possible options:
- Power key and volume down button (this option is the most common).
- Power key and volume up button.
- Power key and Home button.
- Home key and volume down button.
- Home key and volume up button.
Example of button layout on Nexus 5:

Other Android devices
- On devices Samsung a combination of the Home and Back buttons can be used. For some devices, e.g. Samsung Galaxy, the combination of the “Power” and “Home” keys works.
- On HTC devices, hold down the “Power” and “Home” keys, after which the screenshot will be saved.
- If you use devices from ASUS or Acer, you can use the standard combination - hold down the “Power” key and the volume down button.
- Sony also has everything standard - it uses a combination of the “Power” key and the volume down button.
- In the case of Huawei, everything is the same as with Sony.
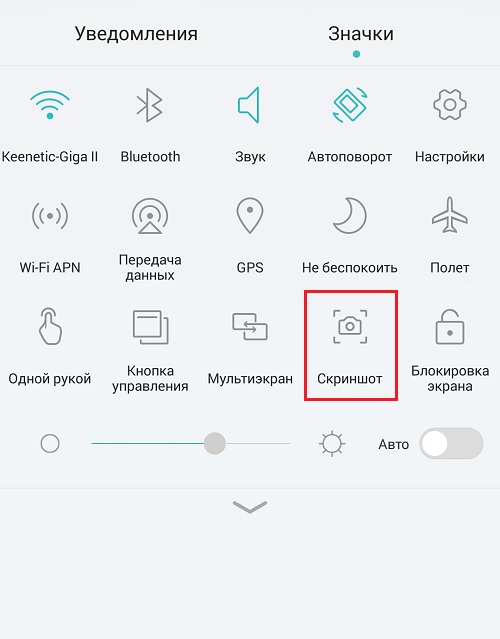
By the way, many companies have started adding a button for taking a screenshot to the drop-down menu (curtain). She looks like this.
In some devices like Samsung Galaxy Note You can use an electronic pen to take a screenshot.

Screenshot Apps
Screenshots can also be taken using third party applications. True, there is one big BUT here - for this you need to root the device. If you are rooted then you can download from Google Play almost any application that allows you to take screenshots. In this case, you can take a screenshot, for example, if you simply shake the device. But if you don’t have root, then you may not download such applications at all, since the most they can do is tell you what buttons you can try to press to get a screenshot on your device.
Taking screenshots is very convenient, and sometimes it just becomes necessary when working or communicating. However, this causes difficulties for some users due to the fact that no one wrote in the instructions for the phone how exactly this is done. Of course, the way to take a screenshot on a smartphone depends on operating system. The most popular nowadays are: Screenshots on phone models with different OS We'll talk about the features of screenshots of each of them below. First, let's look at iOS from developers from Cupertino. If you want to take a screenshot on your iPhone, all you have to do is press the Home and Lock (Power) buttons at the same time. Your smartphone will “blink”, making it clear that the screen has been taken. You can find it directly in the “Camera Roll” album, where all the pictures you take are added. 
With devices under Android control everything is a little more interesting. Since Android itself is an open and flexible system, every developer did not fail to create a so-called shell that will allow the user to associate the OS with this particular brand of smartphone. From this it turns out that depending on what brand your device is, this will be the method of “photographing” the screen. 
The most famous method among Android devices is to hold down the lock and volume down keys together. This combination is used in smartphones: - SONY;
- HTC (some models may use a combination: “Home” and Power);

- Lenovo;
- Xiaomi;
- Motorola;
- Nexus (as you know, Nexus is produced by various companies).
If you use a Samsung device, then everything is as simple as on iOS: press the “Home” and lock (power) buttons at the same time. In newer versions of Samsung's TouchWiz shell, you can swipe the edge of your palm from edge to edge, as if you were wiping the screen. This function must be additionally enabled in the settings in the “Control” - “Palm Control” section. 
If you are using an older version of Android (2.3 or lower), you can only take a photo of the screen using third party program, you will have to download it from the Google store. 
You can find pictures taken on an Android smartphone in the Gallery, namely in the “Pictures” or “Screenshots” folders.
As for devices on Windows Phone, if you are using the eighth version of the OS, you need to press and hold the “Start” and lock buttons together. If you have 8.1, then you need to press the power and volume up buttons together. It will be created on your Windows smartphone new folder in the “Photos” section, so don’t worry, photos from the screen will not be lost. 

As you can see, taking screenshots from your smartphone is quite simple. All you need is to know which method corresponds to which brand. Take screenshots, write comments and leave your opinion on which methods are more convenient for you personally.
The “Screenshot” function is designed to save an image from the screen of a computer, phone and other gadgets. Owners of Android smartphones have the opportunity to screen the display in two ways: using special applications from the shop Play Market or using the device control buttons. Using apps
Let's consider popular options.
Screenshot Touch
Screenshot Touch is free utility on Android to create screenshots. The application also has a function for recording video from the phone screen. To take a screenshot on Android, you will need:
- Download Screenshot Touch (developer - Daejeong Kim) via Play Market and open the program.
- Click on the “Launch Screenshot” button in the main menu and allow the application to access the image on the screen.

- A translucent icon in the form of a camera lens will appear on the smartphone display. You need to click on it once to take a screenshot. To move the icon to a convenient location, hold it down.

- Photos are saved inside the application, where they can be edited and sent to friends, as well as in the phone gallery.

Additional Screenshot Touch features:
- selection of image format (PNG, JPEG, WEBP);
- ability to exclude the status bar and navigation bar from the screenshot;
- Taking a screenshot by shaking your phone instead of pressing a button.
Screen Master
Screen Master - convenient program on Android, with which you can take a photo of the display or record video from it. How to use the application:
- Download Screen Master (developer - Blossgraph) from the Play Market and run it.

- Click on the “Enable Screen Capture” button.

- To take a screenshot, you need to click on the special icon that appears on the display. The application will offer to immediately edit the photo. Having completed this operation, click on the button in the form of a floppy disk (“Save”).

- Images are saved to the Screen Master folder on internal memory Android smartphone.

Other program features:
- setting the screenshot format and quality;
- autostart when you turn on the phone;
- web page capture;
- combining several images into one.
On various models
Let's look at the most common models.
HTC
How to take a screenshot on HTC: Press and hold the “Power” and “Volume Down” buttons at the same time. The screenshot will be saved in the Gallery app. The method works on Android HTC U Ultra, U11, Desire 12, Rhyme, etc.

Xiaomi
How to take a picture of the screen on Xiaomi Redmi 6A and other models in this line:
- Simultaneously press the “Volume Down” and “Power Off” keys.
- Swipe the screen from top to bottom to display the notification menu. Click on the “Screenshot” button (on some phones it is called “Snapshot”).

Sony
Owners of Xperia Z5 and others Sony models can photograph the screen in several ways:
- Press the power off and volume down buttons.
- Press and hold the “Power” button (turn on and lock the display) until a pop-up window appears. Below the “Turn Off” command there is a “Take Screenshot” function.

LG
How to screenshot the screen on Android from LG:
- New models are equipped standard application Quick Memo, which allows you to quickly take a photo of the display and edit it. The “Quick Memo” button for creating a screenshot is located in the notifications menu; to call it, you need to swipe the screen from top to bottom.

- A universal way is to press the phone lock button and the volume down control at the same time. Hold them for 2-3 seconds.
- Voice assistant - after setting up Google Assistant, you can take a photo of the display using the command: “Okay, Google, take a screenshot of the screen.”
On a note: check out the list if you want to use useful programs on a smartphone.
Huawei
Taking a screenshot on Huawei phones:
- Swipe from the top of the screen to the bottom to open the notification menu. Click on the “Screenshot” button.
- Press and hold the volume down control and the power button for about 2 seconds until the photo notification appears.
- The latest Huawei models have added the Smart Screenshot feature. With its help, a photo is taken by double-clicking on the display with your knuckle. The function is activated through the phone settings: section “Management”, menu “Movements”.

DEXP
How to screenshot the screen on DEXP Ixion smartphones: press the power control button ("Power") and the volume down switch, hold them for 2-3 seconds. When a photo is taken, a camera trigger sound will sound and the display will blink. The images are saved to the “Screenshots” folder on the phone’s internal memory.

ASUS
Owners ASUS Zenfone on Android you can take a photo of the screen in 3 ways:
- Standard - use a combination of the “Volume Down” and “Power” keys, holding them down at the same time.
- Menu quick setup(starting with Zenfone 5) - The Screenshot button can be found by swiping down from the top of the screen. If such a key is not available by default, to activate it, go to the “Quick Settings Options” section in the smartphone settings.
- Assign the “Take Screenshot” command when you click the “Recent Applications” button. This can be done in the “Individual” menu ASUS settings→ Button latest apps" Now, when you press this key, the phone will take a screenshot.

Let's sum it up
Works on almost all Androids universal method creating a screenshot - by simultaneously pressing the power button and the volume down key. Some manufacturers add alternative methods. For example, they place a special button in the notification menu. You can also screenshot the screen and immediately edit the resulting images. free programs from the Play Market - Screenshot Touch, Screen Master and similar applications.
First way
This method is suitable for models without a mechanical “Home” button (at the bottom center).
To take a screenshot, simultaneously Press and hold the Volume Down and Power buttons for one to two seconds.
On Galaxy Note 10/10+ simultaneously press the same buttons, but only short term.
Second way
This method is suitable for models with mechanical button“Home” (bottom center).
To take a screenshot, simultaneously Press and hold the Home and Power buttons for one to two seconds.
 Third way
In addition to the first two methods, you can take a screenshot with your palm, but this function is not available on all devices. Detailed information See the article “How to take a screenshot with your palm.”
How to know if a screenshot has been taken
A special icon will appear in the upper left corner of the screen.
 Where to find screenshots
You can view the screenshots taken in the “Gallery” or “My Files” application. They are located in the Pictures/Screenshots or Pictures/ScreenCapture folder.
If none of the methods work
If you can't take a screenshot, try holding the buttons longer. Don't forget: you have to press the buttons simultaneously. If you are taking a screenshot for the first time, it may only work the third or fourth time.
If none of the methods work, then:
- The smartphone or tablet was made by another manufacturer. To learn how to take a screenshot, contact your device manufacturer for assistance;
- The smartphone or tablet has non-original firmware installed. To take screenshots, contact service center Samsung to change the firmware.
- This device is fake. There are many functions on fakes original devices does not work.
To begin with, I'll tell you about standard features. The thing is that some smartphones have a screenshot-taking function out of the box. - Android 3.2 and later - long press on the "Recent Programs" button.
- Android 4.0 - volume down button + Power button.
- Samsung Galaxy - Back + Home button (saved in the ScreenCapture folder).
- Samsung Galaxy S II - Home button + Lock (saved in the ScreenCapture folder).
- HTC Desire S - Power button + Home (saved in the photo folder).
- Sony Ericsson Xperia Arc S - volume down button + Power on.
If you have Root rightsAndroid smartphones are sold without Root rights, which means you do not have access to some hidden features on your phone. The average person doesn’t need them at all, but Root is needed, for example, to install custom firmware. We will talk about this later. Follow the Workshop blog to stay updated. So, if you have already done Root, then you just need to download one of the many applications for taking screenshots on Google Play and everything will be fine. For example: Some of these apps supposedly don't require root access, but they do require connecting to your computer and rebooting. Latest program even paid, but the developers promise that Root is not required. Once I was able to take a screenshot with its help, but a couple of times I wasn’t able to, so it doesn’t always work. Universal methodAnd finally, a method that will allow you to take a screenshot on any device with Android OS. Yes, it is not too simple, but it works. I warn you right away, you will need a computer to work. So, point by point: Connect your phone to your computer using a USB cable and install necessary drivers, if they are not already installed on the system. We download the SDK, but do not install it, but copy all the files and folders from the archive to some folder, for example, C:\SDK. The shorter the path to the folder, the easier it will be further. So, in this folder I had the folders “eclipse”, “sdk” and the “SDK Manager” application Now, from the folder C:\SDK\sdk\platform-tools (or from where you created the folder in step 1) you need to copy the files “adb.exe”, “AdbWinApi.dll” and “fastboot.exe” to Windows\System32 . Copied? Let's move on to the next step. Launch the command line. I hope that most users will not have problems with this, and if they do, the command line can always be found at Start - All Programs - Accessories (or System Tools) - Command Prompt. You can launch Start-Run, type “cmd.exe” there and press Enter. I think you succeeded and a black command line window opened on the screen. Now we need to command line go to the folder where you put the SDK. To do this, you need to use the "cd" utility. For example, if we type “cd c:\”, we will go to the root of drive C. Then we type “cd SDK” and go to the folder with the SDK. Here you need to type “cd SDK” again, because we need exactly this subdirectory. And finally, we type “cd platform-tools” and get into the destination directory. If you copied the SDK not to C:\SDK, then you will have different commands; by analogy, it’s not difficult to guess what needs to be written.
|