Sections of the site
Editor's Choice:
- Take your time buying DVB-T2 tuners
- QQ: register and set security questions Here is a short list of requirements for email marketing in China
- How to put VKontakte comments on WordPress
- VKontakte webcam: new features
- Add to favorites for all browsers Javascript add to favorites
- How to put music on a call
- Android update: how to update to a new version, rollback?
- What to do if Nokia Lumia does not turn on?
- Installing official firmware on Lenovo RocStar (A319) Lenovo flashing
- Review and testing of the Kingston HyperX Cloud II gaming headset
Advertising
| How to make paragraphs straight in Word. How to make a paragraph in a Word document |
|
Formatting paragraphs in Word. In any document you cannot do without text formatting. , we discussed in the last lesson, now it’s our turn to look at the issue of formatting paragraphs in Word. The main semantic unit of a text is usually a paragraph. Therefore, alignment commands and formatting operations are designed to change the appearance of individual paragraphs. Without a paragraph, the text will not look beautiful, and it is not very suitable for reading. You've probably convinced yourself of this? On sites where there is a continuous wall of text, your eyes get tired very quickly. And no matter how interesting it may be, visitors stop reading it mid-sentence and leave. That’s why a competent web designer must break the text into small paragraphs. Books written without paragraphs lose their appeal and most often remain unclaimed. Therefore, paragraphs are a must. In Word you can make your work easier With in paragraphs. For this you need to customize the text editor for yourself. Formatting paragraphs inWordNote Setting paragraph formatting in Word is the same for all versions of the program, so you don’t have to worry about this. To fully format a paragraph, use the "Paragraph " Enter the menu –Format, and select – Paragraph – or right-click on the document field and select the item in the drop-down context menu Paragraph .
— On the left edge — In the center — On the right edge — Width
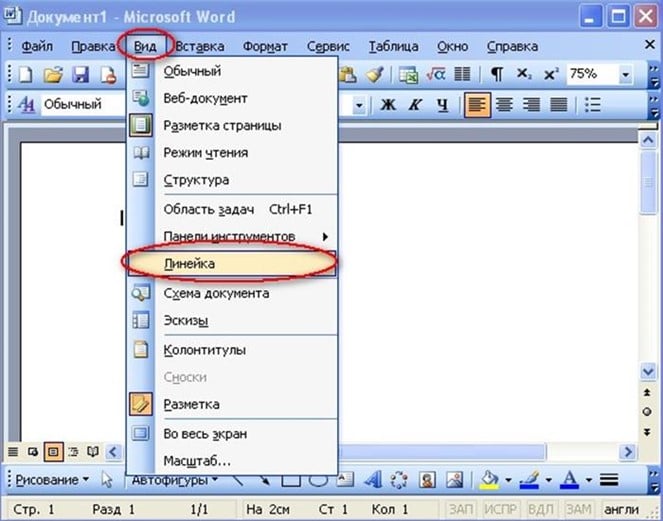
Note: Using a window Paragraph It's very easy to format, but you shouldn't do it. It is useful for learning formatting techniques, but for practical work it is better not to use it. Now let's look at more efficient ways to format paragraphs in Word. There is a way - formatting paragraphs using a ruler . Many people don't use a ruler at all. But in vain - this is also quite a powerful tool in capable hands, and you will soon see this for yourself. Formatting a paragraph using a rulerRuler in Word not only provides information about the document layout, but is also a powerful formatting tool. It allows you to control the side margins and tab stops of the current paragraph. Paragraph boundaries are set by moving (dragging) special markers. How to include a ruler inWordIn Word 2003 the ruler is included in the menu – View. You just need to check the box next to the entry Ruler .
IN Word 2007/2010 the ruler is also in the menu - View – Show and Hide block – Ruler.
Note
The selected tab character is set by clicking on the ruler. You can later change its position by dragging it. To remove a tab character it is dragged outside the ruler. After manually setting a tab stop, all default tab stops that precede it are removed, i.e. all your subsequent documents will already be with this new one paragraph formatting. ∟ Left aligned tab stop position. The text is located to the right of the specified position, starting immediately at that location; ┴ Center aligned tab stop position. The text is positioned symmetrically relative to the specified position; ┘ Right-aligned tab stop position. The text is placed to the left of the specified position, ending at the specified location; Types of tab stop markers:Character-aligned tab stop position. Allows, for example, to arrange a column of numbers of different lengths so that the decimal points are located one below the other. Note: To move between tab stops, use the keys TAB And BACKSPACE . That's how much new we learned today, and what is , And How include ruler in Word , and what is tab in Word . I hope that this new knowledge will be useful to you. One of the main questions many users have when formatting the text of a Word document is related to paragraph or paragraph indentation. When the text has already been typed, it is necessary to put paragraphs so that it is well structured and formatted for easy comprehension by the reader. It's not difficult to do, you just need to know how. And in this article we decided to tell you how to put paragraphs in Word. The first and easiest way to indent paragraphs is using the Word document ruler. If it is not set by default, go to the menu item View – “Show or hide” and check the Ruler tab. In the case of adding paragraphs in Word, we are interested in the ruler that is at the top. On it, as you have already noticed, there are four sliders. Three on the right and one on the left. Unfortunately, few people know which one is responsible for what. To create paragraphs, we are interested in the left sliders. And now we will tell you why each of them is needed. The bottom one is needed for indentation. By moving it to the right, you can easily verify this. The middle one will help you make a protrusion if necessary. But the top one is responsible for paragraphs in a word document. If you move it to the right, an indent will appear at the beginning of the paragraph. And each paragraph will have such indents as you type. There is another way to put paragraphsTo do this, select the text, right-click and select the Paragraph tab. Set the indent length there and click OK. That's all. Hello, friends. Paragraph formatting skills in Microsoft Word will make a very significant contribution to your skills. Thanks to them, you can give texts a logical and convenient structure, separate paragraphs from each other, adjust various indents, etc. You have the power to make the text more readable and convenient, so why not take advantage of it? In this article we will look at the following functionality:
Let's start in order. I give all the examples for MS Word 2013; in other versions of the program the interface may be slightly different. How to set up fields in WordMargins are the empty spaces at the top, bottom, left, and right of a sheet. It is their size that limits the content of the page. To adjust margin sizes, click on the ribbon Page Layout – Page Setup – Margins. In the list that opens, you can select one of the predefined sets of fields. And if you need to set your own dimensions, click “Custom fields...” and in the window that opens, specify the dimensions manually. Usually the left margin is made slightly wider than the rest, leaving room for binding. Indent Settings in Microsoft WordFor more flexible adjustment of the document structure, there are indents. These are the distances from the left margin to the beginning of the text. This way you can change the position of each individual paragraph on the sheet. This is useful, for example, for creating a hierarchical structure of text. You can set indents for each paragraph, several or all paragraphs at once. To change the indentation, place the cursor anywhere within the paragraph and move the sliders on the ruler:
By the way, if you don’t have a ruler on your screen, check the box on the ribbon: View – Show – Ruler. There is a simplified way to change the indents. Click the “Decrease Indent” and “Increase Indent” buttons on the ribbon. How to adjust alignment in WordMicrosoft Word has four options for aligning text on a worksheet:
The last option is the least obvious. The text is distributed on the line so that it is aligned on both edges. Moreover, if the length of the text is less than one line, it will still be aligned to the left, excluding huge spaces between words. To align, use the buttons on the ribbon in the Paragraph command group. To change the alignment of several paragraphs at once, first select them. Line spacing in WordTo change the line spacing in a paragraph, place the cursor in it and click on the ribbon Home – Paragraph – Spacing. Select one of the proposed options. If the spacing option you need is not in the list, click “Other line spacing options.” There you can select the desired interval. Setting spacing between paragraphs in WordBy adjusting the spacing between paragraphs, you improve the readability of the text. People perceive text structure better when each paragraph describes specific aspects of one general issue. To add a space before or after a paragraph, place the cursor in it. After that, click on the ribbon Home – Paragraph – Spacing – Add spacing before paragraph (Add spacing after paragraph). To set the spacing sizes yourself, click the “Paragraph Options” button in the lower right corner of the “Paragraph” group. In the window that opens, set the required interval sizes. Let me clarify that when you type text, the program itself moves to a new line if the cursor reaches the end of the sheet. And to end a paragraph, press Enter at the end. The program will move the cursor to a new line, and the newly typed paragraph will be separated by the specified intervals. If you need to break a line without starting a new paragraph, use one of two methods:
In both cases, the program will insert a non-printing and invisible line break at the specified position. To delete such a transfer, press Ctrl+Shift+8. All non-printing characters will be displayed. Find the line break icon at the break point and remove it. Press Ctrl+Shift+8 again to turn off the display of non-printing characters. Borders and shading of paragraphs in WordYou can format a paragraph by framing it with a frame. To do this, place the cursor in the desired paragraph (or select several). Now click the arrow next to the button Home – Paragraph – Boundaries. If the drop-down menu contains the desired frame option, select it. If not, click “Borders and Fill...”. In this window, there are all kinds of graphics settings on three tabs:
In addition, there is a separate button on the ribbon to fill the background of a paragraph: Home – Paragraph – Filling. As usual, you can choose from a standard set of colors, an extended set, or a spectrum. Click the arrow to the right of the button to open more palettes. Don't overdo it with borders and shading, use them in doses. A jumble of many frames and color effects can create confusion on the sheet. Setting tab stops in MS WordTo “move” a section of text some distance to the right, tabulation is used. It looks like several spaces in a row. So, if you put a lot of spaces in such cases, it’s better to put one tab character. To do this, place the cursor in front of the text that you want to move and press Tab on your keyboard. If you press Tab repeatedly, the cursor will move a specified distance each time. The default is 1.27 cm. You can manually adjust tab distances to your liking. The easiest way to do this is on the ruler by placing marks with the mouse where the tab stops will be located. But first, in the upper left corner of the window, where the horizontal and vertical rulers intersect, select the desired alignment option. To do this, click on the white square, the alignment principle will change:
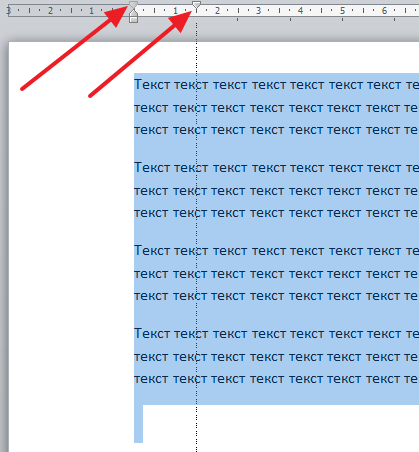
When you have chosen the alignment method you need, click on the horizontal ruler in the places where the tab stop should be. The corresponding marker will appear. These markers can then be dragged along the ruler to change settings. To remove a tab stop marker, drag it outside the ruler. To more accurately adjust the position of the marker, double-click on it with the mouse. The Tab dialog box opens. Using the control buttons, you can add, delete and adjust markers, indicate their exact location, and set their alignment methods. Pay attention to the group of switches " Aggregate" Here you can select the characters that fill the empty space when tabulating. This is very convenient when manually creating tables of contents, subject indexes, etc. Taking into account all the listed possibilities, tabulation has grown from an ordinary rarely used option into a powerful tool for creating document structure. I’m sure many of you liked this article, because now you know how to create a document structure correctly and accurately, which means that working in Word becomes more conscious and comfortable, and the pleasure from a good result only increases. I propose to continue in the same vein, because I will write the next post about. See you there, see you soon! When typing text on a computer, users often ask how to make a paragraph in Word. Usually in such cases they are not interested in the paragraph itself, but in the indentation before it. If you are faced with this problem, then this article should help you. Here you can learn how to indent a paragraph in Word 2003, 2007, 2010, 2013 or 2016. How to make a paragraph in Word 2007, 2010, 2013 or 2016In order to make a paragraph in Word, you must first turn on the display of the ruler. For this go to the “View” tab and check the box next to “Ruler”». In addition, the ruler can be turned on by clicking on the button located in the upper right corner of the sheet (just above the horizontal scroll bar). When the ruler is on, examine it carefully. The ruler has three triangle-shaped sliders. Two on the left and one on the right. Using these sliders, you can control the space between text and the edge of the sheet, as well as paragraphs. To make a paragraph you need to select all the text with the mouse and move the upper left slider to the right.
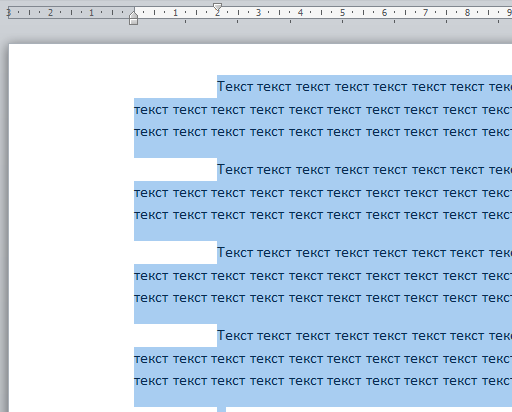
After this, each paragraph of text will be separated from the edge of the sheet by an additional space.
If you need to indent only one paragraph of text, then you can not select the text, but simply place the cursor on the desired paragraph and indent it by moving the slider. How to make a paragraph in Word 2003In a similar way, you can make a paragraph in the text editor Word 2003. First you need to enable the display of the ruler. This is done using the menu “View – Ruler”.
How to make a paragraph using the keyboardIt should also be noted that you can make a paragraph using the keyboard. For this you need to place the cursor at the beginning of the text block and press the TAB key on the keyboard.
This method of creating a paragraph is also convenient because it works not only in Word, but also in many other text editing programs. A paragraph in Microsoft Office Word is not called moving to a new line, as many believe, but directly indentation the same line from the document fields. Because of this funny misunderstanding, difficulties often arise when communicating by phone or working with regulatory documentation that describes the requirements for application notes. Some people believe that a paragraph is button press enter and do not understand what requirements we are talking about. You shouldn't make such mistakes. A paragraph is an indentation from the margins of a document. How to set a paragraphExists 2 main ways paragraph settings: via settings or through ruler. The ruler method is familiar to many. Simple enough pull one of the sliders located at the top of the document. But, in fairness, it should be noted that not all users see the ruler in its rightful place. It's simply necessary turn on. This is done simply - go to the tab view and check the box " ruler». Now we see the Ruler and the sliders on it. They are indicated by the red arrow in the image. Moving upper slider adjusts text indentation in the first line after the hyphen. Lower slider adjusts text position on all other lines. Moving the sliders at the same time changes the indentation of all text between newlines. The second method involves regulation settings with a clear example. At the same time, we can also change between the lines, but this is a separate topic. If you click on tile paragraph in the lower right corner, the following window will open where you can make all the necessary changes. It is important to remember the following rules:
At the bottom of this window there is a preview field that allows you to see how the position of the text will change after clicking the " OK" By adjusting the values, here you can set the necessary indentation parameters for the entire document. How to remove a paragraphAnd if the need to use a paragraph has disappeared, how can you cancel all the settings. There are also two methods at work here. Can return position sliders to the original (that is, move all the way to the left). You can use the same window settings, which has already been discussed above. Open it using the button in the corner. Then you can follow one of two paths, which depends on an important factor - have the settings of Word itself been changed? You can just press a button default, which is located next to the button confirmation or enter all fields equal to “0” and click confirm. After which we will need to choose where to use these settings. We select and confirm the decision. In the first case, the values will be returned to standard in the document that is currently open, in another they will be applied to all new documents based on the specified template. Previously saved and now closed documents will not be miraculously reconstructed. By changing the position of the indent using the window shown above, we were changing the settings. That is, such a seemingly terrible thing was done unconsciously and quickly. It turns out that changing the settings is not difficult. The only thing you should pay special attention to is the checkbox “ Mirror padding" This field is responsible for setting identical indentations from different sides. We have already discussed the group of settings for a separate indent in the first line after wrapping above, as well as adjusting the indents from the left and right edges of the document. There is nothing complicated about it. It may sound scary and confusing, but in practice everything is simple and clear. |


Popular:

New
- QQ: register and set security questions Here is a short list of requirements for email marketing in China
- How to put VKontakte comments on WordPress
- VKontakte webcam: new features
- Add to favorites for all browsers Javascript add to favorites
- How to put music on a call
- Android update: how to update to a new version, rollback?
- What to do if Nokia Lumia does not turn on?
- Installing official firmware on Lenovo RocStar (A319) Lenovo flashing
- Review and testing of the Kingston HyperX Cloud II gaming headset
- Free iPhone IMEI check


