Sections of the site
Editor's Choice:
- How to reduce the size of a pdf, detailed instructions
- Is it possible to change the battery in iPhone 4?
- The best programs to defragment your hard drive on Windows
- Selecting a receiver and acoustics (budget hi-fi) Floor-standing and bookshelf
- Cooler not working on laptop
- Setting a password for a page How to protect a php page with a password
- Neighborhoods of calpe spain
- How to properly charge a laptop to extend battery life How to charge a laptop battery for the first time
- Skyrim - guide to improving graphics (UPD) Basic graphic settings of Skyrim
- How to adopt a child in Skyrim – Children for adoption Download mod for Skyrim improved children
Advertising
| Setting up mail in the Android mail application. Setting up mail on Android Setting up mail notifications on Android |
|
Tablets and smartphones are no longer luxury items, but modern tools used in everyday life and making it easier for users. Almost every adult or child has them and is used for both work and entertainment. Devices run on different systems, but the Android OS is especially popular all over the world. First of all, after purchasing a device, the user begins to install the necessary software. An important point during initial installations is setting up email. Despite the emergence of other, more advanced methods of communication, the use of email services is still relevant, in particular, a mailbox is often required when registering on various resources. Method for setting up mail on Android. The choice of email application depends on the user's personal preferences. On most Android devices, the Gmail client from Google is installed by default, in which case you don’t have to download another one, and when you create an account, you get the opportunity to use all Google services, including Google Drive, where you can store various types of information up to 15 GB for free. If you don’t like the products from the Good Corporation, you can choose the equally popular and convenient Yandex (the service also offers the possibility, as well as many different interesting tools), Mail.ru or any other that suits your taste. Before you create an email on your tablet, you need to download and install a special application. The Play Market contains all the best official ones, so there will be no problems with this. You can choose any one you like based on interface, functionality and other characteristics. For one mail, it is enough to select a specialized utility for the Android OS from the application store, tailored specifically for the mailer you use. If you have several mailboxes, it is advisable to download a universal email client, for example, MyMail, K9Mail, Aqua Mail or any other; they are present in abundance in the Play Market. With this option, you will have the opportunity to receive letters from all those mail services where you are registered. Let's look at how to create one on a tablet running Android using popular services as an example.
If you already have an account for any service, it will be enough to download and install the client and simply log in after launching it; if not, then you can create a mailbox in a matter of minutes. Setting up email on Android devices is no different; the principle of operation is the same for all email service utilities. To create a mailbox, you will need to select the “Create a new account” option in the menu and enter the appropriate data in the form fields. As a rule, the application independently determines the necessary settings and connects to the service, but if this does not happen, mail transfer parameters will be required. This is easy to do; all input data is provided by the mail service. Using the POP3 protocol to transport mail, the client delivers messages to devices without synchronization with the service; all mail changes will be made only in the application, while on the server the data will remain as is. When installing the IMAP protocol, mail is synchronized, that is, all manipulations with letters in the application are reflected on the server.
The Yandex client on Android is convenient, creative in design and easy to navigate. For maximum user comfort, there is a swipe action system. It is also possible to add additional accounts. After installing the client from the Play Market on the device (the process occurs automatically after clicking the corresponding button on the store page), the user needs to log in or register. If the application does not determine the settings on its own, you will have to configure it manually. The procedure may also be necessary if you are using a universal client. You just need to select the installation manually, specify the type of protocol you need and fill in the fields for incoming and outgoing email servers. Basic settings of Yandex mail on Android using protocols:
The login and password fields are filled out individually; this is your Yandex account data. From the moment the setup is completed, the mail will begin to fully function.
One of the most popular email services, Mail.ru, is as easy to set up as Yandex. You can use both a native client and a universal one, in this . As in the previous case, install the utility from the store, select manual configuration and enter the necessary data in the fields. Setting up Mail.ru mail on Android devices is done in the same way, only the server addresses will be different, for incoming messages - pop. mail.ru (POP3 protocol) or imap.mail.ru (IMAP protocol), for outgoing – smtp.mail.ru. The remaining settings, port and security type will be the same as in the case of Yandex. Next, you can configure the synchronization parameters with the My.mail.ru service, the frequency of checking letters and other details, and also enter the name in the appropriate field that will appear in the “from whom” column when sending messages.
Google's mail app is almost always already installed on Android, so you're unlikely to need to install it. If you do not yet have an account, you will need to register, where you will be asked to enter your credentials. It is possible to add other accounts, for which you should select the appropriate option in the settings, select the one you need from the list of email clients, and then enter your credentials. After such manipulations, mail from other mailboxes will be available in Gmail. All email clients perform automatic mail setup from Google. The incoming mail server will be imap.gmail.com, and the outgoing mail server will be smtp.gmail.com. In this case, Gmail settings can be changed. By default, the IMAP protocol is used, but as a result of synchronization, battery costs, traffic consumption increase, and some devices even have heating problems. If you want to switch to POP3, you can do this by going to Mail Settings, where in the “Forwarding and POP/IMAP” section, check the boxes next to the items “Enable POP for emails received from now on” and “Disable IMAP”. Gmail users can also take advantage of Google's interesting Inbox utility, which includes many useful tools and is equipped with the ability to read and delete messages by swiping right and left. The client has a more original design and a greater number of features, and is available for download from the Play Market.
The Rambler.ru service has also enjoyed considerable popularity for many years. Setting up Rambler mail on Android devices is similar to the Yandex and Mail.ru services described above. We select the POP3 or IMAP protocol for incoming letters, register the addresses pop.rambler.ru (port 995, SSL) or imap.rambler.ru (port 993, SSL), respectively, for outgoing ones - smtp.rambler.ru (gjhn 465, SSL) . The settings are suitable for any client and domain offered by the service. Before using a third-party utility, it is important to go to the “Mail Programs” menu in the mailbox settings, where you check the box next to the item indicating that you plan to use third-party clients to receive mail.
Data about servers is always present in the help section of each mail service, so if you choose another option, you can find information to fill out the settings directly on the service. As you can see, there is nothing complicated about filling out these protocols for email clients yourself; they are all configured in the same way, so now you can choose any email client for yourself, and even if the application does not detect the settings, you can always configure the connection manually. All you need to guarantee the functioning of mail on your Android is proper configuration and a working Internet. The article talks in detail about how to set up mail on Android. All the most popular email services among CIS users are affected. Thanks to the information received, you will be able to set up a mailbox on your smartphone as quickly as possible. How to set up Yandex mail on Android using built-in software: instructionsYou can set up Yandex mail on Android in several simple and straightforward ways: using utilities from the application store or using the built-in Email program. To begin the synchronization process, the device must have an Internet connection. Here are brief instructions on how to set up mail on Android using the built-in software of your smartphone. To get started follow these steps:
on "Android"The above instructions are suitable for setting up all popular email services, including mail.ru. But, if you want to use third-party software, pay attention to the best program for synchronizing with Mail.ru mail.
The MailDroid.Mail program is a client with the most pleasant user interface among all the programs presented. The application supports the Mail.ru service. Using this utility, the user will be able to sort all incoming letters. There is a choice of themes. The program will provide convenient instructions on how to set up mail on Android. Synchronization of Gmail and Rambler mailboxesTo synchronize Gmail, Google has developed a program that is included in the standard software set of any Android smartphone. It is most convenient to use. If you have a number of problems with this program, you can install the Inbox utility from Gmail. It scans emails into the user's inbox, sending the user instant notifications. If you are unable to synchronize Rambler mail in the standard way, which is indicated in the first paragraph of the article, install the Profi Mail application. This is a fairly popular mail utility on the Android software market. The application has both free and paid versions. There is the ability to synchronize with a huge number of email services, including Yandex. The program runs in the background, instantly notifying the user of new emails. Connecting Yandex using third-party programsK-9 Mail is an open source utility that is very popular among Android users. You can download K-9 Mail completely free of charge. With Yandex mail, the application works stably, without errors. Setting up mail takes a minimum amount of time. The application has a nice and user-friendly interface.
Thus, having considered all of the above methods for synchronizing mail with your device, you now know how to set up mail on Android and can choose the most suitable setup option for yourself. The described methods are suitable for all Android devices. One of the most popular functions in any modern smartphone is an email client that allows you to receive and send emails from various services, be it standard search engine services Google, Yandex or third-party email services, for example, Mail, Beeline and others. In this material we will describe to you in detail how to set up mail on your Android and how to create backup copies of your letters!
So, the process of setting up mail can be divided into three different categories:
Attention! Whatever service you use to send and receive emails, the essence of email does not change. Almost all projects for working with emails use identical technologies. 1. Setting up mail using the operating system itselfSo, how to set up mail on Android? Standard tools of this system allow you to receive and send letters from an attached email address, for example, the same Gmail or connecting a separate address for working with mail. We will consider both options. The first option is Standard Mail from GoogleInitially, we will consider the option of working with standard mail from Google. As soon as you add an account for your smartphone running the Android operating system, mail will be set up automatically, and all messages will be downloaded to your device, both previously read and not yet opened. To work with accounts and configure them, you need to go to the “Settings” tab, select “Accounts and synchronization”, and then log in to the account in which your mail is attached. In this case, we are talking specifically about Google - the Gmail service, which is used by millions of people around the world. Second option - Connecting mail from third-party servicesLet's say that you use mail from Yandex or Mail.ru. What to do in this case? As mentioned earlier, the principle of operation of mail services is the same, the only thing is that some settings in the records are different. To set up mail in any other service, you need to select the E-mail application in the main menu of the system and open it. First try logging in with automatic setup. To do this, simply enter your email address in the “E-mail” field and your password in the “Password” field. Once the data has been entered, click the “Next” button. If the system gives an error, return to the previous point and click the “Manual configuration” button. Using the example, we will configure Mail.ru mail.
In the window that appears, enter the settings as in the picture:
For the outgoing message server, set the following parameters:
Attention! All parameters for your email client can be viewed on the official website, for example, www.mail.ru or www.yandex.ru, by going to the appropriate section. In the “Help” section, find the item that mentions setting up mail on your smartphone, and see the list of parameters that you need to register for your account. Once all the data has been entered, you will need to click on the “Finish” button, after which the system will check the accuracy of the entered data and synchronize with the mail server. All your emails will be automatically downloaded to your phone. You can delete incoming emails from your phone at any time by first making copies. It is also worth considering that several email accounts can be connected to one smartphone, for example, if you work directly with Yandex, Mail.ru and other email services! 2. Setting up mail in Android applicationsAbove we described a method that allows you to connect and configure mail in the standard options of the Android operating system. In this same paragraph we are talking about specialized applications that are developed specifically for each service, for example, Yandex Mail or Gmail, Mail.ru and many others. The procedure in this case will be as follows:
Each program has its own design, its own specific settings, and separate functionality, so here each user himself determines whether he should check his mail through the official application of the mail service or specify his e-mail through the standard settings in Android. You can install several programs, for example, to work with Mail, Yandex, Rambler, just keep in mind that this significantly increases battery power consumption. 3. Setting up mail on Android in browsersDue to the fact that most users prefer to access the Internet from mobile devices and smartphones, many email services have developed a mobile version, with which the site automatically adjusts to the diagonal dimensions of your device. All these operations are carried out in a browser, for example, Safari or Google Chrome, Opera. In order for you to be able to access your mail service, you need to open any browser on your device and write its name in the search engine or immediately go to the official website, for example, at www.yandex.ru to work with mail from Yandex. Next, you go to the “Mail” tab, enter your username and password. We recommend that you save your password in your browser so that you do not have to enter it every time you log in.
Subsequent times you will be logged into your email account automatically as soon as the page opens. In your browser settings, you can also add a page to bookmarks to get to the email service with one click. As you can see, setting up mail on Android is quite simple, and there are many ways to do this! Based on statistical data, we can say with complete confidence that most users prefer to use standard Android settings or specialized applications to work with mail. Exiting through the mobile versions from the browser is carried out only by those people who cannot independently install the application from Google Play or register the settings in Android. What you should do is up to you to decide! Good luck! Modern smartphones running the Android operating system can perform various tasks on which the user could spend his time. Using email is one of the basic needs of most people, and accessing it from your smartphone is often not just a convenience, but a necessity. The Android OS integrates the ability to configure email. Setting up mail on Android does not require special knowledge or time and is completed in a few minutes. You can configure mail on your device in two ways: using built-in tools or downloadable applications. Using built-in toolsIf the user already has a Gmail email, then the issue can be resolved by adding the appropriate account in the device settings. After this, you need to synchronize your account, which will result in all emails being downloaded to the device. Under the configured account, you can both send and receive letters. If the user has an account from other email services, then you need to open the standard “Mail” application on the device, where the system will prompt you to enter your email address and password in the appropriate fields. After this, you need to select the account type. In most cases, this is POP3, but before setting it up, it is advisable to clarify this point with your provider. Next, you need to follow the instructions and eventually the email client will be configured to receive and send letters.
Some users may have a question - how to set up mail on Android with your own domain name, and not from Gmail or other common services? Setting up mail with your own domain follows exactly the same procedure as described above, and if configured correctly, the mail client will work with any mail.
Setting up Yandex mail requires special attention, since the company insists on using a separate application. In order to set up an email client, you first need to log into your email account through the website. Next, in the settings, you need to select “Mail programs”, where you need to check the necessary boxes. After this, you need to create an account using the above method. If an error message appears when setting up your mail client, then you need to visit the mail service website, where you specify the data for setting up mail on Android. Setting up mail using the applicationSetting up mail on Android using specialized applications is the easiest and fastest way. Depending on which email service your account belongs to, you can download the appropriate application from Google Play. Many email services such as Yandex, Gmail, Rambler offer their own free and reliable applications for working with letters.
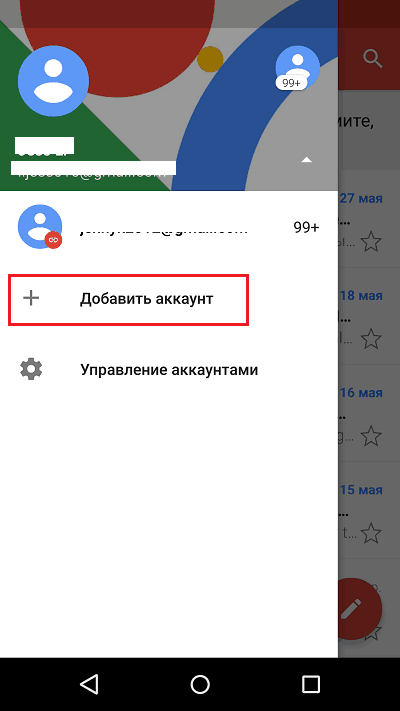
In addition to individual applications, there are many third-party email clients, such as MailDroid or K-9 Mail, which also allow you to fine-tune the reception and sending of letters from any email address. Our man won’t go into his pocket for words, but for mail he will. No, we are not talking about an envelope with a letter taken out of a box and stuffed into a pocket, but about a smartphone, which is our personal “postman” in a modern version. Many people think that Android phones allow access, which is linked to a Google account, and iPhones only work with a mailbox that is associated with an Apple ID. And that other email accounts require additional programs. In fact, gadgets have enough capabilities for everything. Let's talk about how to set up email on your phone to receive emails from all your accounts in one mailbox - built into the system. Setting up mail in the Gmail app on AndroidAdding and setting up a new accountMail client " Gmail", pre-installed on Android phones, can be used to assemble letters from various mail services, except those that do not support third-party applications, such as the highly secure ProtonMail and Tutanota. By default, it collects emails only addressed to the Google account associated with the device. To connect another email account to the Gmail client, do the following:
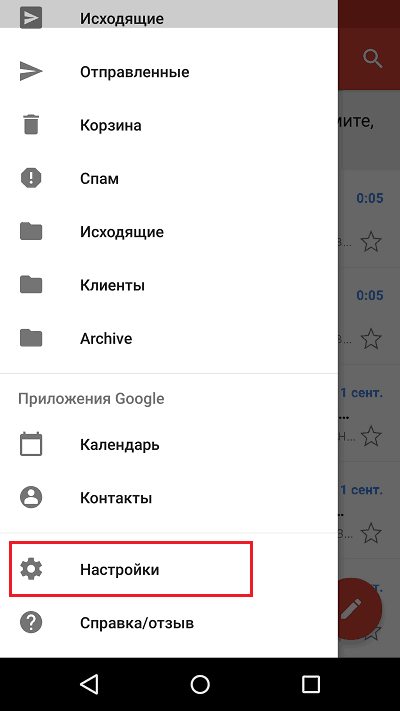
You can finish here, but if you want to customize the new box more subtly, open the side menu in the application again, scroll down and tap the button Settings».
Select the account you want to edit.
The following parameters are available for change:
In exactly the same way, accounts for other mail services are added to Gmail. There are no restrictions on quantity. It is usually not necessary to use manual settings, as described above, except for connecting corporate or some exotic mail accounts. In other cases, the application selects the optimal parameters by default. How to change and delete your Gmail accountBy default, Gmail only displays correspondence from one account—the currently active one. To check another person's mail, you need to make it active. All connected accounts are displayed in the top field of the main application menu (hidden behind the “hamburger” button). To switch between them, just touch the desired shortcut. And to simultaneously download messages from all your mail, select “ All boxes».
To delete an account from the Gmail application, click the triangle button in the main menu and open “ Account management».
Next, select the email service and account you want to delete. On the next screen, highlight the desired address again and go to the menu hidden behind the “three dots” button (top right). Tap " Delete account».
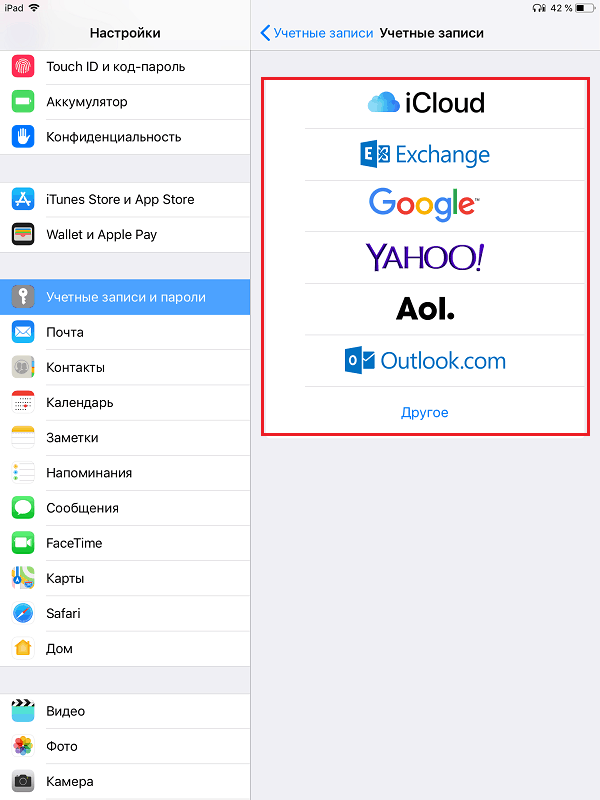
Setting up mail on iPhone and iPadConnect and set up your accountAdding and setting up an email account on Apple mobile devices is no more labor-intensive than on Android, but, in my opinion, it is less intuitive. And they are executed not in the mail section, but in “ Accounts and passwords». To use a different email account on your iPhone or iPad other than the one linked to your Apple ID, do the following:
In chapter " Additionally» contains the following options:
After closing the settings window, you will be taken to the newly created account section. By the way, there is also a button to delete it.
Now the mail program built into the system will receive letters, including from this mailbox. Setting up the mail applicationThe parameters of the built-in mail program are configured, as you probably already guessed, through the section “ Mail». The following is collected here:
As you can see, the email program on Apple phones and tablets allows you to completely configure it to suit your own needs. Not every third-party application can boast such functionality. Another plus in the collection of mailers built into the system - both on Android and Apple - is the absence of advertising, which almost all free analogues are stuffed with. So both programs are quite good. Johnny Mnemonic |


Popular:

New
- Is it possible to change the battery in iPhone 4?
- The best programs to defragment your hard drive on Windows
- Selecting a receiver and acoustics (budget hi-fi) Floor-standing and bookshelf
- Cooler not working on laptop
- Setting a password for a page How to protect a php page with a password
- Neighborhoods of calpe spain
- How to properly charge a laptop to extend battery life How to charge a laptop battery for the first time
- Skyrim - guide to improving graphics (UPD) Basic graphic settings of Skyrim
- How to adopt a child in Skyrim – Children for adoption Download mod for Skyrim improved children
- Unlock Bootloader HTC


