Sections of the site
Editor's Choice:
- Design and principle of operation
- Create a portrait from a font using Photoshop Portraits from letters
- History of the device
- How to reinstall a program on your computer How to reinstall a game without deleting it
- Selfish profile php mode
- Armenian satellite channels Armenian channels on hotbird
- Adding external processing to the database
- BIT: Commercial Service Management The sequence of installation steps should be approximately as follows
- How to pass a polygraph? Polygraph questions. How to fool a polygraph. Lie detector: what is it, where and why is it used? Lie detector as it is also called
- Working with email: effective rules Rules for working with email
Advertising
| Useful things from the computer cooler. How to make a fan from a PC cooler? Features of blade geometry |
|
In this article I will tell you how to make an engine - a Bedini generator from a computer cooler. This device model is one of the lowest power, but at the same time it is very convenient to use, cheap and easy to manufacture. It is very convenient to conduct experiments with the model. It takes up very little space and is easy to maintain. I will tell you the best, in my opinion, way to make it. You will need: Transistor 2N3055 TO-3; Diode 1 N 4001 and 1 N 4007; Resistor 47 Ohm - 100 Ohm (I recommend 51 Ohm, 1W -2W); 1kΩ trim resistor (I recommend R-17N1-B1K, L15KC or 3296W-1-102LF potentiometer 1K(SP5-2VB)); computer cooler (I took JF0925S1H, fan 12V, 92x92x25mm), but in general it doesn’t matter what kind of stickers there will be on the cooler; terminals, crocodiles. You can buy all this at a radio store, electrician, or take it out of radio devices; I bought it at the Voltmaster store. I really liked the store, their prices are an order of magnitude lower than others. You also need a neon light bulb NE - 2. Pull it out of the starter to fluorescent lamp, a radiator (you can take a piece of aluminum, you can pull it out from some unnecessary radio equipment), a piece of plywood or organic glass 16.5mm * 15.5mm and other small fittings (single-core and stranded wires, bolts, nuts).
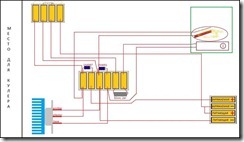
Here is the diagram to assemble:
Here is a visual diagram:
Now attach the transistor to the heatsink and the heatsink to the base.
The next step is to prepare the cooler. Remove the sticker, then the rubber plug on the back. Using a small screwdriver or tweezers, remove the cotter pin (circlip). Remove the blades.
You will see 4 coils attached to the chip with three legs. Grab the core of the coils with pliers and insert a small screwdriver into the space for the blade axle. Holding everything firmly by the core, hit the screwdriver with a hammer. The microcircuit with coils must separate from the entire structure.
Unsolder the coils from the microcircuit. The chip has 3 pins, you must insert a cutoff pin as the fourth pin. There are 2 wires soldered to one of the legs, unsolder one and solder it to the new leg so that there is one wire going to each leg.
Place the coil assembly back onto the axle, solder 4 different colored wires and lead them out.
If you don’t have an air conditioner or even a household fan at home, and the summer heat doesn’t allow you to live normally, you can use your wits and use old computer parts. Any craftsman can assemble a fan from a cooler, fortunately, the materials for construction are always at hand, and in every home or office you can fish out something useful from computer trash. Materials for useful craftsTo make this simple device with your own hands, you will need the following materials and tools:
There are coolers different sizes. Their design includes wires with which you can adjust the number of revolutions depending on the temperature central processor. In our case, these wires will not be needed - we will work only with the black (minus) and red (plus) wires, which receive voltage from the computer motherboard. The remaining wires can be cut off using wire cutters so that they do not interfere with assembly. We need to do this carefully so as not to damage the red and black cores we need. Operating procedure:
If you press too hard, cutting the insulation may damage the insulation of the wires underneath the outer layer of plastic you cut. Then you will have to bite off the entire braid and repeat the procedure due to the fact that a slight violation of the integrity of the insulation usually leads to a short circuit. Now that you have prepared the wires yourself, you can proceed to the next step.Soldering and insulating wires
run the tip along the twisted wires if they are treated with flux, or apply them to a piece of rosin and press a little with a hot tip.
This process is called tinning the wires or treating the contact points with hot tin with your own hands. Rosin is needed to help the tin bond better to the surface of the bare USB wire. Now you need to insulate the conductors so that a short circuit does not occur when connecting to the computer’s USB connector. So, unwind a piece of electrical tape about 3-5 cm long and pass it between the soldered wires. Wrap one wire so that the tin-coated contact area is reliably insulated and no pieces of bare conductor are visible through the layers of insulating tape. Next, you need to cut off another piece of electrical tape and do the same with the second wire.Stand
It's time to think about a stand for your DIY fan you just made. You will need a piece of copper or aluminum wire. Take a piece of wire and bend it into a “P” shape. Thread the ends into the bottom two bolt holes of the cooler. Bend the wire and thread the ends through the top holes. Now you can adjust the fan tilt level.You can make a whole battery of fans with your own hands. To assemble a fan from four or more coolers, you need to know how to properly connect them to the power source (USB connector of the computer), as well as how to connect these fans to each other. Connecting cablesFrom the school physics course we know that there are two types of connections - serial and parallel.
With the first type of connection, you need to take the red (positive) wire from the USB cable and connect it to the red wire of the first cooler, and connect the black wire of the first cooler to the red wire of the second cooler, and so on. The last one, black, connects to the core of the USB cable of the same color. Parallel connection is much simpler: all the red wires are assembled into one twist, just like the black ones. The red wires are connected to the red wire of the USB cable, and the black wires, respectively, to the black wire. To make the contact more reliable, you need to make tinning and wrap the contact points with electrical tape, as described above.Decor Now you need to think about the design of the fan unit that you made yourself. In order to assemble all the coolers together, you need to decide what shape the structure will be in. You might find it easier to fold them into a square or just line them up.
In any case, for these purposes you will need a glue gun, which is usually used to make DIY products in technical creativity or floristry circles. You can use it to glue the ribs of the coolers in the right places and let them cool. But if you don't have a gun and just have wire and tape, you can fasten the coolers through the bolt holes with wire and wrap the edges with black tape. So, you have managed to make sure that making a simple room air blower with your own hands is simple and accessible even to a person far from technical creativity. Such simple solutions can help out in a situation where you need to keep the room cool in windless weather, but a regular fan is either broken or simply not in the house. In these cases, simple ingenuity comes to the rescue. Home » Articles » Educational program for dummies: second life of a cooler from a damaged power supply (we find a use) odnoklassniki-obsori.ru noticed that your computer began to “freeze” strangely: that is, it works normally for a while, and then - bang!” - and a “dead” screenshot! Only restarting the system using the “Reset” button helps solve the situation, but not for long: after a restart, the problem with the “freeze” repeats. You remove the cover of the system unit and feel that it is very hot in the unit. And when you touch the heatsink on the processor with your finger, you feel real heat: the processor is simply burning! Here's the reason for the freeze: overheating! Having replaced the thermal paste and cleaned the system of dust and dirt, you start the system again, but looking at the virtual thermometer you understand that the problem with the temperature inside the system unit has only been partially solved. This means that soon the problem with the system freezing will again be relevant on your computer. Solution: increase system cooling. But as? Well, installing an additional cooler will help you here. And this is where a cooler made from a burnt-out power supply comes in handy. Here's what needs to be done. Open the failed power supply and remove the cooler from it. Attention: the cooler must be removed very carefully so as not to break the two wires - red and black. More precisely, they must be disconnected in such a way that they remain hanging on the cooler, and their length must remain the same. To do this, look carefully at these two wires that come out from under the cooler sticker and unsolder the opposite ends of these wires! How to make a fan with your own handsIn general, if you have at least a teaspoon of brains and at least one eye, you will understand and see everything. Let's assume that you have done everything and the result is in your hands: a cooler with two wires. Now it should be installed in the “system unit”. Question: where? Answer: wherever you want! The main thing is that the cooler performs its function, that is, blowing and blowing. So decide where to place it yourself. But where to connect the cooler so that it spins - I’ll explain that to you now. So, yes. Take a look at your new power supply: see if it has connectors that you connect to “CD/DVD”? Now look for two such connectors, which are also called “father” and “mother”. Appearance Such connectors have a white or black plug, with round holes (female) or pins (male). You need a "mom". Such plugs are available on any power supply! Now strip both cooler wires (about a centimeter) and connect like this: the black wire of the cooler to the black wire in the female plug, and the red wire to the yellow wire in the female plug! Don’t get confused: it’s yellow, not red! To keep the wires in their “sockets”, simply wrap them with a piece of electrical tape or adhesive tape. That's it: now start the system - your cooler is spinning and cooling the system. Hi all! Today I decided to talk a little about using an old system unit to build a new one, modern computer. Or rather, tell us why you shouldn’t do this. If, of course, the budget allows, and if the system unit is old, really old. Form factorTo begin with, about motherboard, old cases are not designed for modern motherboard standards and form factor. Yes, in principle, you can install a new motherboard in an old system unit. How to make a fan from a PC cooler?If, of course, its size allows it. But there can be problems with the fasteners, and the outputs on the rear panel may not always line up. So this needs to be checked. power unitNew cases, good ones, already have built-in power supplies. Yes, they are not always what we expect, but still, there are good ones. And it’s easier to immediately buy a system unit in Moscow or in another city of yours. Although the prices for such cases are completely different. And you can find a good system unit and power supply separately, not much different in price than 2 in 1. CoolersThe new cases have a much better thought out ventilation system (sorry for the tautology), since they are already designed for powerful modern devices. And this is one of the main reasons why you should use a new system unit.
Dimensions of video cards and coolersAnother disadvantage of old cases is that not all modern components can fit into them properly. This refers to the length of the video card and the dimensions of the coolers. PortsNew cases, accordingly, have new ports. And this is at least one USB 3.0 input. And many other useful and modern things. For example, dust filter, connector for quick installation HDD and others. So you shouldn’t save money, and when assembling a modern computer, also buy a system unit in Moscow or in another city, in good store. And it will definitely fit all your new components. Although it is also better to check this. These are the five arguments in favor of buying a new system unit, instead of using an old one with new filling. Although the final choice, as always, is yours. What you can make from disks with your own hands (crafts from cds and dvds)Hello my readers. Today I have prepared interesting material for you about... what can be made from disks who have served their time. Or, to put it another way, the topic of our meeting with you is cd crafts with your own hands. I myself have accumulated several thousand old laser discs, so I rummaged through the global web and found a bunch of interesting options for using them. Global crafts from CDsWhen I talk about global crafts, I mean their scale and the large number of CDs and DVDs needed to make them. How to make a Bedini charger from a computer coolerSo, one of the global uses of CD discs for crafts is cladding the facade of your home! Isn't it original? And also beautiful, creative, economical and simply interesting:
A smaller project is decorating the ceiling or walls of your apartment using old CDs. Another cool idea is to create curtains from disks. In this way, you can successfully replace some doors and curtains in your home with something like this hi-tech crafts from laser discs:
Useful household crafts from laser discsWhen talking about what you can make from laser discs with your own hands, you cannot ignore household crafts. Some interesting ideas I collected here. You can use an old laser disc as a stand for a mug of hot tea or coffee. You don't even have to do anything! You can make a napkin holder from a CD. Useful and original idea. Plus, it's quite easy to implement!
If you like to work at the computer at night, then you will need a lamp that is made of several laser disks, wires and LEDs. By the way, you can connect such a lamp via the USB connector of your computer or laptop. The brightness of the glow is determined by the brightness and number of LEDs used.
Continuing the theme of lamps, here is a photo of a night lamp, which basically consists of a whole stack of disks.
You can also note the rather interesting design of the lampshade made from laser disc boxes. Now I'm making one for myself.
You can also make a New Year's lamp from an ordinary electric garland and several laser discs. If the garland has several modes of operation, it will turn out great.
A watch with a dial made from CDs looks cool. We take the mechanism from a Chinese quartz watch or simply buy it at a hardware store. The design of the craft can be anything you want. For example, you can do beautiful watch in techno style. When hot summer days arrive, home cooling can become a problem. Not everyone has their own fan in their room. This is quite a serious problem, especially since summer has become hotter in recent years. Today we will tell you how to make a fan out of a cooler. In fact, there is one interesting method for getting out of a difficult situation. Almost every person in the house has a lot of spare computer parts that can be used for their intended purpose, or you can simply build something useful out of them. The fan from the cooler is optimal solution room airflow problems. A fan from a home PC cooler is the optimal solution to the problem of room airflow. Yes, its power is not so great, but for a small room it will be quite enough. Making a cooling fan, by the way, is extremely simple. To do this you will need some tools and materials. Tools and materialsTo work, you must have the following:
That's basically all you might need. These tools and materials can be replaced with others if a different type of wire connection technology is used. Return to contents
The cooler will create a flow of cold air that will bring coolness into the room. So, now we have everything we need to carry out the work. A cooler can have many various wires, because today computer elements are being made that have their own brain. There are wires here that serve to transmit information to the device, which allows, if necessary, to increase or decrease the speed of its rotation. These elements are not needed for operation. Only the red and black conductors should be left. They are the ones who supply power to the device. All other wires should be cut off using wire cutters. This must be done extremely carefully so as not to damage those that will be used in further work. Next is taken USB cable. It doesn’t matter whether it will be working or if it will be missing some of the wires, the most important thing is that the red and black wires are also present here. The rest should be cut off, although they may simply not be used, but for easier subsequent connection to the cooler, it is still better to remove them. This is also done using the most ordinary wire cutters. So, two cables are prepared, which means that you can safely move on to the next stage of work. It is worth remembering that the USB connector is used for power. A standard 220 Volt socket is inappropriate here, since the operating voltage of the cooler is standard for personal computer and completely coincides with the one issued by USB.
The most important thing in a USB cable is that there are red and black wires needed to make the fan. The next step is to strip the red and black wires. This can be done using the same wire cutters, or you can use an ordinary knife. Here everyone does the work in the way that seems most convenient to them. The stripped wires must be twisted to form a single wire. Next, each end should be tinned. To do this you will have to use a soldering iron, solder and flux. The device must be preheated. To do this, the soldering iron is plugged into a standard 220 Volt outlet. To fully heat it up, you should wait about 10 minutes, although in this situation everything directly depends on its power. The higher it is, the less time you will have to wait. When the soldering iron has warmed up, it should first be dipped into flux, which will create the necessary atmosphere for melting the solder. You can use the standard tin-lead version for such work, since you will have to solder ordinary copper. Rosin can be used as a flux, or acid can also be used. It all depends on what a person has in his home. Return to contents Continue the workflowNext comes the actual tinning; everything needs to be done extremely carefully. Molten metal is applied in a thin layer to the conductors. Moreover, all four wires that are to be connected are subjected to this procedure. Now you can safely connect all the conductors to each other. To do this, they are pressed against each other, and then warmed up using the same soldering iron. To make a connection, sometimes it is enough to hold the heated device on the wires for a few seconds. Now you need to check the strength of the connection. To do this, pull the soldered wires. If the soldering is good, then they will be tightly connected to each other. At this point the process can be considered complete.
Of course, you shouldn’t immediately insert the connector into the USB, because there is a high probability that something will happen short circuit. The conductors must be insulated. For these purposes, in most cases, ordinary electrical tape is suitable. It is best to wind it not in one, but in several layers at once. This will increase the protection level of the device. Now all that remains is to place the finished fan on the table, then insert the cord into the corresponding connector on system unit. Surely he will start blowing. In this case, of course, it will not have any adjustment of the rotation speed. For this purpose, additional devices must be included in the chain. For example, you can install a voltage regulator. This device will allow you to reduce the rotation speed of the cooler by changing the resistance.
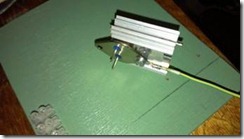
It often looks like a regular mechanical regulator. Of course, you can do without this option. This mini hood can be used for soldering work, wood burning, as a hood near an ashtray, etc.
First, let's make a hole in the distributor using a wood bit. box. I took a crown slightly smaller than the fan itself.
After this, we strip the ends of the wires of the power supply and cooler (the yellow one is ground, it is not needed) and connect them together in accordance with the color, insulating them with electrical tape.
We check the operation of the cooler and determine the suction side. Using glue, glue the moment cooler to the distributor. box so that the suction side is on the outside. |


Popular:
How to open APK and how to edit?
|
New
- Create a portrait from a font using Photoshop Portraits from letters
- History of the device
- How to reinstall a program on your computer How to reinstall a game without deleting it
- Selfish profile php mode
- Armenian satellite channels Armenian channels on hotbird
- Adding external processing to the database
- BIT: Commercial Service Management The sequence of installation steps should be approximately as follows
- How to pass a polygraph? Polygraph questions. How to fool a polygraph. Lie detector: what is it, where and why is it used? Lie detector as it is also called
- Working with email: effective rules Rules for working with email
- Learning Java What is the difference between jre and jdk


