Sections of the site
Editor's Choice:
- The best programs to remove ads, viruses and malware
- Smart defrag 5 activation key
- How to dial landline numbers
- How to connect and disconnect Internet XL tariff plan on MegaFon
- Switch from Beeline to MTS while saving the number
- Windows Photo Viewer can't open this image
- How to reduce the size of a pdf, detailed instructions
- Is it possible to change the battery in iPhone 4?
- The best programs to defragment your hard drive on Windows
- Selecting a receiver and acoustics (budget hi-fi) Floor-standing and bookshelf
Advertising
| DNS does not work on the computer. What is a DNS address and how to configure it |
|
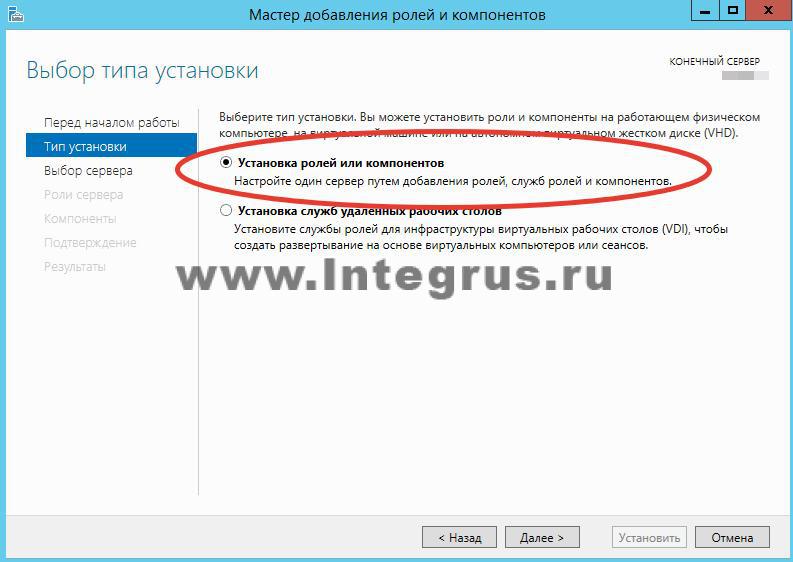
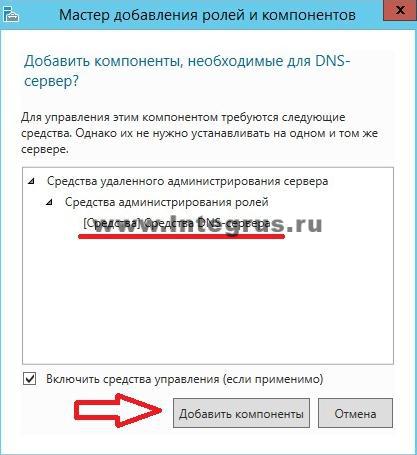
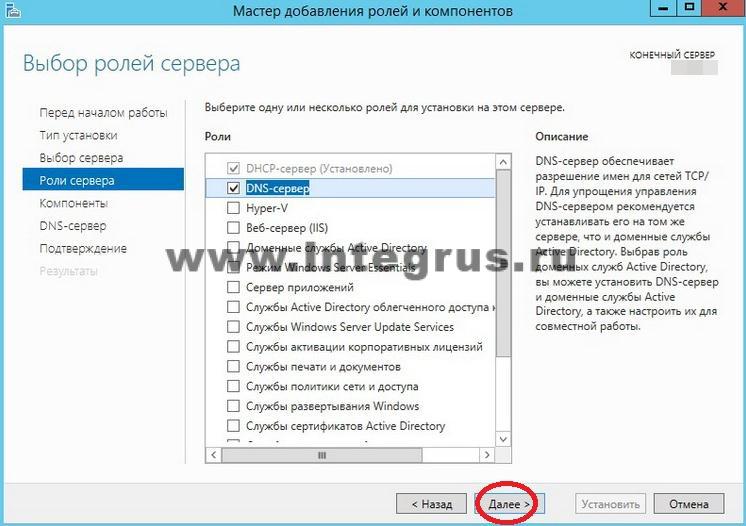
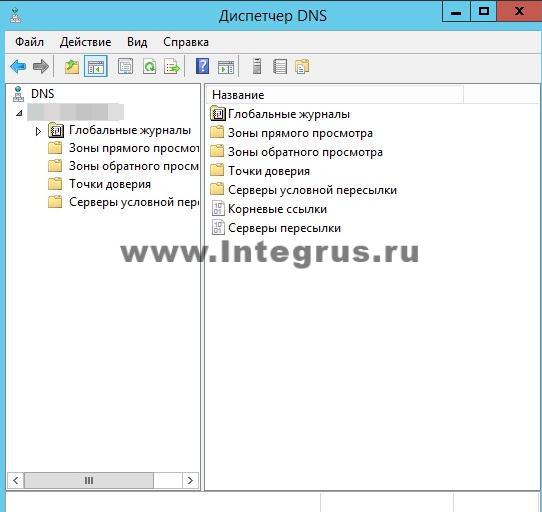
Do you want to quickly test your knowledge? system administrator? Ask him for his IP address public DNS Google. Any self-respecting system administrator will answer: “8.8.8.8”, and an advanced one will add “... and 8.8.4.4”. What's happenedDNS? DNS is an acronym for Domain Name System. Translated as a domain name system, it is a system that matches a domain name and a host’s IP address. So, knowing the host name, you can get its address and vice versa. What is it for? World Wide Web The Internet is designed in such a way that each device (computer, phone, tablet, router) has its own unique address(in fact, addresses may be repeated if we are talking about different LOCAL networks, but in this article we are talking about global network and we will not go into details of NAT, PAT and routing), and you can access this device only by knowing its address on the network. Working on the Internet, we access dozens of sites every day. It would be difficult to remember all their addresses, consisting of a sequence of numbers and dots, for example, what is easier to remember 77.222.61.? Of course, the second one. And the domain name system will remember the address for you. DNS is available on every computer, on every network and on every provider; in addition, it has a hierarchical form and in the case when the domain name system cannot determine the address of the requested resource by domain name, it forwards the request to the upstream DNS server. The request can be transmitted up to one of the 13 “world’s most important” root DNS servers. How to install a DNS server?The server can perform various functions, it can act as a global catalog, store file information, work with databases, and work with several users simultaneously. Depending on the purpose of the server, roles are installed on it - a special set of programs that allow the server to perform the necessary functions. How to install a roleDNS servers? We will perform the installation on Windows Server 2012 R2. Most often, the DNS server role is installed with a domain controller. But if during installation Active Directory If you unchecked the “DNS server” checkbox, or AD is simply not needed, then you only need to install the DNS server. To do this, go to Server Manager and click the “Add Roles and Features” button. The Add Roles and Features Wizard window opens. Read the wizard's introductory text and click Next. Make sure Install Roles and Features is selected and click Next. Select a server from the server pool. In our case there is only one server, you may have more. Select Role DNS Server. By checking the required box, we will see the “Add Roles and Components Wizard” window appear. These components are required to manage the installed role. If you are going to administer the DNS server from another server, you can skip adding these components. Back in the window with DNS Server checked, click Next, then Next, and Next again until the Install button becomes active. Click the "Install" button. The installation will begin. After the installation is complete (the installation will take less than 5 minutes), the following message will appear: “Installation completed on YourServerName.” You can click the “Close” button. Now a new line “DNS” will appear in the Server Monitoring Panel, as well as in the Start Menu. If you click on this line, the “DNS Manager” will launch. It looks like this.
There are currently no zones configured on the DNS server. Such a server is called a caching server. Zones are parts of the namespace for which the server is responsible. Forward lookup zones involve resolving a name to an IP address. A reverse lookup zone, on the other hand, matches an IP address to a name. Let's create a direct viewing zone and make it easy setup. To do this, right-click on the inscription “Forward viewing zones” and then “Create a new zone”.
The “New Zone Creation Wizard” window will open, click “Next”. The zone type selection window will open. If you have no other DNS server select “Main zone” and “Next”. In the next window you need to specify the zone name. It is recommended to use your domain. In our case, the name would be: . Click “Next”. In the next window, select the dynamic update type. It is recommended to allow dynamic updates, but only if DNS will be used exclusively in your local network. Otherwise, this item may entail security risks, which the “New Zone Wizard” will warn you about. Click “Next” and “Finish”. The direct viewing zone has been successfully created, let's carry out its simple configuration. Setting up a browsing zone is done by adding DNS records to the zone. There are several types of DNS records. Let's look at the main types:
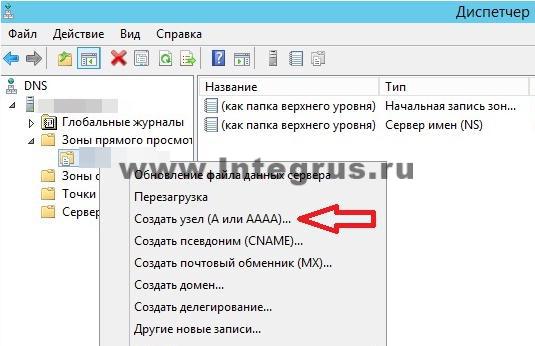
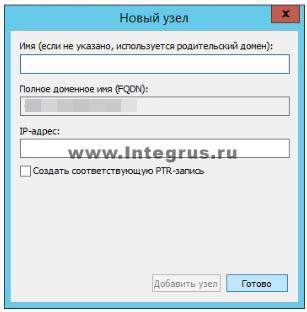
Let's create an A record for our new forward lookup zone. To do this, right-click on the zone and select the appropriate context menu item, as shown in the figure. In the “New Node” window that opens, enter the Node Name, for example GateWay, and its IP address, for example 192.168.0.1. Click the "Add Node" button. Ready! The entry has been successfully created! In this article, we tried to explain in the most understandable language to an ordinary person without deep IT knowledge what DNS is, how to install the DNS server role on Windows Server 2012, got acquainted with the main types of records and showed in pictures how these records are made. And if all of the above seemed difficult to you, then our specialists will set up a server for you in less than an hour. Very often, when responding to comments about solving some problem with the operation of the Internet connection, network cable, or Wi-Fi, I recommend checking the IP and DNS retrieval settings for a specific connection (wireless, or via local network). Since it is the incorrect settings for receiving IP and DNS address s very often become the cause of various errors and lack of Internet on the computer. In this article, I will write in detail (and I’ll show you in the screenshots), how to check the IP and DNS settings for the desired connection, how to set automatic receipt IP and how to set static addresses. I have already written about this more than once in different articles, but when this information is in a separate article, it will be better and more convenient. Also, I will show you how to do all this on a certain operating system Windows 8, Windows 7 and Windows XP. The differences there are not strong, but it is much easier to do something if the instructions are written specifically for your system. Why is there a problem connecting to the Internet if the IP and DNS are set incorrectly? Everything is very simple. For example, on a computer there are two connections, let’s say, two ways to connect to the Internet: via wi-fi - Wireless network connection , and via a network cable – LAN connection. If, for example, you do not have Wi-Fi on your computer, then there will only be a network connection, but this does not matter. So, for each connection, you can set the IP address, subnet mask, default gateway and DNS. Or, set the automatic receipt of these parameters. It is very important. The problem may be that, for example, some static IP address is set on your computer (doesn't matter for wireless adapter, or local network connections). For example, the settings remained from connecting directly to the provider, or to another network. But some static address is indicated there, maybe you yourself experimented with something, and it remained there. Let's say you installed a new Wi-Fi router and are trying to connect your PC or laptop to it. By cable or Wi-Fi. The computer, of course, tries to connect with that IP (and other parameters), which are specified in the connection properties. But the whole problem is that the router does not want to connect a computer with such static addresses, it wants to issue an IP automatically, which the computer, of course, does not accept. This is a conflict in the connection and operation of the Internet connection. The same problem can occur when connecting directly to your ISP. For example, the provider provides the IP and other parameters automatically, but you want to connect to it with a specific static IP address. There will be no connection, or there will be an error. In both the first and second cases, you just need to set automatic IP and DNS acquisition. Because Wi-Fi routers, as a rule, give out all addresses automatically. Downside: when you need to set IP and other addresses manually It may also be that, for example, the Wi-Fi router is disabled automatic distribution IP (DHCP server disabled). In this case, in the properties of a specific connection on the computer you need to set a specific, static IP address, gateway, mask and DNS. Or when the provider provides the Internet using Static IP technology. You just need to set specific addresses manually. You can do this using the tips you will find below. What errors can occur due to incorrect settings for obtaining an IP and DNS address? Errors can be very different. The most popular - " ". On Windows 8 and 8.1. (although there are a lot of other reasons). Also, it may arise. These problems can occur both when connecting via Wi-Fi and . If the DNS addresses are set incorrectly, or there are problems with automatically obtaining them, then there may be a problem with opening some sites and . In this case, you need to set automatic DNS acquisition, or specify static addresses (I wrote about this in the article linked above). Setting up IP and DNS on Windows 8 (8.1)Right-click on the network icon in the notification panel. Select. Next, in a new window, click on Change adapter settings. A window will open with available connections to the Internet.
In the new window you can set automatic receipt of addresses for this adapter (by highlighting the items Obtain an IP address automatically and Obtain a DNS server address automatically), or set addresses statically. After making changes, do not forget to apply the settings by clicking on the button Ok.
Instructions for Windows 7In Windows 7, everything is done exactly the same as on Windows 8. It would be possible not to write separately for the seven, but so be it. Right-click on the network icon, then select Network Control Center and shared access . Next, click on I Changing adapter settings, and again right-click on the adapter whose properties we want to change. Select from the menu Properties. Like this:
Setting up automatic obtaining (or setting static) IP and DNS on Windows XPPress Start and open Control Panel. Then, select Network and Internet connections.
As in the two systems that I wrote about above, we set the parameters we need for obtaining IP and DNS. Either receive automatically, or set static addresses and click Ok.
Some providers suffer from intermittent (or constant) DNS problems. For a home user, if it is not possible to change providers, the problem can be solved either by (ideologically incorrect) using other people's DNS servers (addresses can be found on the forums), or by launching your own DNS server, which is not as difficult as it might seem at first glance. A built-in DNS server exists in the server version of Windows, but thanks to the efforts of Microsoft marketers, it is not available in the desktop edition (Windows 2000/XP/Vista), so, as often happens, let’s turn to the generous world of Unix. The most famous DNS servers are BIND, djbdns, PowerDNS, MaraDNS and Unbound. There is no desire to consider BIND, djbdns, due to its features, is strictly tied to Unix, the Windows version of PowerDNS is not updated, so MaraDNS and Unbound remain. You can try one or the other, but keep in mind that they won't work at the same time. The manual will be in the style of a short HowTo for a trained user (more likely a system administrator), so if nothing is clear, call a computer geek you know. If you don’t really understand how DNS works, but really want to understand what we’re doing here (we’re running a DNS cache that can accept recursive queries and send iterative ones), you can read the chapter of the manual (in Russian). UnboundWe go to the website http://unbound.net/ in the Downloads section, find the lines: Windows 32-bit version compiled from the source.Installer: Using the link (at the time of writing - unbound_setup_1.3.0) we download the distribution kit. Launch the file, click “Next”, read the license agreement, if you agree, click “I Agree”, uncheck the “DLV - dlv.isc.org” box (we don’t need to check DNSSEC signatures), click “Next”, “Next” , “Install”, “Finish”. The service is automatically installed and starts. Everything you need to get started (including README.txt) is located in C:\Program Files\Unbound. MaraDNSLaunching MaraDNS under Windows, as it turns out, is quite a non-trivial task, so if you really want to, you can try it yourself. Windows setupSo, we have installed and launched the DNS server, we now need to configure Windows. In the properties of the Internet connection (“Start”, “Settings”, “Network connections”, the desired connection, context menu, “Properties”) on the “General” tab, open “Internet Protocol TCP/IP”, if the setting is “Obtain DNS server address automatically”, you need to change it to “Use the following DNS server addresses” and enter the address 127.0.0.1. If you have activated the “Use the following DNS server addresses” option and specified the addresses of the provider’s DNS servers, delete either both or one of them (after writing it down on a piece of paper) and enter the same 127.0.0.1. There is no need to specify the same address (127.0.0.1) twice. Click “OK”, “OK”, wait until everything is saved and try to open some site. Another verification method is for real admins. We go to the console, launch nslookup, then execute: > server 127.0.0.1 Default Server: localhost Address: 127.0.0.1 > www.mail.ru Server: localhost Address: 127.0.0.1 Non-authoritative answer: Name: www.mail.ru Addresses: 194.67.57.26, 194.67.57.126, 194.67.57.226, 194.67.57.20 > exitIn this case, we successfully resolved the (A-type) record for www.mail.ru. If that doesn’t work, check that you have an Internet connection by ping the provider’s gateway (you can find out via ipconfig /all). If connected, look in the Task Manager to ensure that the DNS server process is running. If it is not running, look at the “Services” snap-in (run services.msc in the console): try to start the service and check that it is running automatic start. If it doesn’t help, either read the documentation (DNS server), turn on the log and check your firewall and DNS server configuration file (although it should already be configured by default), or call someone more qualified, or delete the program and return settings back, and [sad | let's go for a walk | drink beer | ...]. However, theoretically there is nothing complicated in the described process, so it should work (like the author). Notes:
That's all, thanks for your attention. |


 If you need to change the settings for connecting via a network cable, then right-click on the adapter Ethernet. If to connect via Wi-Fi, then the connection
 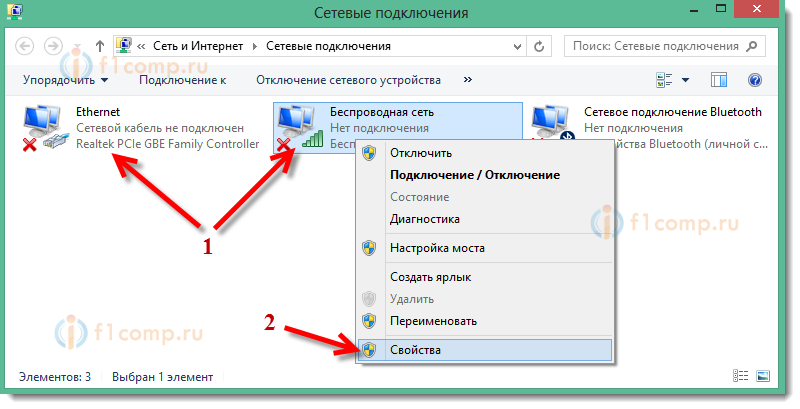 Next, select an item in the list and click on the button Properties.
 Restart your computer and try connecting to the Internet.
 Select the item Internet Protocol Version 4 (TCP/IPv4) and press the button Properties. We indicate the required IP and DNS, or set them to be received automatically, and click Ok.
 Everything is ready, as you can see, nothing complicated.
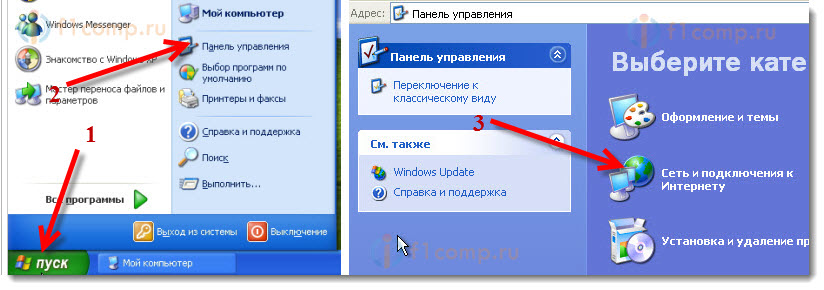 Next, select the item Network connections.
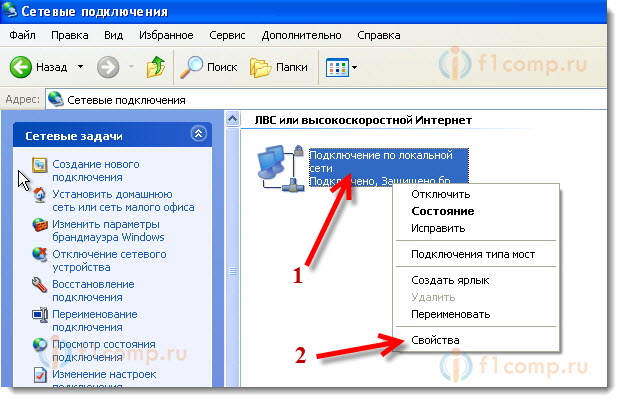 Select an item Internet Protocol (TCP/IP) and press the button Properties.
 That's it, the adapter parameters have been changed.
Popular:

New
- Smart defrag 5 activation key
- How to dial landline numbers
- How to connect and disconnect Internet XL tariff plan on MegaFon
- Switch from Beeline to MTS while saving the number
- Windows Photo Viewer can't open this image
- How to reduce the size of a pdf, detailed instructions
- Is it possible to change the battery in iPhone 4?
- The best programs to defragment your hard drive on Windows
- Selecting a receiver and acoustics (budget hi-fi) Floor-standing and bookshelf
- Cooler not working on laptop


