Sections of the site
Editor's Choice:
- Take your time buying DVB-T2 tuners
- QQ: register and set security questions Here is a short list of requirements for email marketing in China
- How to put VKontakte comments on WordPress
- VKontakte webcam: new features
- Add to favorites for all browsers Javascript add to favorites
- How to put music on a call
- Android update: how to update to a new version, rollback?
- What to do if Nokia Lumia does not turn on?
- Installing official firmware on Lenovo RocStar (A319) Lenovo flashing
- Review and testing of the Kingston HyperX Cloud II gaming headset
Advertising
| Restoring your computer to its previous settings. Restore old computer settings |
|
Due to the presence of viruses, driver or software mismatches, the OS may malfunction. If your Windows crashes, don’t rush to panic. The situation can be corrected by returning the state of files and programs to the moment when the PC was working properly. While running OS Windows 7, 10 or 8, certain errors and problems may occur. As a result of such failures, starting the operating system again in operating mode becomes impossible. In this case, it is not at all necessary to do a time-consuming reinstallation of the OS. All you need to do is perform a system restore. Recovering the OS using the recovery environmentWhen working we use the following scheme of actions:
There are several methods you can use to get your OS running again. Some of them rely on rolling back to saved settings. Others simply clear the data. You can “reanimate” the OS in one of the following ways:
Restoring the operating system using system “reanimation” checkpoints is one of the most affordable, effective and popular options. To apply it, you need to make a series of clicks:
With such an operation, problems with the computer will be corrected, changes will be canceled and the system will be returned to the operating state that allowed the PC to boot normally. There is no loss of data, files and documents with this type of recovery. All data is saved. The operation is reversible. You can roll back the system to a previous computer state and use a different restore point. Many people wonder how to make a recovery point on their own (manually) in order to choose it in the future? To do this in the same menu "Start" - "System Restore" You can create such a point yourself at any time convenient and suitable for you. It will be saved indicating the current date, which you just have to remember. From restore pointIn computer engineering there is such a thing as a recovery point. These are saved PC settings. As a rule, saving occurs automatically with each successful OS boot. The easiest way to restore Windows 7 is to use this data. Press F8 when your computer boots. This command will bring up a menu of system startup options. Next, you need to select the Last Known Good Configuration option. Another method can be used. Go to the properties of the My Computer folder. Find the line System Protection, clicking on which will open the dialog box of the same name. Click Recovery – Next. We set a target date, indicate the disks that need to be fixed, and confirm the actions. After rebooting, the PC should work normally. No restore pointsYou can fix problems with the OS even without restore points. To do this you will need to resort to the LiveCD program. You need to download it and burn it to a flash drive with the .iso extension. Before proceeding directly with the recovery, copy all the necessary files to a removable disk. The LiveCD program provides a special menu for these purposes. We will fix the system error using an archived copy. Connect the USB flash drive, open the Windows\System32\config\ folder. Files with the names default, sam, security, software, system must be moved to any other folder. In their place, transfer similar files from the RegBack folder and restart the computer.
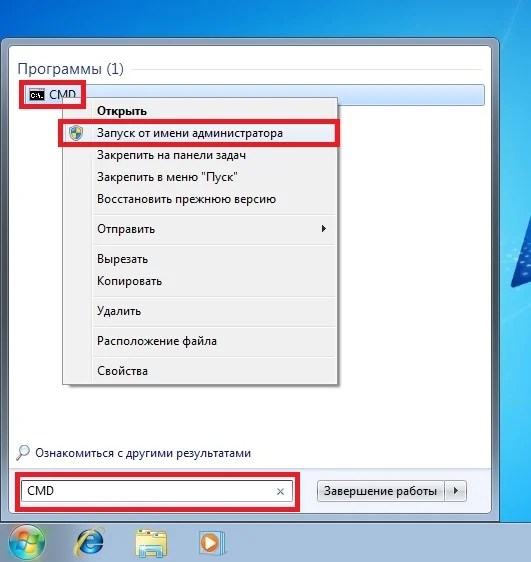
The described method will only help if the problem is related to the registry. Command lineYou can resort to “reanimating” Windows 7 from the command line if the PC begins to freeze or works slowly, however, the system still boots. Enter the menu "Start" and using the right mouse button, launch the command prompt as administrator. Run the rstrui.exe command, which will open the system restore program. Click "Further". In the next window, select the desired rollback point and click again "Further". Once the process is complete, the PC should work normally. There is another way to access the utility. Let's go to "Start". To open the command line, click "Run" and enter the CMD command. We click on the found CMD.exe file and wait for it to launch. Next, enter rstrui.exe in the command line and confirm the action with the Enter key on the keyboard. It is not always possible to play it safe and create OS restore points in advance. Problems may arise that block the option of such “reanimation” of the PC. Then you can use another, no less effective and easy option - restoring the Windows system using the system itself. We rely on the diagram:
Restoring Windows 7 using Safe ModeThis method is preferred if the usual system boot is impossible. Then after pressing the PC power button on the system unit, hold down the F8 key to call "Start Menu". One of the "Menu" options is "Safe mode". Select it and press Enter on the keyboard. As soon as Windows boots, we carry out the algorithm of actions that we described earlier.
System recovery Windows 8/8.1If you managed to start the OS, you can resume Windows 8 via "Options". Hover over the top right corner and enter them. Click on "Change computer settings" – . Chapter "Recovery" will offer several options:
Decide what exactly needs to be done. Next, follow the menu prompts. If you choose the latter method, in the window that opens, click on the diagnostics item. You will be offered the following options:
To resume Windows 8.1, press Win+R and call sysdm.cpl. In the system properties window in the tab "Protection" specify the required system drive. Click "Restore". Clicking "Further", you will be able to see a list of rollback points. Select the one you want and click "Search for affected programs". Changes that have been made to the PC since the selected moment will be deleted. Complete the process by clicking "Ready". If you work with Windows 8, problems may occur, the Internet may not work correctly, etc. To fix this, you can use the classic recovery method through restore points. Another option is a system rollback. To do this, open the menu "Start" - "Control Panel" - "Windows Update". Select an item "Removing updates". The same can be done using the command line. So, in the list of updates that opens, we delete those from the moment of installation of which (we look by date) problems and malfunctions began. We delete unnecessary files and reboot. You can perform a factory reset on Windows 8.1. Important files will not be affected during this operation. The method is effective, but to implement it, the OS needs to boot without problems. We use the algorithm:
If you cannot log into the system in the usual way, you must use the disk with the system. Load the installation disk, select "System Restore". Press the button "Diagnostics", And "Restore". If you have problems with Windows 10, press Windows + Pause. Go to "System protection" and press "Restore" – "Further". Select the desired indicator and click again "Further". When finished, click "Ready". The computer will automatically restart and the changes will take effect.
One of the advantages of the “ten” is the ability to return the settings to factory settings. This helps avoid having to install the system all over again. To reset your data go to "Computer Settings" – "Update and Security" – "Recovery" – "Return the computer to its original state". Click "Begin". You can take care of the possibility of a rollback in case of failure in advance. You can create resume points yourself or configure their automatic creation at the desired frequency. To do this, in the settings, in the Update and security item, select Backup service. Specify where to save copies, click Add disk. After selecting the device, the function will be activated. You can restore your Windows 10 system again by using restore points. In this case, the system will be rolled back to the moment when it loaded smoothly and worked without failures. This recovery method is described at the beginning of the article. If the OS does not boot, a warning table with a key appears on the screen "Additional recovery options". Click it and select "Diagnostics" - "System Restore". We select a Windows restore point, wait for the system to roll back and reboot. If such operations do not help and the computer continues to work incorrectly, you can roll back to the basic settings. Some programs and utilities, personal PC settings will be reset, and personal data will be deleted. This technique is used extremely rarely if the other options described above do not help. The algorithm of actions is as follows:
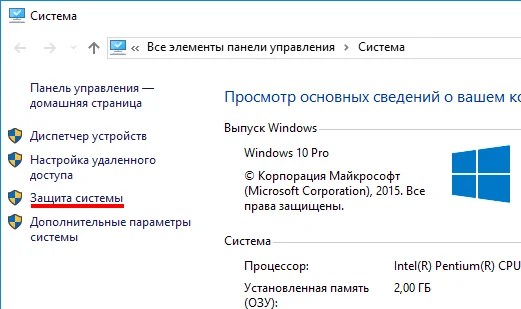
Recovering the system after this will take 40-90 minutes. Resuming using the installation discOne of the radical methods of fixing the error involves using an installation disk. After launching it in BIOS, click System Restore. In the Troubleshooting section, specify the desired action. Next, follow the system prompts to complete the process. Windows 10's new reset and file backup tools help out in many critical situations by preventing data loss, but they don't have the same power as Windows 10 System Restore, which reliably protected all your computer data in previous versions of Windows. Fortunately, Windows 10 still supports the Windows 10 System Restore feature, and if necessary, you can use it to protect any and all data on your computer, not just user files and settings. To return your computer to a point in time where it was stable and performing better than when it crashed, follow the instructions below. 1. Right-click the Start button and select System from the context menu. In the window that appears on the screen, go to the System Protection section (in the left panel). Finally, in the System Properties dialog box, click the Repair button. The System Restore dialog box will appear on the screen.
2. Click the Next button in the System Restore window. The next page of the window will present a list of available restore points.
3. Click one of the restore points provided. To display more recovery points, check the Show other recovery points option at the bottom of the window.
4. Click the "Search for Affected Programs" button to see how restoring the system to a specified point will affect installed programs. By carefully reviewing the information presented in the window, you will determine the programs that will need to be reinstalled after restoring the system. 5. To confirm the restore point, click the Next button. In the next window, click the Finish button. After a short reflection, the computer will return to the previous state in which it (hopefully) remained normal. If your computer is already working normally, then you can manually create an additional restore point, as described earlier. Give the recovery point a name that most accurately describes the state of the computer in it, for example, Before the neighbor arrived. Naming recovery points is a good practice to keep the data stored on your computer safe from any trouble. The operating system configuration is essentially the computer settings that can be damaged. This usually becomes possible due to the impact of software or through failures in the OS itself. In this case, there is a need to restore the computer to its original state. In practice, the situation with computer settings is mainly resolved by rolling back the system to a particular date associated with some event within the operation of the computer. This refers to so-called recovery points, which can be created either automatically or manually. Therefore, it is advisable to take care in advance to create a snapshot of the system at a certain moment when it had acceptable performance. In any case, the question is “how to restore computer settings?” is solved by choosing a different return point, which is achieved using the example of the “seven” as follows:
As a result of the above actions, you can restore your PC settings to the time when the system was working properly. System Restore: how to enable?Your computer's settings cannot be locked to a specific date if System Restore is disabled. To check the state of the PC within the framework of the proposed problem, it is necessary, using the example of the same “seven”:
Advice: if you decide to clean the registry, do not forget to create a restore point, since even in case of serious failures due to inept actions, you can use safe mode to log in, which is usually called by pressing the F8 key during boot start, to fix everything . pauk-info.ru Windows 7 System RestoreMost often, the function of restoring the computer to a working state is required if some program was installed and after that the system began to slow down. You should also restore the system to an earlier state if the computer was subject to a virus attack. In most cases, the computer is infected or littered with programs so much that the recovery operation can only be performed from safe mode. How to boot your computer in safe mode - when you turn on the computer, press F8 and select “safe mode” from the menu that appears. So, I will briefly describe the recovery procedure in the Windows 7 operating system. Right-click on the “computer” icon (desktop) and go to the last item “properties”. In the window that appears, select “system protection”.
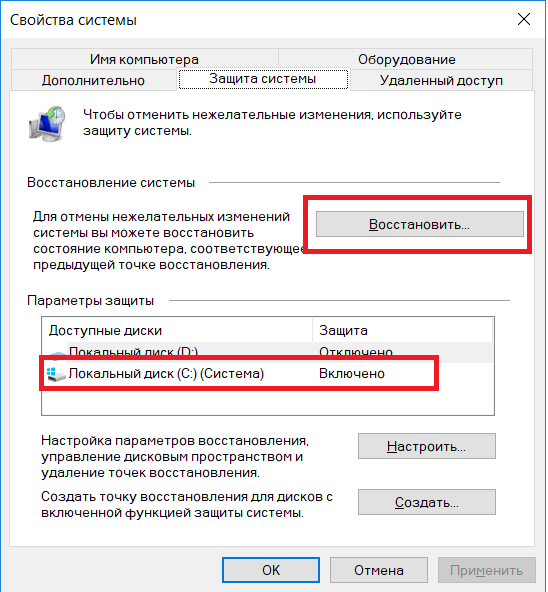
At this stage, we need to make sure that data recovery on drive C is enabled on your computer. If the function is enabled, proceed further by clicking on the “Recovery” button.
The System Restore window will appear. Here I recommend selecting “Select a different restore point.”
And here you are already estimating the approximate date when the computer began to slow down. Here, opposite the dates, it will be indicated which programs were installed, which will also greatly help you when choosing the working state of the system. Be sure to check the “show other restore points” checkbox to display all recorded restore points. Restoring the system to a working state
The next window is for informational purposes, check the selected date and click on the “Finish” button. Next, we confirm the start of the recovery operation.
We smoke for a few minutes, drink coffee, and don’t touch anything. After the system reboots, you will see a message indicating that the system was restored successfully. If you are still not satisfied with the state of your computer, try rolling back the system to an earlier date. Let me remind you that this action does not affect your files, such as photos, videos, etc. The restore only affects Windows system files, programs, and the registry. For advanced users, there is a more reliable and interesting option for creating a Windows backup and restoring the system, which requires the ability to work from the BIOS. webwulpix.ru Restore your Windows 10 computer to its previous stateWindows 10's new reset and file backup tools help out in many critical situations by preventing data loss, but they don't have the same power as Windows 10 System Restore, which reliably protected all your computer data in previous versions of Windows. Luckily, Windows 10 still supports Windows 10 System Restore, and you can use it to protect any and all data on your computer, not just user files and settings, if needed. To return your computer to a point in time where it was stable and performing better than when it crashed, follow the instructions below.
2. Click the Next button in the System Restore window. The next page of the window will present a list of available restore points.
3. Click one of the restore points provided. To display more recovery points, check the Show other recovery points option at the bottom of the window.
5. To confirm the restore point, click the Next button. In the next window, click the Finish button. After a short reflection, the computer will return to the previous state in which it (hopefully) remained normal. If your computer is already working fine, you can manually create an additional restore point, as described earlier. Give the recovery point a name that most accurately describes the state of the computer in it, for example, Before the neighbor arrived. Naming recovery points is a good practice to keep the data stored on your computer safe from any trouble. You can rollback your computer for many reasons, for example, you reinstalled the drivers, but they don’t work properly, or you installed a lot of programs and games, many of which were installed incorrectly, or you made an update after which the system didn’t work properly, or Windows simply won’t start. This can be done in different ways. Some methods by which you can roll back and restore the system are universal, and some are suitable specifically for a specific reason. How to roll back to a restore pointIf Windows does not start on your computer, then this method is not suitable, but it is suitable for rolling back the system to Windows after installing games or programs, after an unsuccessful experiment with the settings in the system, after an unsuccessful update or after removing drivers. A restore point is created automatically, usually after installing a program, but you can create a system restore point manually. To see all your restore points, you need to open them by simultaneously pressing two WIN+X keys on your keyboard. A context menu will open in which you need to select Control Panel. Using the Control Panel you can roll back your Windows 7 system In the Control Panel window that opens, enter the word in the search field recovery. After this you need to click on Recovery which appeared at the very top of the Control Panel.  By selecting this item you can roll back the Windows system. By selecting this item you can roll back the Windows system. In the next window there will be several items, and you need to click on the item Starting the recovery system to roll back your computer. If you need to create a restore point manually, then you need to click on the System Restore Settings item and in the next window click on the Create button located at the very bottom of the window. A new Restore system files and settings window will open in which you need to click Further.  Windows 10 rollback point Windows 10 rollback point In the next window, Restoring the computer to a previous state, to restore the computer retroactively, you need to check the box Show other restore points. Then click on the date when everything was fine with your computer and click Further. After this, perform a system rollback and after rebooting, the computer will return to the state of the selected date. How to roll back from WindowsThis method, like the previous one, is not suitable if Windows does not start. Using this method, you can roll back the system to factory settings with the loss of all data or partial loss of data. As in the first case, open the Control Panel and go to the Recovery window.  To open computer settings, click on the last line To open computer settings, click on the last line In this window you need to click on the item If your PC is having problems, you can restore it in PC Settings. After this, a window will open on your computer Computer settings on the tab Recovery.  Windows 8 system rollback Windows 8 system rollback There are three recovery options on this tab: System Restore via Command LineUsually they do a system restore if Windows stops starting on the computer. This method is also called system recovery via BIOS or system recovery via cmd. To start rolling back the system through the BIOS, you need to press the Start button on your computer and immediately hold down the F8 key on the keyboard, and when the boot menu appears, release it.  How to restore a computer via BIOS How to restore a computer via BIOS Next, to restore the system via bios, you need to select the item using the arrows on the keyboard Safe Mode with Command Line Support and press ENTER on your keyboard. A command line will open in which you need to enter %systemroot%\system32\restore\rstrui.exe and press the ENTER key on your keyboard. After this, the system rollback will begin in safe mode. When the system rollback is completed via the command line, you will need to restart the computer and it will start in normal mode. Very often a situation arises when a computer or laptop begins to work unstably after installing a particular program, or after being infected with a virus. In this case, a function that will return the computer’s state to a few days ago will be very useful, thereby undoing unwanted changes to the system. This Windows OS feature is called System Restore. We will tell you how it works and how to use it in this article. Restoring Windows to a previous stateThis option is really very useful. You can always use it after the computer becomes unstable after making certain changes, such as, for example, installing a program or updating a driver. But there are two conditions that must be met to successfully use Windows System Restore:
In order to check whether the recovery option is activated on your computer, you need to do the following: Right-click on the “Computer” icon on the desktop or in the “Start” menu and select “Properties” from the menu that opens.
System protection In the window that opens, opposite drive C should be “Enabled”. This means that recovery on the system disk is activated.
Checking the activation of the recovery function As already written above, the second point is to have a restore point, the date of which suits you. Well, let's say you want to roll back to the state of the computer that was yesterday, and the closest point is only a week ago. In this case, you must understand that if you use this restore point, then everything that has happened to the computer over the last week (installation of programs, configuration of services) will be canceled. To view the list of available recovery points, you need to click the “Restore” button in the same “System Protection” window.
If there is a point in this list that suits you by date, then to restore the computer to this date you need to select the point in the list with a single left click of the mouse and click “Next”, agreeing with all the suggestions of the recovery specialist.
Selecting a restore point After this, the computer will restart and return to those few days ago. |


 1. Right-click the Start button and select System from the context menu. In the window that appears on the screen, go to the System Protection section (in the left panel). Finally, in the System Properties dialog box, click the Repair button. The System Restore dialog box will appear on the screen.

 4. Click the "Search for Affected Programs" button to see how restoring the system to a specified point will affect installed programs. By carefully reviewing the information presented in the window, you will determine the programs that will need to be reinstalled after restoring the system.
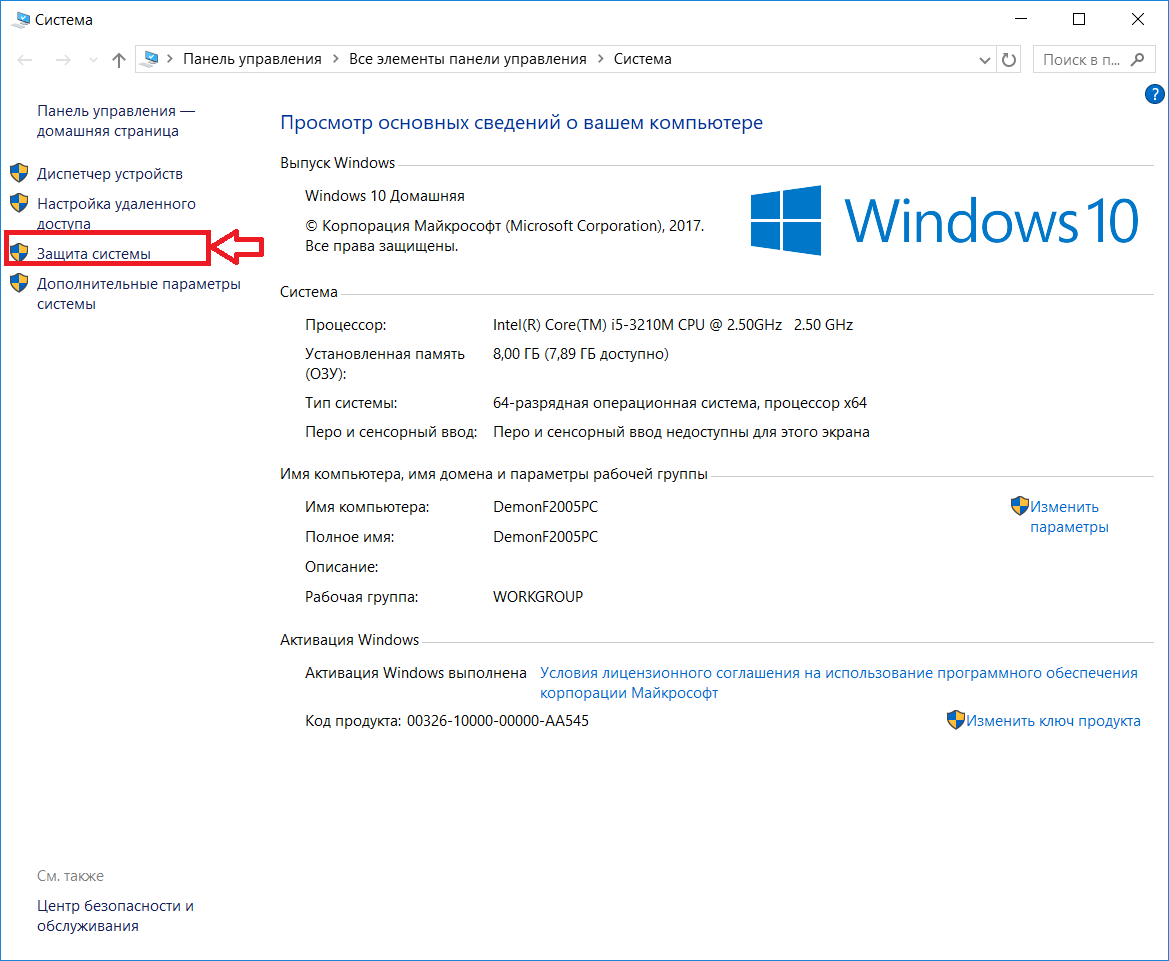


New
- QQ: register and set security questions Here is a short list of requirements for email marketing in China
- How to put VKontakte comments on WordPress
- VKontakte webcam: new features
- Add to favorites for all browsers Javascript add to favorites
- How to put music on a call
- Android update: how to update to a new version, rollback?
- What to do if Nokia Lumia does not turn on?
- Installing official firmware on Lenovo RocStar (A319) Lenovo flashing
- Review and testing of the Kingston HyperX Cloud II gaming headset
- Free iPhone IMEI check


