Sections of the site
Editor's Choice:
- Outputting part of an image html sprite
- Setting up additional details and additional information for 1c nomenclature additional details and information differences
- What to do when there is no registration data
- Request for data selection (formulas) in MS EXCEL Excel selection by condition macro
- Temporary temporary one-time email Temp Email, mail sites, social media registration
- What to do if the computer does not see the phone via the USB port
- How to install Windows on Mac?
- Asus rt n16 setup firmware
- How to find out the bitness of the operating system and processor in Windows
- How to turn off the Windows Firewall: complete deactivation and disabling for individual programs How to completely disable the Windows 7 firewall
Advertising
| How to make a full backup of Android. Backup on Android and data recovery on Android How to backup an Android system |
|
Many users of Android devices know that experiments with firmware, installation of various add-ons and fixes quite often lead to the device not working, which can only be corrected by installing the system completely, and this process involves completely clearing the memory of all information. In the event that the user has taken care of creating backup copy important data, or even better, a full system backup; restoring the device to the “as it was before...” state will take a matter of minutes. There are many ways to make a backup copy of certain user information or a complete system backup. What is the difference between these concepts and for which devices is it advisable to use one or another method will be discussed below. A backup copy of personal information means saving data and content generated by the user during the operation of the Android device. Such information may include a list installed applications, photos taken by the device’s camera or received from other users, contacts, notes, music and video files, browser bookmarks, etc. One of the most reliable, and most importantly simple ways To save personal data contained in the Android device is to synchronize data from the device’s memory with cloud storage.
Full system backupThe above methods and similar actions allow you to save the most valuable information. But when flashing devices, not only contacts, photos, etc. are often lost, because manipulation of device memory sections involves clearing them of absolutely all data. To reserve the opportunity to return to the previous state of software and data, you only need a full backup of the system, i.e., a copy of all or certain sections of the device’s memory. In other words, it creates full clone or a copy of the software part into special files with the ability to restore the device to its previous state later. This will require the user to have certain tools and knowledge, but can guarantee complete safety of absolutely all information. Where to store the backup? When it comes to long-term storage, in the best possible way there will be use of cloud storage. When saving information using the methods described below, it is advisable to use a memory card installed in the device. If it is not available, you can save backup files to the internal memory of the device, but in this case it is recommended to immediately copy the backup files to a more reliable location, such as a PC drive, immediately after creation. Method 1: TWRP RecoveryFrom the user's point of view, the simplest method of creating a backup is to use a modified recovery environment for this purpose - custom recovery. The most functional among such solutions is TWRP Recovery. 
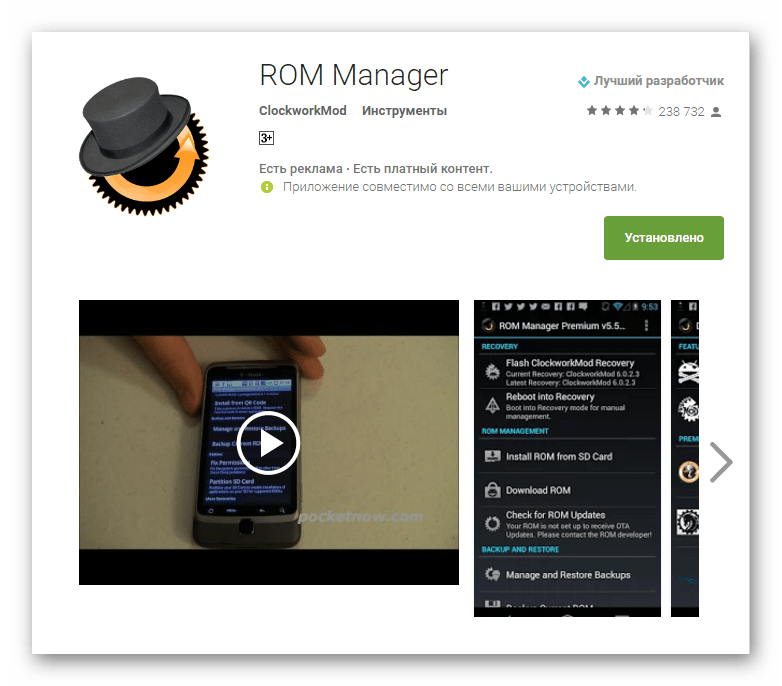
Method 2: CWM Recovery + Android ROM Manager AppAs in the previous method, when creating a backup of the Android firmware, a modified recovery environment will be used, only from a different developer - the ClockworkMod - CWM Recovery team. In general, the method is similar to using TWRP and provides no less functional results - i.e. firmware backup files. At the same time, CWM Recovery does not have the capabilities that many users need to manage the process of creating a backup; for example, it is impossible to select individual partitions for creating a backup. But the developers offer their users a good Android application, ROM Manager, using the functions of which you can start creating a backup directly from the operating system.

Method 3: Titanium Backup Android AppTitanium Backup is a very powerful, yet quite easy-to-use tool for creating system backups. Using the tool, you can save all installed applications and their data, as well as user information, including contacts, call logs, sms, mms, WI-FI hotspots and more.
The advantages include the ability to widely customize parameters. For example, you can select applications whose data will be saved. To create a full-fledged Titanium Backup, you must provide root rights, that is, for those devices on which Superuser rights have not been obtained, the method is not applicable.
It is highly advisable to take care in advance of a safe place to store the backups you create. Inner memory smartphone cannot be considered as such, it is recommended to use a PC disk to store backups, cloud storage or, as a last resort, a MicroSD card of the device.
Additionally In addition to the usual copying of the backup folder created with Titanium Backup to a safe place, in order to be safe from data loss, you can configure the tool so that copies are created immediately on a MicroSD card. 
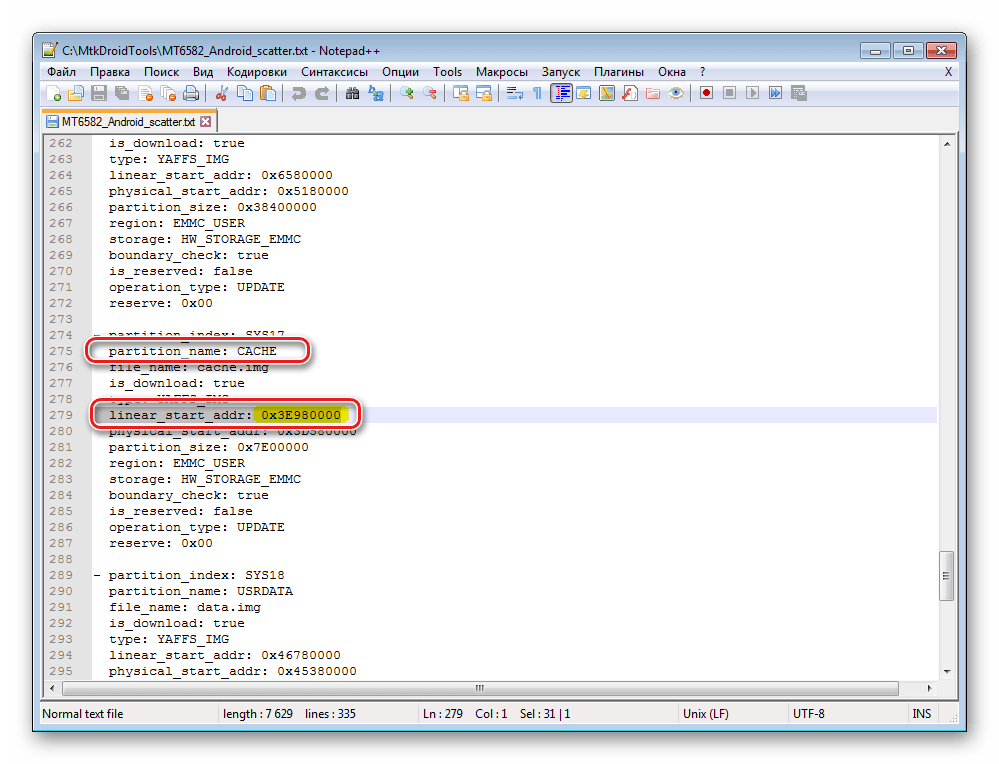
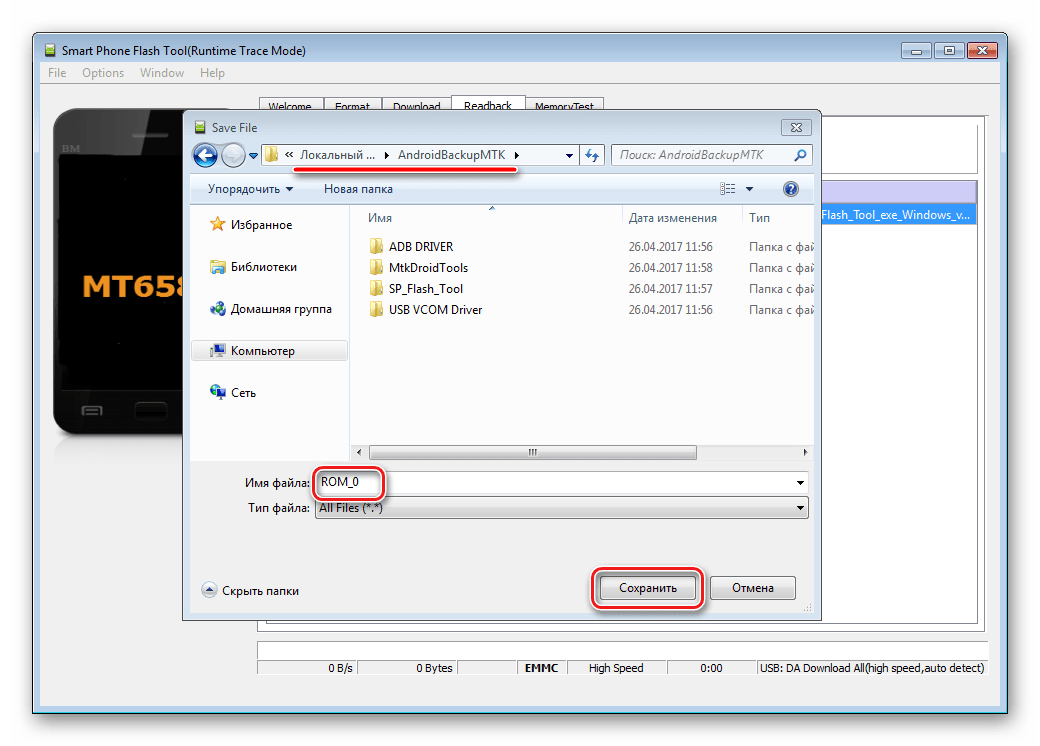
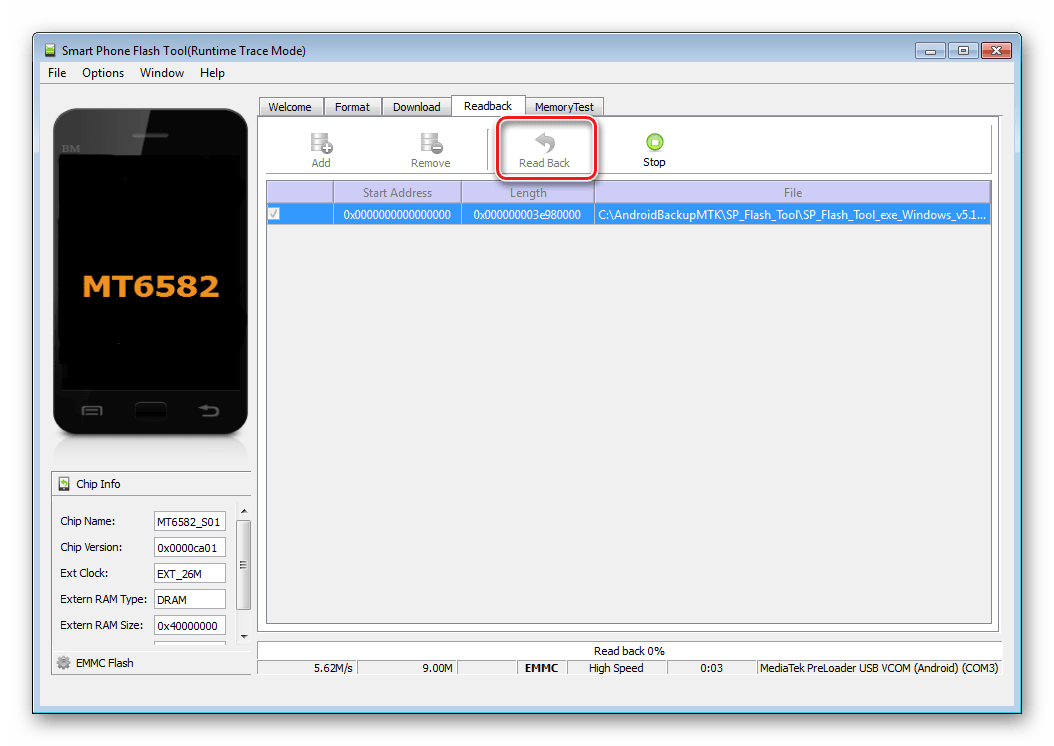
Method 4: SP FlashTool+MTK DroidToolsUsing the SP FlashTool and MTK DroidTools applications is one of the most functional ways that allows you to create a truly complete backup of all memory sections of your Android device. Another advantage of this method is that it is not necessary to have root rights on the device. The method is applicable only for devices built on the Mediatek hardware platform, with the exception of 64-bit processors.
And choose the path to save the scatter.
Method 5: System backup using ADBIf it is impossible to use other methods or for other reasons, to create a complete copy of the memory partitions of almost any Android device, you can use the OS developer tools - the Android SDK component - Android Debug Bridge (ADB). In general, ADB provides all the possibilities for carrying out the procedure; only root rights on the device are required. It should be noted that the method in question is quite labor-intensive and also requires a fairly high level of knowledge from the user. console commands adb. To facilitate the process and automate the entry of commands, you can turn to the wonderful shell application ADB Run, this automates the process of entering commands and saves a lot of time.
For quick recovery lost data on your smartphone, you need to know what a backup is and how to create it on Android. With its help you will quickly return everything deleted files, restore game and program settings, as well as IMEI, identification numbers, passwords and all other information contained on the device. DefinitionBackup is an archived backup copy of your phone or computer files. A backup can be created on any operating system. Its purpose is to save all user data and configure the system at the time the archive was created. After resetting to factory settings or forcefully restoring the system using a backup, you can quickly return all lost data and avoid wasting time on reinstallation programs and OS configuration. A copy of the data is created using special programs. The most popular utilities:
Types of backups in AndroidIn Android OS, users can create a backup copy of the entire system or its individual components:
Why is it important to create Backups periodically?Backup allows you to get rid of the problems associated with sudden loss of data on your smartphone. Periodically creating a backup will allow you to save all operating system settings, as well as messages and multimedia files. If errors occur that require you to reset your phone, you can easily return all deleted information. In the Android OS, a backup can be created using the built-in system options or using special programs. In what cases should you make a backup? 1. Before updating the firmware. It doesn't matter whether you download a new version of Android over the air or install updates manually, create a copy of the installed OS. We recommend moving all photos, videos and music to a memory card or uploading this data to cloud storage; 2. Before resetting. Over time, smartphone users may experience a decrease in the performance of their gadget. This is due to the load random access memory, viruses. The easiest way to restore devices is to reset the OS to factory settings. Before doing this, it is better to create a backup of your phone book and SMS so as not to lose important data; 3. To reset the lock password. If you have set a password, graphic key or PIN code and forgot it, you can reset it without losing data by using a backup. The only requirement is that an archive with a copy of the data must be created before setting the password. Also, periodically creating a backup phone book will allow you to quickly return lost numbers in the event of a SIM card error or after clearing the memory card. What is needed to create a copy?To create a backup in Android OS in the standard way, you will need:
Another way to create a backup is to use third-party programs that do not require superuser rights. They allow you to back up only basic OS data. For example, a phone book, messages, accounts linked to the OS. Creating and restoring a copy can be done using one program that must be installed on your smartphone. Backup programsAfter flashing your gadget, you get an absolutely “clean” software shell. No programs, accounts or their settings previous version You will not be able to return the OS if you did not take care of creating a backup copy in advance. Many users prefer to install applications from scratch. However, it is much easier to use a backup and return all application settings using one archive. Restoring previous settings does not affect the operation of the OS in any way and does not cause bugs or errors. Backup programs will be relevant for those applications that are not in the official PlayMarket. Titanium Backup and Helium are two of the most popular programs for working with backup copies of applications in Android OS of any version. To get started with each of these utilities, you will need superuser rights. To create a backup of one installed program or several types of software at once, use the instructions for one of the following utilities. Titanium BackupThe utility has more than 5 million official downloads on the Play Market. The application not only allows you to restore operating system data, but also works with manufacturer-installed software, removes components and settings that a regular user cannot remove using the standard settings window. Main features of Titanium Backup:
Convenient transfer of settings from one gadget to another is the most useful feature Titanium Backup. If it happens that your smartphone breaks down or you lose it, thanks to a backup you can easily restore all contacts and messages in popular instant messengers and transfer the information to another device. You don't need an old SIM card to transfer data. All you need is a second gadget, a backup archive and the Titanium Backup utility. All backups created in the program are automatically synchronized with one of your cloud storages:
To move program data to a second gadget or restore settings after a factory reset, reinstall Whatsapp messenger and Titanium Backup. Open the recovery tool and sync the utility with the cloud. In the list of all programs installed on your smartphone, select the desired messenger, click on it and in the options menu click on “Restore”. Titanium Backup will automatically create the required backup copy in the cloud and return all lost files to the program. You will be able to use all your contacts again and access lost chats. In the same way, you can transfer data from any other program to a second gadget. Most often, the application backup function is useful for transferring messenger data and saving progress in games. HeliumHelium is another simple and useful utility for quickly restoring your device. The software works on all devices, regardless of whether you have superuser rights. The only requirement is synchronization with the cloud. The utility does not save backups to a memory card or external drive. Helium features: 1. Synchronization of applications on several devices; 2. System backup; 3. Convenient file explorer; 4. Uninstalling programs and rolling back their updates. To create a backup copy of the installed program data, follow the instructions:
To restore information from a copy using Helium, open the utility on another device. In the settings, activate the “Synchronization with the cloud” item. Next, in the main program window, go to the “Recovery and Synchronization” tab. Select the program whose data you want to return and click on “Restore”. To create any other type of backup, go to the “Browse” tab and select one of the backup options.
Saving IMEIIMEI is the international numeric identifier for your device. Using this set of numbers, you can find out the manufacturer of the gadget, its model and status. Phones and tablets without IMEI are considered stolen and are unofficially prohibited for use in the CIS. As a result of resetting settings or software errors, the IMEI identifier may be lost. However, you can restore it using a backup copy. Signs of a lost IMEI:
You can restore the ID only with superuser rights. To return the IMEI, you will need to install the Android Terminal Emulator console emulator utility (if your phone does not see the network, download the installation APK to your computer, and then move the file to your phone using a USB connection). Follow the instructions:
After successfully completing all commands, exit the emulator window, restart your smartphone and check the operation cellular network, geolocation and Internet connection. Everything should work fine. If desired, you can check the presence of IMEI using the engineering menu. Backup photos and videosAs a result of your smartphone being stolen or reset to factory settings, the most unpleasant thing is the loss of photos, videos, music and other personal data. All programs can be reinstalled, but it is almost impossible to return personal information without premature preparation. Even if you are sure that nothing will happen to your gadget, we recommend that you set up at least one of the methods described below for saving your multimedia data. Using the Google+ appThe standard application from Google is pre-installed on all devices with Android OS. The purpose of Google+ is to combine and synchronize all Google services in one account. If you have Google Drive cloud storage installed on your device and Google app+ - this does not mean that file synchronization is configured. The point is that in mobile version Google Drive cannot be configured to sync a specific folder. Users can only activate through the smartphone settings automatic sending all photos taken with the gadget’s camera. Follow the instructions to sync any folder on your smartphone with One Drive and automatically send copies of files to the cloud: 1. Install the FolderSync application on your smartphone or update it to a new version if the utility is already on your smartphone. The utility allows you to select any folder in the smartphone’s memory and configure its synchronization with the cloud (link to the Play Market page :); 2. Further, for devices with Android0 OS and higher, it is not necessary to allow access to all folders and files on the smartphone. To do this, simply open the FolderSync program immediately after the first installation and in the pop-up window, click on the “Allow” button; 3. To set up automatic backup of photos, videos and other files in the main FolderSync window, click on the “Create New Sync” button; 4. Then the built-in assistant window will open. In it you need to enter a name for the created “folder-cloud storage” pair; 6. In the horse that appears, select cloud service OneDrive or other site with which you want to set up a link; 8. To confirm the action and save the settings, click on “Authenticate Account”; All user data is added to the repository. No matter what happens to your phone, you can always get your photos back using any computer or browser. At the directory selection stage, you will be asked to configure one of the following options for connecting to cloud storage:
In the connection settings, you can select a schedule according to which synchronization will occur. We recommend sending data to the cloud every day. In case of an error or breakdown of the phone, all important files will be backed up. other methodsIn addition to Google Drive storage, you can also choose any of the following services:
All of these cloud storage services have client apps in the store Google Play and the ability to synchronize phone data with the server through the usual program settings. We create a backup of any filesIn addition to the options described above for creating a backup of photos, music, videos, users can download the following programs to their smartphone to work with backup copies of documents of any format:
DataSyncThe application works in a similar way to FolderSync discussed above and allows you to create a backup of any information that is stored in the internal or external memory of the device (with the exception of installed programs And system settings). Also, DataSync allows you to configure sending a backup from one device to another via a Bluetooth connection, which is convenient in moments when you need to save important information but there is no Internet connection. Thanks to the two-way synchronization option, two gadgets will be able to exchange game data. This way, all missions and progress will be saved on both devices at once. DropSyncDropSync is another popular utility for sending backups. Its peculiarity is additional monitoring of the phone’s performance. If the smartphone has low battery, the application will not sync data, so as not to reduce the operating time of the device. Users can select the synchronization type:
Backup for all data and settingsNAND (or Nandroid Backup) is a concept that is used in the Android OS to refer to a complete backup of the firmware installed on a smartphone, including all system data and its settings. The backup also includes all installed programs. The full backup function is supported by recovery menus such as TWRP or CWM. TWRP is an advanced recovery menu that is installed on the phone by the user, and CWM is an alternative recovery menu. Firmware with one of two types of recovery is installed in the system partition of the smartphone’s memory, after which you can create a backup of absolutely all data. After recovery, you will be able to use all lost programs, contacts and files again. Also, a backup created in CWM or TWRP can be installed on any other Android device if it supports working with the created firmware version. Nandroid Backup Online Nandroid ManagerTo create a complete backup copy of the device's software shell, you need to download and install the Nandroid Manager program The utility allows you to create a quick standard (copying all data) or custom backup of the system (the user selects what needs to be saved) without going into the recovery menu. In the application settings you can select the following backup options:
The Nandroid Manager utility synchronizes the created backup archive with the cloud, FTP server. Users have access to the function of creating a schedule for updating a backup copy. To save battery power, we recommend that you configure the downloading of a new version of the backup only during the period when the gadget is charging. Notice! Uploading a full backup of the operating system via Nandroid Manager can affect the performance of the gadget. Backup with ADBADB is a debugging bridge for Android OS. In simple words, using ADB you can create a system backup by connecting your smartphone to your computer. ADB is a console application in which the user enters system programs performed on the phone. ADB Features:
To get started, download and install the ADB Run utility on your computer. Launch the folder that appeared on your computer desktop as a result of installing ADB Run. Connect your phone to your PC and in the ADB Run program folder create Text Document devices.cmd (the file must be a standard notepad object or any other text editor. Immediately after creation, rename the TXT format to CMD). Open devices.cmd and write the following commands in the file:
After the text about the successful completion of the operation appears, enter a new command to create a backup of the current firmware state: adb create backup [-l] [-r] The backup copy will be saved in root folder ADB Run utility on your computer. You can move it to any other folder or cloud. Super Backup application - creating a copy without ROOTTo create a backup copy of your smartphone data, you can use third party programs, which without superuser rights are able to set up a backup of selected information. Super Backup is one such application. His main feature– wide functionality. The user can create copies of the following types of information: 1. Applications; 3. Call log; 4. Calendar; 5. Bookmarks; 6. Phone book contacts. To start working with the program, select the desired type of data to be backed up. Next, select cloud storage, enter the name of the archive containing the copy and wait until the copying process is completed. To restore information, re-launch the program and go to the “Recovery” section. Next, go to the cloud memory and select the desired archive. ConclusionTo ensure you never lose important data on your smartphone, follow these backup tips:
Thematic videos:
Nothing lasts forever, and, oddly enough, including various mobile gadgets and devices. Have you ever encountered a situation where your phone ended up in the hands of third parties (simple theft) or was simply smashed at speed or from the roof of a building? In 50% of cases, the data can be recovered, because the SD card remains intact or the phone’s memory is not damaged, but you have to pay huge sums of money (from 1000 to 10,000) to restore information in various service centers, and no one guarantees you a 100% return of data. What to do in this case? Any user, ahead of events, can predict such a situation and make a backup copy of the data in advance. Even if time passes between the last backup and the loss of access to the phone, the percentage of lost information will be kept to a minimum. We will tell you how to make a backup copy of Android, what methods are provided for this and how often such operations need to be performed. Why do you need a backup and what tools to use?Backup involves creating a copy of certain information on any device or system. This material is about the Android operating system, which is installed on smartphones and tablets. The copy can store not only data from SMS messages or contacts, calendars, but also all applications and programs installed on the phone. To make a backup copy, you must first decide what exactly you need to save. For Android, there are a huge number of methods, each of which allows you to backup data without any problems. In this article we will describe the main ones and indicate which data is most suitable for working with which method. Backup contacts, SMS, calendars in AndroidLet's say that you need to make copies of only contacts or along with them also a standard text information, such as calendars, call logs, etc. The following methods are suitable for this:
We described the process of synchronizing contacts in the article -. Any user can work with the programs listed above without any problems. IN Google service Play they are provided free of charge. The described method is suitable for those people who need to make a backup without applications and games! Full backup of data in Android - popular methodsIf you decide to do full copy information on your device, including applications and games, you can use standard means operating system or install an additional program that will create a backup of your data with the specified parameters in a few minutes. Here is the main list of tools for work:
Creating an Android backup through system settings
Creating a backup via recovery modeIn the article "" we told you how to switch to recovery mode on most devices (combination Home keys, volume up, volume down). Look at the material and basic combinations, go to this mode.
Backing up applications with Titanium Backup
The program is provided in two versions: free and paid (from 247 rubles), however for standard operations The first option will be sufficient. All files are saved into a single file zip format, which can be transferred to another device or saved to a USB drive. To make a copy, follow these steps:
This was the process of creating copies specifically for applications! To restore them in the future, you will also need Titanium Backup. Only this time you will have to select a full or partial list of applications by checking the boxes and clicking the “Restore” button. Recovery is available in several modes:
Creating a complete copy of data in Titanium Backup (paid version)
After purchasing the paid version, you will have an additional item to manage all processes. Believe me, the price of 247 rubles is a minimal loss for you if the information is really important. Creating a copy of Android in the Safe Backup program
To restore a previously created backup, you will need to click the “Restore” button and specify the file version. conclusionsThis is not a complete list possible ways creating a copy of Android, but they will be fully enough to save at least 90% of the important information. And one more important tip! All apps are saved to your Google Play account. If the data (settings, progress in games) is not important to you, then you don’t need to create copies. It will be enough to go to the Play Store and restore previously downloaded programs and games. All authorization data will have to be entered again. Modern smartphones store a huge amount of necessary and important information, and each user customizes the phone individually. And so, when switching to a new device, the Android owner is faced with a situation where the operating system needs to be configured again. The ideal solution here is deep or partial backup . But not everyone knows how to make a full Android backup quickly and safely using a tablet or phone without losing important data. How to backup individual applications on Android
This tool can be freely downloaded from . It works on two “bases”: either provision and all frauds are carried out only on a smartphone, or access to a PC if you do not have “Superuser” mode.
She can:
The paid premium version has more advanced functionality, but if you only need to save, for example, games, the free version will be enough. The application works perfectly on the latest versions of the operating system, mainly Android 7.0, 7.1 and 8.0. Now let’s look at what actions we will perform in it:
Backup via system option (No Root)
The easiest and most comfortable option, suitable for beginners and simply users who did not want to waste their time. Opening "Settings", go to point "System" – "Backup", in the location we select Google Drive. Made. The following information will be saved:
Root rights are not required; their presence does not affect the quality of the backup in any way. Unfortunately, failures during the backup process are possible, which is why many users complain about the insufficient amount of stored information. And on some devices it’s like this system function refuses to work at all, this may affect phones with operating system below Android 6.0. Backup Android using FlashTool (No Root)
This is a more serious and difficult procedure that allows you to back up the entire firmware. There will be many stages, and for users who are not confident in their abilities and technical knowledge, we this option We do not recommend! But if you are an experienced Android expert, then you can safely get started. To begin with, we prepare all the necessary materials so that during the backup process we do not have to be distracted by them.
After the backup is completed, the files can be moved to any cloud storage, because if you have a computer or hard drive some major trouble will happen - the saved information will be lost, don’t risk it! So we made a backup on Android via FlashTool using a computer, now we are trying the following method. Backup via Titanium Backup (Root)
Quite light and comfortable option using special Titanium Backup program. You can download it without any problems from Google Play and install it in the standard way. Now we launch the application and give it access to root rights. Yes, “Superuser” mode is required here, and this, in principle, is the main disadvantage of this utility. Click on the checkmark image in the upper right corner to go to the page "Batch Actions" and choose what data we want to save. Click next to what you want "Start".
Another worthy option that works on all devices, but from experience I will say that it is much easier than the FlashTool method. For this we need recovery mode. Of course, the most popular and most functional is TWRP, allowing you to install custom firmware, different kernels, but for backup is quite suitable and stock. Begin:
IMEI, as we know, is the unique identification number of a smartphone. And quite often there are situations when this number needs to be saved, that is, backed up. For this we will use special program Root Explorer. Root rights are also required for it to work. We open the application, through it we go to the root of the device, where the one we need is located efs folder We carry out a long press, after which an additional mini-menu appears, where we select "Create archive"(Archive permission is at your discretion). Backing up instant messengersMessengers for the modern user are simple necessary thing, which helps you communicate with friends and, for example, send your boss a photo of the work done. Let's look at the example of WhatsApp. It stores a huge amount of necessary information: important messages, images, phone numbers. And the ideal way not to lose such materials is to make a backup. How to do it on WhatsApp? Built-in backup optionAll popular instant messengers have their own backup function, which allows you to save the necessary materials directly from the application itself. WhatsApp is no exception. Begin:
No one can predict when problems will arise with a smartphone and all data will be lost. This can happen if it is lost or stolen, or it simply stops working. In this Android data recovery guide, we will look at several convenient methods. These include: Backing up to your account and using Super apps Backup to back up important data. Using Google ToolsThis method requires an Internet connection. If you chose not to create backups when you first set up your device and account, you can activate this feature now.Go to Settings > System > Additionally > Backup .
Turn it on and add " Backup account".
Click " Start copying"which starts the backup process and subsequent synchronization of your applications and their data, call logs, SMS and contacts, device settings, photos and videos.
Recovering data after resetting your phoneTo recover from previously saved data, you will need a PIN code, pattern or screen lock password.
Using the Super Backup appallows you to backup Contacts and SMS, Call History, Call Logs, Bookmarks, Calendars and Applications, as well as Call Recordings directly to the SD card.For example, let's back up and restore contacts using the current application. Go to Contacts > Backup copy , set the name of the saved file and click " OK".
We follow the same scheme with other categories. Backing up photos and videos here is implemented by an additional program from the same manufacturer, which not only backs up, but also protects them by hiding them from prying eyes and encryption. If you don’t want to trust the work to a third party software, that is, a simple proven method, connect the device via a USB cable to your PC and copy the necessary data. It is very convenient and practical, even if you have other tools for this, as they say, there is no such thing as too much! |


 Few people know, but Android has standard functionality for creating copies. And so, the procedure is as follows:
 This is a universal tool for working with backups. With this program you can not only create, but also restore any backup on your device. Just keep in mind that this application requires root rights!
 The difference between the paid version and the free version is that in the first version you will have access to additional options for creating copies. In addition to applications, it is possible to save system data, user software, check copies and much more.
 Almost all programs require root rights to create copies. But what should a person do if he does not have such access? In this case, we suggest you use the Safe Backup tool. The program is distributed free of charge, has only a few menu items (which is very convenient) with a Russian interface.
 It is not always necessary to copy the entire system, and the process is quite painstaking. If you need to save only specific programs, we recommend using this method. And here the ideal option is the Helium application.
 But here things are a little more complicated, since we need a complete saved copy of Android. Of course, it will take up more space, and there are several different ways to create it.


Popular:
New
- Setting up additional details and additional information for 1c nomenclature additional details and information differences
- What to do when there is no registration data
- Request for data selection (formulas) in MS EXCEL Excel selection by condition macro
- Temporary temporary one-time email Temp Email, mail sites, social media registration
- What to do if the computer does not see the phone via the USB port
- How to install Windows on Mac?
- Asus rt n16 setup firmware
- How to find out the bitness of the operating system and processor in Windows
- How to turn off the Windows Firewall: complete deactivation and disabling for individual programs How to completely disable the Windows 7 firewall
- Powerful converter of HTML files to Doc, PDF, Excel, JPEG, Text Using the Total HTML Converter program


