Sections of the site
Editor's Choice:
- What is an MTS trust payment?
- Aeroflot Bonus program: how to accumulate miles and what can you spend them on?
- How to find out which drive is on your computer: SSD or HDD How to find out which ssd is on your computer
- Testing Fractal Design Define R5 Fractal Design Define R5 - Quiet, spacious
- How to speed up Android smartphone and tablet?
- Flood Control VKontakte: we tell you why the problem occurs and how it can be removed. So flood control
- Charger based on an ATX power supply Laboratory power supply based on a 3528 PWM controller
- What to do if the wire does not charge your iPhone
- Virtual machine for Mac Virtual windows on mac os
- About Tele2 service How to enter payment confirmation to number 312
Advertising
| Installing Kali Linux with Windows. Installing Kali as an additional operating system on a Windows computer System requirements kali linux 2.0 |
|
Almost every user today has heard about the free Linux operating system. The open platform for development and accessibility of the system made it very popular. But if you've never used it, installing it instead of Windows may be reckless. It is much more convenient to install any version of Linux as a second operating system on your device. Reasons for installing Linux next to Windows 10Windows 10 is the latest operating system from Microsoft. She is successful and multifunctional. Few users will be able to completely abandon its use in favor of installing Linux. In turn, Linux has a number of advantages over other operating systems:
The disadvantages, however, are also obvious:
Installing various Linux buildsSince Linux is open to user development, there are many different versions of this operating system.
Each user should choose an assembly to suit their needs before proceeding directly to installation. Preparations before installationBefore you begin installing the version of Linux you've chosen, you should do some preparatory work on your hard drive. First, you should save all the necessary files to the drive, since there is a risk of losing them during installation. Then you should split the disk into partitions to correctly install the second operating system. Partitioning a partition using the Disk Management system program You can also split a partition directly during the Linux installation. But if you do this in advance, you can avoid some unnecessary risks during installation. Partitioning a partition using the Linux installerNo matter what version of Linux you install, you will need to partition your disk. If you did not do this before installation, you can also do this during installation.
The creation of partitions is complete and this means that you can continue with the installation. Installing Linux Ubuntu next to Windows 10You can download the latest version of the Linux Ubuntu system from its official website. After this, follow these steps:
Video: detailed installation of Linux Ubuntu on a computer with BIOSInstalling Linux Mint next to Windows 10To install Linux Mint you need to do the following:
Video: installing Linux Mint on a computer with another OSInstalling Kali Linux next to Windows 10Installing the Kali build is slightly different from previous ones.
Video: how to install Kali Linux on a computerInstalling Kubuntu next to Windows 10The installation process for Kubuntu Linux is similar to that of Ubuntu, which is not surprising. To install Kubuntu next to your Windows, follow these steps:
Installing Rosa Linux next to Windows 10As is the case with other assemblies, to install Rosa Linux you need to download the necessary image and burn it to media.
Video: installing Rosa Linux on a Windows computerInstalling Arch Linux next to Windows 10Installing Arch Linux will be significantly more complex than installing others. If you are not an advanced user, it is recommended to select a different build. Otherwise, complete the following steps to prepare for system installation:
Directly installing Arch Linux will also require you to enter the following commands:
Installing Ubuntu on VirtualBox Windows 10Before installing the operating room Ubuntu systems On VirtualBox you need to do the following:  After that, open VirtualBox and follow these steps:
Restoring Windows 10 boot after installing UbuntuIf errors occur during system installation, the Windows boot loader may crash. This will make it impossible to start Windows 10. Fortunately, this is not difficult to fix. You will need an installation Windows disk 10, which you can prepare in the same way as any other boot drive. It is important that the version of Windows matches the one you have installed. Mount the image and then do the following:  Installing Linux as a second operating system is a good solution, but it is important to choose an assembly based on your goals and technical knowledge. If you have certain skills, you can install any of the assemblies without much difficulty. Using Linux together with Windows 10 will help you maximize the potential of your computer. If you want to have a portable flash drive or external hard drive with Kali Linux>, then there are at least two options:
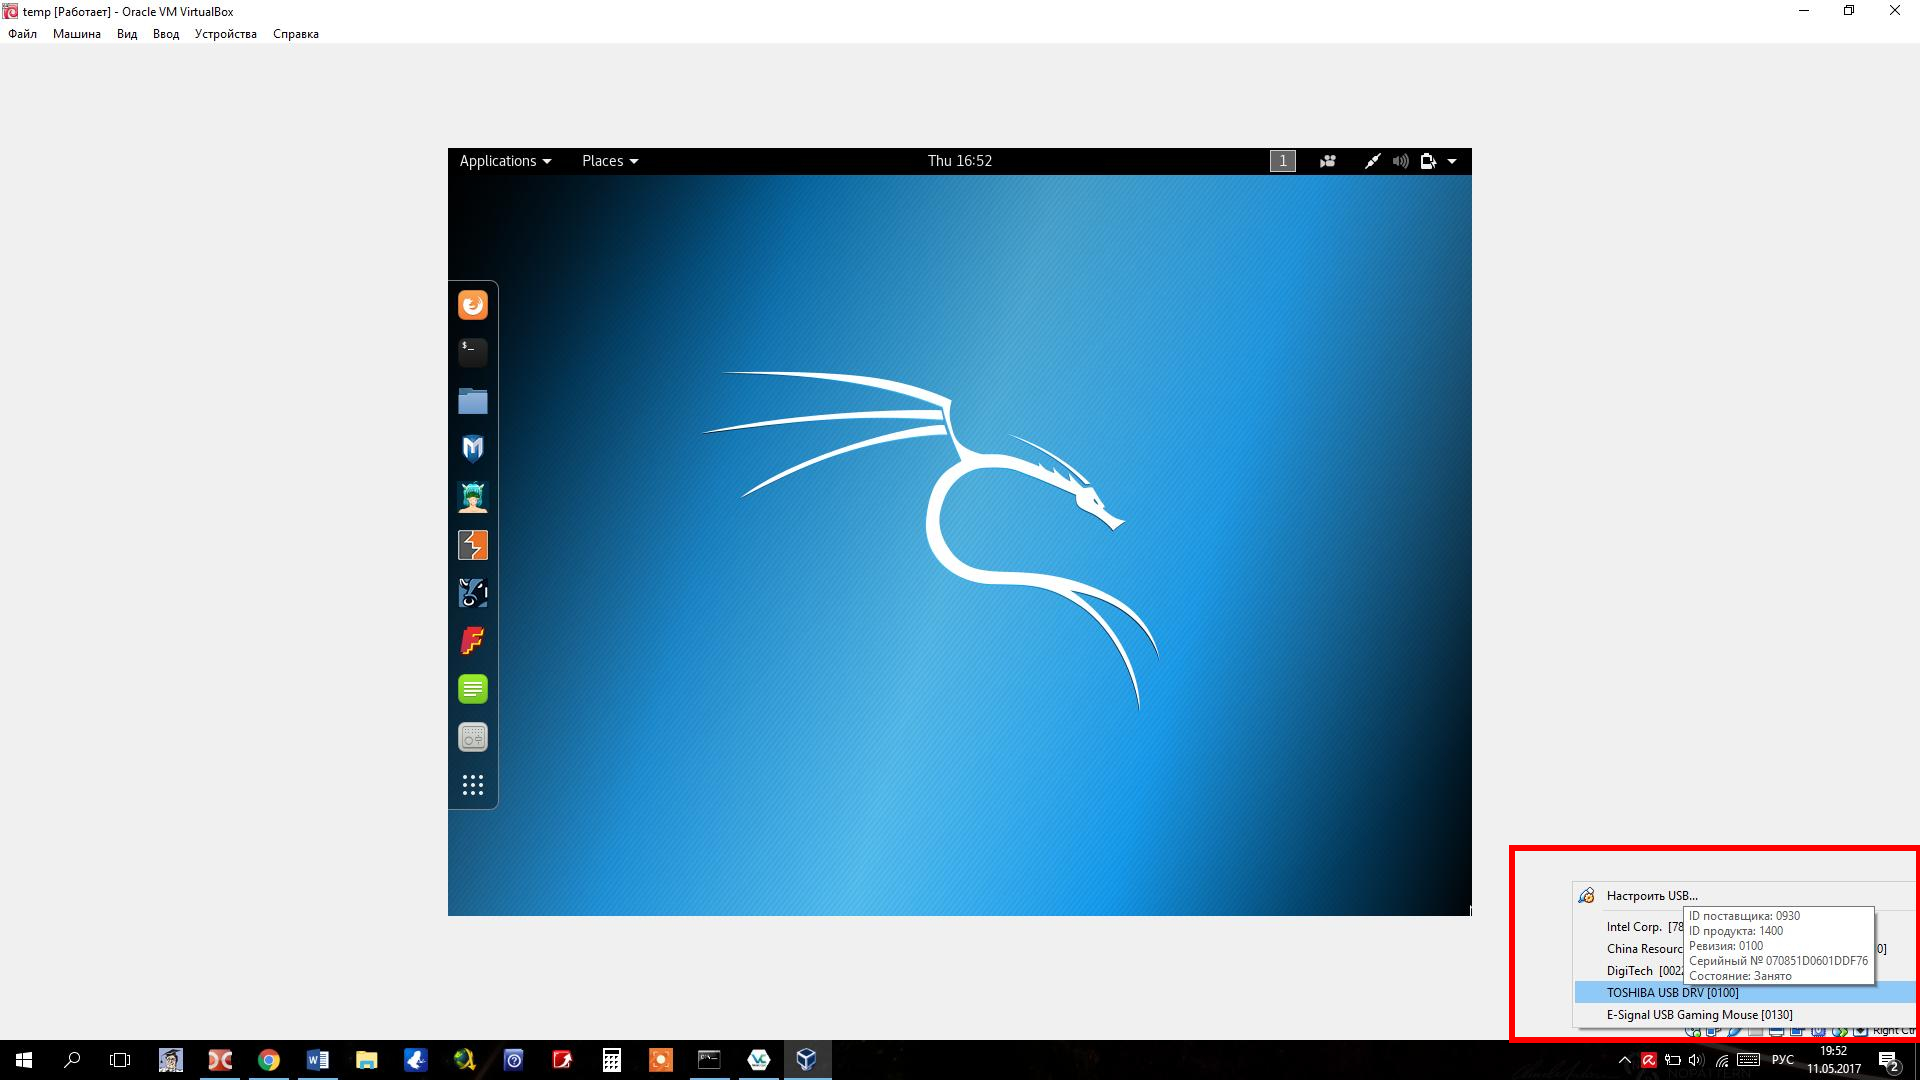
The first option is similar to a regular operating system installation. But since we will install on a flash drive, we get portability - the ability to boot on any computer with a USB input. All changes made to the system are saved after reboot. In general, the work is not much different from working with a regular computer. The second option is creating Live system on a USB drive (the same flash drive). But since the Live system is not capable of saving changes (user files, system settings), another partition is additionally created for it, on which files and settings made are saved. That is, it would seem that it turns out something like the first option - there is a system that “remembers” the changes made after a restart. In fact, there are some nuances. A live system with persistent itself takes up less space - the same as a downloaded one. ISO image– i.e. usually up to four gigabytes. The operating system installed in the usual way takes about 13-15 gigabytes. But a normally installed system will boot faster because Live uses compression. A live system with persistent may encounter a problem where the new kernel (which can be updated) is incompatible with the old bootloader (which is part of the Live image and is not updated). In general, both methods deserve the right to exist, and both of them will be discussed on the pages of HackWare.ru. This tutorial will show you how to create a flash drive with Kali Linux installed. A detailed procedure will be described to avoid some problems that may arise when installing the system on a USB drive or when booting from a USB flash drive or external drive. Instructions for installing Kali Linux on a USB memory stickInstalling on a USB flash drive is similar to installing on an internal drive. But in order not to accidentally damage the main computer system, computer hard drives or the main system boot loader, I suggest installing Kali Linux on a USB flash drive in virtual computer. After this installation is completed, you will be able to boot from this flash drive on your real computer. I use VirtualBox as a virtual computer. I assume that you already have VirtualBox installed, or you know how to install it yourself. In VirtualBox, create a new virtual computer. The most common virtual computer for Linux. The only difference is that it does not have to have a (virtual) hard disk. When you reach the Hard Disk window during the process of creating a new virtual computer, select “Do not connect the virtual hard disk”: Once the virtual machine is created, launch it. Official releases (not weekly automated builds) are recommended as ISOs. When trying to use the weekly builds, I was getting errors that the kernel modules couldn't be loaded and the installation was failing. USB flash drive for Kali LinuxFor Kali Linux, as well as for any modern Linux distribution I recommend memory cards Volume more than 16 gigabytes. Those. that's 32 gigabytes or more. The higher the speed, the better. Flash drives are not well suited for multiple simultaneous read/write operations, and operating systems operate in this mode. Even with a good memory card, your system will work noticeably slower than a desktop one; it may lag and slow down. With a bad (slow) memory card, work can become difficult and uncomfortable. How long do USB flash drives with an installed operating system last?I am one of those who do not spare my media. I download torrents on my memory cards in my phone, I install operating systems on my USB flash drives, use them intensively, and often make and restore full backups. I haven't had a single memory/USB card break due to heavy use. Honestly, I think it's a myth that memory cards can get damaged due to frequent use. Maybe I'm just lucky. I want to say that USB flash drives (at least some) can “live” for years and be used with operating systems installed on them. Cleaning a USB memory stick to install an operating systemBefore starting the installation, I recommend completely erasing the data from the flash drive (remove GPT), because otherwise I sometimes had errors with a problem writing to the disk. We will do this using the Live system itself, booting from the downloaded ISO. When this menu appears, instead of selecting “Graphical installation”, boot into the system. When you boot into the bottom bar of the virtual machine, connect your USB flash drive to the system: You can look at the list of disks, but since there are no other media (hard drives) there, you will only see a flash drive called /dev/sda: fdisk -l To remove GPT from the disk, if it is there, run: gdisk /dev/sda To switch to expert mode, enter Then to remove GPT enter Agree twice to completely clear the drive. Now our flash drive is cleaned, without removing it, reboot the virtual system. Now select “Graphical install” from the menu: Instructions for installing Kali Linux on a memory cardThere are no differences from installing the operating system - everything is quite standard, the choice of language, username, etc. If you have problems with this, then, again, refer to the note “Installing Kali Linux”. Perhaps there is only a small nuance with the swap partition. We do not need a swap partition on the flash drive at all - we will use the computer resources directly, i.e. all RAM - this should be enough. But even if this is not the case, the swap partition on a flash drive will only do harm, since it will be very slow. To prevent the creation of a swap partition, when going to “Disk Partitioning”, select “Manual”: Select a section: Select “Yes”: Select “FREE SEAT”: In the next window, most likely, you won’t have to change anything: Select “Primary”: Select “Partition setup complete”: Select “Finish partitioning and write changes to disk”: The system complains that no partition for swap space is specified and praises it in every possible way. In our case (installing the OS on a flash drive), it is really not needed. Select “No”: Now select “Yes”: After this, the normal installation of Kali Linux OS will begin. Leave it unchanged here: Select your flash drive: When the installation is finished (and this may take longer than you expected, since flash drives are not as fast as even regular hard drives, not to mention SSDs), then turn off the virtual computer. You can reboot your real computer to boot from the system freshly installed on the USB flash drive. If you do not have UEFI, then when the computer starts to boot, press the Delete or Esc button many times (sometimes another one, depending on the model motherboard- you can find this out on Google). In the BIOS, where “Boot Order” is selected, select your flash drive. The flash drive must be inserted into the computer at this moment, otherwise the BIOS will not see it. If the flash drive is inserted, but the computer does not see it, try inserting it into different slots and reboot each time and go to the BIOS. If you have UEFI, then you can’t just get into the BIOS. The easiest way to get into the BIOS is to enter command line(on behalf of administrator): shutdown.exe /r /o After this, a message will appear that the computer will restart in less than one minute. After the reboot, we get here and select “Diagnostics”: Now select “Advanced options”: Now "UEFI Firmware Settings": Well, “Reboot”: Different manufacturers have different BIOSes, so yours may be different. But I’ll show you an example of my laptop so that the essence is clear. Go to the Boot tab, select Boot Option Priorities, see what options there are: There is only one option and I definitely don’t have my flash drive. Are looking for Secure Boot and disable (Disable): A new menu item OS Mode Selection appears. In it we select CMS and UEFI OS. If you select only CMS OS, then the installed Windows will not boot. Now we look for an item such as Fast BIOS Mode and disable it (Disable). This is necessary so that when loading the BIOS it starts checking for the presence of USB devices: But we need to go to BIOS again! Therefore, when loading, press the appropriate key. My key is F2. On the old computer, this key was Delete. The BIOS writes this key itself when the computer boots. If you don’t have time to look or don’t understand English, then look for your model on Google. Or try the brute force method. In addition to those mentioned, this key can also be Esc or some F*. Go to the Boot Option Priorities tab again. Now there is a flash drive there. If you do as I did - put the flash drive in first place, and Windows Boot Manager in second place, you will achieve the following effect: if the flash drive is inserted into the computer, then Linux will boot from this flash drive. If there is no flash drive, then Windows will boot - and there is no need to go into the BIOS again! Don't forget to save and reboot. Solving the problem “the disc contains an unclean file system”When booting Linux you may encounter an error: The disc contains an uncle file system (0, 0) This error appears especially often when trying to boot from a USB flash drive or external drive. The reason for this is that the GRUB settings point to the wrong drive, for example the Windows drive. The system does not understand the disk file system and cannot continue booting. This problem can be solved quite simply. Restart your computer, and when the GRUB boot loader menu appears, press the e key. You will see something like this: Notice the line starting with linux. In my case there is an entry root=/dev/sda1 Since during installation in the virtual computer there were no other storage media except the flash drive, it was given the name /dev/sda1. A real computer has at least one other hard drive, and the name /dev/sda1 could be assigned to it. And the flash drive I'm trying to boot from now has a different name. This name could be /dev/sdb1, or /dev/sdc1, or something else (depending on the number of disks in the system). If you don't know the new name, just try different options. Move the cursor to the disk name and change it to /dev/sdb1. After that, press the F10 key and wait for it to load. If the download is unsuccessful, then restart the computer and change the entry to /dev/sdс1 (and so on alphabetically), press F10 and check whether the download was successful. After successfully loading into the system, change the name of the boot disk. For example, in my case the disk name turned out to be /dev/sdс1 (with the letter c). Then the command to change the boot disk will look like this: sudo grub-install --recheck /dev/sdc sudo grub-mkconfig -o /boot/grub/grub.cfg Replace /dev/sdc with the name of your disk or flash drive. Now, when rebooting, an error will not occur, and I will immediately get into Kali Linux installed on the flash drive. Backing up a flash drive with Kali LinuxInstalling an operating system on a flash drive, and especially its subsequent configuration and installation of programs, is a lengthy process. In case the flash drive does break or you need it to write coursework, you can make a backup copy of it. It is also recommended to make backup copies before installing video drivers or other similar experiments that are dangerous for the OS. If we are talking about creating a backup copy of the OS, and not individual files, then the best option is to clone an image of the entire disk. If necessary, this will allow you to very quickly return the entire operating system with all settings. The disadvantage of this method is that the backup image will take up exactly as much space as the capacity of the flash drive. Even if, for example, the operating system with all the files takes up only half the volume USB media, then the image will still be the size of a flash drive. As already mentioned, the advantage is that you do not need to select files for synchronization, all backup copy stored as a single file, restoration guarantees a complete return to its original state. On Linux systems, a similar image can be created using the dd program, and for Windows there is a wonderful free, open source source code Win32 Disk Imager utility. Launch Win32 Disk Imager, select your flash drive as Device, and in the Image File field write the path where you want to save the image: When everything is ready, click Read. Security issues of operating systems of built organizational networks have always been the most important aspect of administration. Diagnosing the presence of vulnerabilities required a lot of work, and often even after this, loopholes remained for attackers. Such manipulations have become much easier with the advent of Kali Linux. Instructions for its use are mostly available only on English language. This system is not suitable for regular home use, especially not recommended for beginners. This is a professional tool that you need to learn to use and requires fine tuning. And this requires sufficient experience and a complete understanding of the actions being performed. Important CautionsThe capabilities of the Kali Linux operating system are so wide that not everyone uses them to improve the security of their own system. Often she becomes convenient tool for illegal actions of attackers. Therefore, it is important to understand already at the initial stage of acquaintance that certain manipulations that the system allows to perform may be illegal. Even installing Kali Linux and trying it out for educational purposes in some countries can lead to unpleasant consequences. As a small piece of advice, we recommend installing the system on and working through a VPN if you don’t want to limit yourself to a superficial study of it. When starting, it is also necessary to use keys to avoid problems with the law. What is Kali LinuxThe predecessor of Kali is BackTrack Linux, which is quite famous in narrow circles. The second one is based on Debian, and this provides support for packages and applications developed for this OS, which makes the work quite comfortable through the use of familiar tools. If necessary, it will be quite easy to find programs for Kali Linux. The distribution includes all kinds of utilities that allow you to conduct a full security audit to prevent intrusions. Running services, access to a computer via the network, web applications in use, and much more can be analyzed using the tools available in Kali Linux. As you can already understand from the name, the system is built on the Linux Kernel. The first version of the distribution was released more than two years ago. It contained all the most basic things, the main emphasis was on functionality rather than on visual appeal. But the great popularity of the system and its active use in a professional environment led to the need to make changes to the distribution. User reviews of Kali are mostly positive. The system has become more stable compared to BackTrack, the set of programs and utilities has expanded, but on some laptops sometimes the operating system stops seeing the built-in Wi-Fi adapter. This happens when using Live launch from a flash drive; the problem is corrected by using an external adapter or installing the OS on HDD. Changes in the new version
At the end of last summer, Kali Linux 2 was released. Thanks to the released update, the system has become much more stable and the operating interface more attractive. In addition, many utilities for such a long time by standards information technologies the deadline has expired. If previously you had to search for and install new versions yourself, now this work is performed by the system itself, which allows you to keep them up to date without much effort. In addition, the system itself received support for rolling distribution mode. Technical features
The new distribution is based on Linux Kernel version 4.0, included in the Debian Jessie release. As a this moment Gnome 3.14 is used, and the workspace has acquired an updated style and interface, the menu has changed slightly in some items. Available builds At the moment, there are various distribution kits that are convenient to work under certain conditions. You can easily find Live builds, images for popular virtual machines, and installation packages. In addition, instructions are provided that you can follow to prepare your own assemblies. If necessary, your own image can be assembled to work with ARM; work with this architecture is perfectly supported, ensuring multi-platform system. Then it will be possible, for example, to install Kali Linux on a tablet or smartphone. For those who have already installed the first version, it is possible to upgrade to the second within the system. It is enough to use a set of commands, including obtaining a new distribution and installing it. Details can be found in the official accompanying documents. Getting started with the system. Theoretical basisIt is difficult to understand the extensive capabilities of the system without studying the Kali Linux documentation. Instructions for use, unfortunately, in the form of detailed manuals for fine tuning, are available on the official website mainly in English, as in most other sources. However, a large number of fans gave rise to the emergence of detailed Russian-language manuals in the established community, based on their own practice. In addition, there are training courses for specialists in Russian, both entry-level and more advanced, for professional corporate work. Practical development
To study the system, it is enough to install it in any accessible and most comfortable way, especially since the large selection of available Kali Linux 2 distributions allows this. However, for educational purposes, especially at the initial stages, it is better to use virtual machine. This will be enough to study the set of utilities that are included in the package, get used to it, and begin to confidently navigate the system. When learning to work with Kali Linux, instructions for use are a must. In addition to the fact that the OS has rich capabilities that are difficult to learn without any documentation, when installing it you will need configuration that will allow you to use them most effectively. It is better to carry out practical mastery of the tools on your own equipment in order to prevent possible problems with the law if the actions performed are contrary to it, and somehow the fact of their implementation becomes known to third parties. Run from a flash drive
After completing the stage of mastering working with the system, you will want to use it to analyze security and eliminate detected weak points V existing networks in a company or at home. The easiest way is to always have a distribution kit with you, ready to run, if necessary. This is quite easy to do if you use specialized programs for the working operating system, for example, Rufus. Support for saving files on a system installed on a USB drive even after rebooting can often be useful. This option is also provided, but it is important to remember that for the described persistence mode, you will need to specify the appropriate mode at the beginning of each boot so that the normal live mode does not start. Moreover, if in simple version A 2GB flash drive is sufficient, but in the latter case you will need additional space to create a separate partition in which the necessary data will be stored. Why is it useful to use Kali Linux?
In their work, attackers use specialized tools that can significantly reduce the time required for unauthorized penetration into the network. For example, with the help of Kali Linux, hacking becomes much easier and more convenient, especially when passwords and default hardware settings are not changed. Unfortunately, even in large corporations this happens quite often. After this, obtaining the necessary data is a matter of technology; for a qualified specialist, the whole process does not present any particular difficulties. It's all the more important to use the same tools to identify vulnerabilities in your defenses to make it harder for those people to do their job. Simple practical example is hacking Wi-FI routers, which are installed in almost every apartment these days, not to mention organizations. Network penetration via Wi-FiTo hack a Wi-Fi router, it is enough to brute force passwords. But even on fast equipment this takes a lot of time. Modern routers use the WPS protocol, designed to simplify network setup. Not all users understand security wireless networks, they need all possible help in setting them up. With the use of this protocol, there is no need to specify WPA/WEP encryption parameters, which provide protection against unwanted access, manually, they, like the network name, are set automatically by pressing a button on the router. It seemed like a great idea, but, as often happens, vulnerabilities were found that could be used to crack a password in a few hours. Not only does the WPS PIN code consist of 8 characters, the last of which is enough to check it in blocks, and not as a whole, as a result of which the number of possible combinations is reduced to 10998. Using Kali Linux, it is quite easy to hack a Wi-Fi network through enabled WPS , and it won't take much time. A utility that will monitor the network and one that directly searches for the PIN code is sufficient. For greater clarity, you can check how easily and quickly this happens on your home router. Thus, to protect yourself, it is better to disable WPS on the router, where this option is active by default. Otherwise, every neighbor, even a schoolchild, will be able to connect to the network and use it. The instructions for use are quite simple; this is one of the most common examples on all resources dedicated to this operating system. Kali Linux WiFi: hack
In short, using the iwconfig command we determine the available network interface (usually it is called wlan0, but it may differ). After this, we start monitoring the active interface: airmon-ngstartwlan0 To find out which networks are in scope, run the following command: Where mon0 is the name of the previously running monitor. From the entire list that appears, only those networks that have WPS enabled are of interest. To define them, use the command Now you can select any goal you like and start selecting a PIN code: Reaver -I mon0 -b -a -vv The BSSID from the result of the previous command is written here. If everything is done correctly, password search will start. On average, a network takes four to six hours to be hacked. But some new router models have protection against WPS attacks and turn off brute force after a certain number of unsuccessful attempts. And this is just one side of Kali Linux. The instructions for use will give a comprehensive idea of the capabilities of the system. Kali Linux is a distribution that is becoming more popular every day. In view of this, there are more and more users who want to install it, but not everyone knows how to do it. This article will outline step-by-step instruction on installing Kali Linux on PC. To install the operating system, you will need a flash drive with a capacity of 4 GB or more. The Kali Linux image will be written to it, and as a result the computer will be started from it. If you have a drive, then you can proceed to the step-by-step instructions. First you need to download the operating system image. It is best to do this from the official website of the developer, since that is where the distribution of the latest version is located. On the page that opens, you can determine not only the method of downloading the OS (Torrent or HTTP), but also its version. You have the choice of either a 32-bit or 64-bit system. Among other things, it is possible at this stage to select the desktop environment.
Once you have decided on all the variables, start downloading Kali Linux on your computer. Step 2: Write the image to a USB flash driveInstalling Kali Linux is best done from a flash drive, so first you need to write a system image to it. On our website you can find out step by step guide on this topic. Step 3: Start PC from USB flash driveOnce the flash drive with the system image is ready, do not rush to remove it from USB port, the next step is to boot the computer from it. This process will seem quite complicated for the average user, so it is recommended that you first familiarize yourself with the relevant material. Step 4: Start installationAs soon as you boot from the flash drive, a menu will appear on the monitor. Here you need to select the installation method for Kali Linux. The installation with GUI support will be presented below, since this method will be most understandable for most users.
Depending on the power of your computer, this process may take a long time. Once completed, you will need to create a user profile. Step 5: Create a User ProfileA user profile is created as follows:  After entering all the data, the program for HDD or SSD partitioning will begin loading. Step 6: Partitioning the DrivesMarking can be done in several ways: automatically and manually. These options will now be discussed in detail. Automatic marking method The main thing you should know is that if you partition the disk automatically, you will lose all the data on the drive. Therefore, if there are important files on it, move them to another drive, such as Flash, or put them in cloud storage. So, to mark up automatically, you need to do the following:
Manual marking method The manual markup method differs favorably from the automatic one in that it allows you to create as many sections as you wish. It is also possible to save all information on the disk, leaving previously created partitions untouched. By the way, in this way you can install Kali Linux next to Windows, and when you start your computer, select the required operating system to boot. First you need to go to the partition table.  Now you can move on to creating new sections, but first you need to decide on their number and type. There will now be three markup options: Low security markup: Medium security markings: Marking with maximum security level: All you have to do is choose the optimal markup for yourself and proceed directly to it. It is carried out as follows:
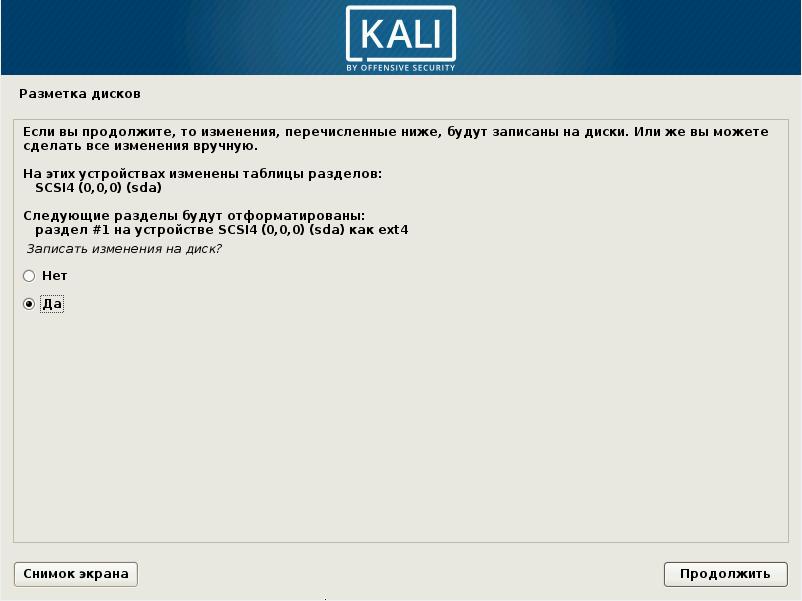
Using these instructions, partition the disk with the appropriate security level, then click the button “Finish partitioning and write changes to disk”.
As a result, you will be provided with a report with all the previously made changes. If you do not see any differences with your actions, select "Yes". Next, the installation of the basic component of the future system will begin. This process is quite long.
By the way, you can mark up a Flash drive in the same way; accordingly, in this case, Kali Linux will be installed on the USB flash drive. Step 7: Complete installationOnce the base system is installed, you need to do some more settings:
After all the steps have been completed, your computer will restart, then a menu will appear on the screen where you will need to enter your username and password. Please note that entry is under account superuser, that is, you need to use the name "root".
Finally, enter the password you created when installing the system. Here you can determine the desktop environment by clicking on the gear that is located next to the button "Entrance", and selecting the desired one from the list that appears.
ConclusionAfter completing each step of the instructions, you will eventually be taken to the desktop of the Kali Linux operating system and can start working on your computer. Operating system Kali Linux (formerly BackTrack 5 ) is gaining more and more popularity. This is due to many reasons, the main one of which, as official sources say, is concern about security computer systems, web applications and networks. This article will tell you how Kali Linux is being installed on a USB flash drive . As a result, you will receive a full-fledged operating system located on your flash drive. You can insert it into and boot from any computer, thereby quickly gaining access not only to files in the OS, but also to its main components. System requirementsBefore telling the story how to install Kali Linux on a USB flash drive, with It is worth paying attention to its system requirements. They, of course, are not very high, like any other Linux distribution, and are perfect for any computer, but since we will be dealing with flash drives, they are worth mentioning. So for full installation systems you need to have: 10 gigabytes of free disk space; 512 megabytes of computer RAM. Here the first indicator is more interesting, since it relates directly to the flash drive. Due to the fact that the volume occupied by the system is 10 GB, it is necessary to use a flash drive of 16 GB or more, because in addition to the system itself, you will create, download and copy files in it. After we have dealt with the system requirements, we can move on to instructions on how to produce installing Kali Linux on a USB flash drive. Preparatory activitiesInstalling Kali Linux on a USB flash drive , like the installation of any other OS distribution, begins with a number of preparatory activities. Now they will all be examined in detail. Step 1: Download the imageThe first thing you need to do is download the ISO image of the distribution onto your computer. This must be done exclusively on the official website of the developers, so you will absolutely receive official version distribution, without unnecessary changes. In addition, on the site you can independently select the OS version, its bit depth and much more. Just go to the site, click the "Download" button and select the distribution that suits you. Step 2: Create a bootable USB flash driveAlthough we will carry out the installation" Kali Linux "on a flash drive, we need to create its boot image on a second flash drive. This is done quite simply. Let's look at how to create I using the Rufus program. So, first of all, go to the official website of the program and download it from there. After that, open and click on the disk button, which is located in the lower right part of the window. Select the ISO image of the distribution that was downloaded in advance and click "Open" in Explorer. In the first drop-down list, select the flash drive on which the image will be written (do not confuse it with the flash drive on which the installation will be performed, these are two different drives). The remaining fields can be left unchanged. Finally, click the "Start" button. The recording process will begin. Wait for it to finish and then proceed to the next step. Step 3: Boot PC from USB flash driveSo, let's move on to the last preparatory stage. We need to start the computer from the flash drive on which the image is recorded" Kali Linux ". This is done through the BIOS. Restart your computer. At startup, press the F9 button. In the list of devices, select the name of your flash drive. After this, the computer will start from the flash drive, and you will see the main installer interface. Installing Kali LinuxIt's time to move directly to the instructions, how to install Kali Linux on a USB flash drive. Below will be all the steps that need to be taken to successfully complete the task are outlined. Step 1: Start installationSo at this stage installing a full-fledged Kali Linux system on a USB flash drive there is a list in front of you. You can do a lot of things in it, but we are only interested in installation, so using the arrows on your keyboard, highlight the Install item and press the Enter button. Language selection A language selection window will appear in front of you. If you want to Russian version of Kali Linux , then, accordingly, select Russian from the list. Please note that after selecting it, a window will appear saying that the installer has an incomplete translation. Highlight No, refusing to return to the language selection window, and press Enter.
Region selection Now you need to select your region. This is necessary to correctly determine the time zone. The list will present three options: Russian Federation. If your country is not in the list, then select “Other” and find it in the list. Defining the keyboard layout The next step is to determine the keyboard layout. Here it is recommended to choose English to eliminate problems with filling out your profile, what will happen next. Loading components Now you will see a window displaying the process of downloading and installing additional components. Do not cancel it under any circumstances, as this may cause critical error. Be patient and wait for it to finish.
Step 2: Create a ProfileAfter the process of downloading and installing components is completed, the profile creation window will appear in front of you. First of all, you will be asked to enter the computer name. Choose the option yourself, and after entering, click the “Continue” button. Entering your password A password creation window will appear. This is a very important stage that cannot be skipped. Remember, the longer the password, the less likely it is to be hacked. However, if you are sure that your computer is not in any danger, you can use a password consisting of one character, for example "0".
Step 3: Disk PartitioningIt's time to talk about the most important step in installing Kali Linux on a flash drive. Now we will partition the disk. Markup option So, you have a window in front of you in which you need to select a layout option. Since we are installing the operating system on a flash drive, we need to select “Manually”. By the way, at this stage a flash drive must be inserted onto which the distribution must be written. Disc selection After selecting, you must determine the disk on which the installation will be performed. You must select your flash drive. You can identify it by name or size. Partition table Since the flash drive will be completely customized for the operating system, we must create a new partition table, at this stage we select the “Yes” option. By the way, switching between options occurs by pressing the TAB key. Creating a root partition Now you will see a partition table, but since the flash drive is clean, there will be only one partition with free space. You need to select the same “Free space” and press the Enter key.
In the window that appears, select "Create a new partition". After this, you need to indicate the amount of disk space that you are going to allocate for the root partition. We remind you that the minimum required is 10 GB, but if flash memory allows, it is better to enter 11-12 GB. After entering, click "Continue". Now you see the last window of the Partition Wizard. In it, you need to select the file system "Ext4 Journaled File System" and the mount point "/", and leave the rest untouched. Finally, click “Partition setup is complete.”
Creating a swap partition In addition to the root partition, you also need to create a swap partition, or, as it is also called, the “swap section”. For this: Select the "Free Space" section. In the window, press Enter on "Create a new partition". In the field for entering the allocated disk space for the partition, indicate the number of gigabytes that are installed on your computer. Since the OS will be on a flash drive, which means that it will be used on different computers, it is better to specify from 4G to 8G. Click Continue. Select the partition type "Primary". Select the "At the End" location. In the last partition creation window, change the file system to "Swap Partition". Click "Partition setup complete."
Step 4: Finish installationAfter completing the steps, select "Finish partitioning and write changes to disk." In the next window, select “Yes” and in subsequent ones also agree to the offers. As a result, you need to wait for the installation process to complete and restart your computer. You can also use these instructions to install BackTrack 5, because, if you remember, this is the previous version of Kali Linux. Of course, there may be differences in some points, but the essence is the same. By the way, installing Kali Linux on a USB flash drive via VirtualBox happens exactly the same way. |
 Kali Linux is known for its enhanced security
 Mint Linux - an improved version of Ubuntu
 Kubuntu Linux - Ubuntu with a different graphical shell
 Rosa Linux - Russian build with a number of innovations
 Arch Linux - build for advanced users
 During installation, select the “Other option” line and click “Continue”
 Linux has its own disk utility that can also be used to partition a volume
 Select a partition that has enough free space and click "Change"
 In the "Edit Partition" window you can see the total amount of free space on the disk
 In the Edit Partition box, enter the weight of the space you want to partition and click OK
 Review and confirm changes when creating a partition in Linux
 Select a new partition and click on the plus to create a partition
 Enter the required information to create a root partition and click OK
 Enter the necessary information to create a swap partition and click OK
 Enter the required information to create a home partition and click OK
 Specify your drive in Rufus
 Select GPT as partition scheme
 Click on the disk icon and select the Linux image that you downloaded from the official website
 Select your drive type in the Boot Menu
 Select your system language and click "Install Ubuntu"
 From all installation types, select "Install Ubuntu alongside Windows 10"
 Select fat32 partition which should have enough space
 Specify the weight of the section at your discretion
 After reboot, select Ubuntu as the operating system
 Set the time zone in Ubuntu installation settings
 Select the default keyboard layout for Ubuntu
 Enter your new Ubuntu account details
 Agree to restart your computer by clicking "Restart"
 Download the desired version of Linux Mint from the official website
 Download Linux Mint using any of the methods suggested on the site
 Burn the Linux Mint image to a bootable drive
 Wait for the timer to expire to begin installing Linux Mint
 Select Start Linux Mint to login
 Run the Install Linux Mint file on your desktop
 Select your language for Linux Mint system
 Check the box to install additional programs and click “Continue”
 To install Linux Mint with Windows 10, select the appropriate option
 Select your region to set the time zone correctly
 Select the keyboard layout you want to use on your new system
 Enter your Linux Mint account login details and confirm them
 Wait until the installation process completes to access the system
 Restart your computer when prompted
 Select Kali Linux version to download from the official website
 Choose a graphical installation for a more visual process
 Specify the language to install Kali Linux
 If there is an error, install the drive with the operating system in another slot and click “Yes”
 Enter the Kali Linux password twice, which will be used when making changes to the system
 Select the appropriate time zone from the list
 Indicate that you want to select the area manually
 Select the unallocated area: it is labeled “Free Space”
 Select the option “Automatically mark free space”
 Select "All files in one section"
 Select a section and click "Finish partitioning..."
 Select Yes to continue installation when Windows 10 is detected
 Manually point to the system drive to install the operating system boot loader
 Download the Kubuntu image from the official website
 When the keyboard icon appears, press any key
 Select Start Kubuntu to begin installing the operating system
 Wait for the Kubuntu GUI to finish loading
 Select "Launch Kubuntu" to access the operating system
 It may take a while for the desktop to load without installation
 Select the Install Kubuntu file to begin installation
 Specify the language you want to see during installation and in the system itself
 After checking the Internet, click the “Continue” button
 Since you need to keep Windows 10, select the installation type "Manual"
 Accept the changes to continue installing Kubuntu
 Set the time zone of the new operating system by selecting your region
 A clear keyboard layout will help you make sure you're choosing the right language
 Enter the details for the new account and click “Continue”
 Wait until the Kubuntu installation process is complete
 Restart when prompted
 Select Install ROSA Desktop to begin installation
 Select your language when installing the system
 Accept the terms
  Also select your keyboard layout language
 Specify the desired method for switching language layouts
 Enter your time zone in the list of regions
 Select the time display method on your system
 Select "Use free space" when installing rosa linux
 Wait until the installation is finished, the slides will change during the process
 Specify the system disk for the operating system boot loader
 Set any password you like, but remember it
 Enter your account information in the new operating system
 Set any name for your device
 Configure automatic startup of operating system services
 After completing the installation of the system, you need to restart the computer
 Sign in using your account password
 Download the Arch Linux build from the official website
 Burn Arch Linux to media in a way convenient for you
 Press F12 to enter Boot Menu
 Place your drive first in startup order
 Select Boot Arch Linux
 Enter the command to check the network before installation
 Select free space and create partitions for installation one by one

 Enter the command to start installation and confirm your entry
 Enter the command to detect partitions during installation
 Enter the last command to access the arch linux operating system
 Using the given command, set the region for the currency
 Also set the language zone using a special command
 Enter the command to synchronize the operating system time to GMT
 Set the password using the passwd command
 Complete the installation with exit and restart the system with reboot
 Login to arch linux using password
 Click on the New button of the VirtualBox panel
 Enter any name for the virtual machine and click Next
 You can leave the default value if it suits you
 Select to create a new virtual machine and click the Create button
 Set virtual machine disk size to dynamic
 The virtual machine disk value can also be left at default
 When all the virtual disk settings are configured, click Create
 Select the virtual machine you created
 Click on the plus sign under the media overview
 Download the Ubuntu image to your virtual machine
 After double clicking on the image, it should have loaded into the media menu
 Specify CD/DVD as boot priority so that the image is mounted at system startup
 Click Start to start the virtual system
 Wait until the system loads for the first time
 Select a language to install the system in a virtual machine
 Check the box to download updates and click Continue
 Select disk cleanup - since we are installing the system on a virtual machine, files will not be affected
 To set the time, select the region where you are located
  Wait until Ubuntu is installed on the virtual machine
 Reboot the virtual machine by clicking the Restart Now button
 Enter your password to login


Popular:

New
- Aeroflot Bonus program: how to accumulate miles and what can you spend them on?
- How to find out which drive is on your computer: SSD or HDD How to find out which ssd is on your computer
- Testing Fractal Design Define R5 Fractal Design Define R5 - Quiet, spacious
- How to speed up Android smartphone and tablet?
- Flood Control VKontakte: we tell you why the problem occurs and how it can be removed. So flood control
- Charger based on an ATX power supply Laboratory power supply based on a 3528 PWM controller
- What to do if the wire does not charge your iPhone
- Virtual machine for Mac Virtual windows on mac os
- About Tele2 service How to enter payment confirmation to number 312
- Working with internal memory EEPROM Eeprom erasing


