Sections of the site
Editor's Choice:
- Review and testing of the Nokia XL Dual SIM smartphone Mobile communication technologies and data transfer speeds
- Taking a screenshot on a Samsung Galaxy A7 smartphone
- Reasons for time failure on a laptop and how to fix them The date and time settings on the computer are lost
- Setting up an iPhone after purchase How to set up an iPhone se after purchase
- The keyboard does not print the letters you press Buke the keyboard does not work
- Russian Post tracking of shipments
- Best Ways to Make a Beautiful Background for Your YouTube Channel
- Factory reset Samsung smartphones
- What is Power BI and how to work with it?
- Network adapter - what is it?
Advertising
| Windows 7 and ssd setup secrets. Optimizing SSD disk performance under Windows |
|
Today we will talk about setting up new hard drives, so-called SSD drives. After reading the entire article, you will be able to configure your SSD drive under Windows 7.
So we configured our operating system for an SSD drive, thereby extending its life! Of course, it will last a long time without any settings, but if you want to extend the life of the drive as much as possible, then follow all these steps. That's all, good luck! Hello! Decide to prepare an article in which you will talk about how to properly install Windows 7 on an SSD drive, and how to configure Windows 7 on an SSD drive after installation so that it works for a long time and without problems. I recently bought a laptop, took an Asus K56CM and immediately bought an OCZ Vertex 4 128 GB SSD drive for it, I really wanted to experience all the speed that an SSD gives. In our case, the model of laptop/computer and SSD drive does not matter; my instructions can be said to be universal. I will write what needs to be done immediately after installing an SSD drive into a computer and how to configure the operating system after installation on the SSD. If this is your first time encountering an SSD, then you are probably wondering why there is such attention to configuration operating system for these drives compared to conventional hard drives. I will now explain everything in simple words. SSD drives have a limited failure time compared to hard drives. Simply put, they have a certain number of rewrites. Now I won’t say what this number is, it varies and what is true and what is not is difficult to understand. For example, for my OCZ Vertex 4 in the characteristics it was written that the operating time between failures is 2 million hours. And the operating system writes a lot during operation, deletes and writes again various temporary files, etc. Services such as defragmentation, indexing, etc. serve to speed up the system on normal hard drives. And they only harm SSD drives and reduce their service life. In fact, installing Windows 7 on SSD almost no different from installing on a hard drive. But after installation, you will need to make some adjustments to the operation of Windows 7, but there is nothing complicated there, we will do everything using the utility SSD Mini Tweaker 2.1. What should you do before installing Windows 7 on an SSD drive?Well, first you need to install an SSD drive in a laptop or computer, it doesn’t matter. I will not describe this process. There is nothing complicated about this, and this is a topic for another article. Let's say that you have already installed the SSD, or it has already been installed. If you will use a regular hard drive in your computer next to the SSD drive, then I advise you to temporarily Windows installations 7 disable it, this is so that you do not get confused when choosing a partition to install the OS, but this is not necessary. All you need to do before installation is to check whether our solid state drive is working in AHCI. To do this, go to the BIOS; if you don’t know how, read the article. Next, go to the tab "Advanced" and select the item “SATA Configuration”. Select the item, a window will open in which we select AHCI(if you had another mode enabled). Click F10 to save settings. Now you can begin installing Windows 7. The installation process on a solid-state drive is no different from installing on a hard drive. I just want to give you one piece of advice: Try to install the original image of the operating system Windows 7 or Windows 8. I recommend installing only one of these operating systems, because only seven and eight can work with SSD drives. Do not use different assemblies, and if you install an assembly of Windows 7 or Windows 8 downloaded from the Internet, then try to choose an image close to the original one. We install the operating system. You may find the following articles useful: Once the operating system is installed, you can proceed to setting up Windows for SSD. Setting up Windows 7 to work with an SSD driveMore precisely, Windows 7 will work anyway, our task is to make sure that our solid-state drive lasts as long as possible and without various errors. As I already wrote at the beginning of the article, to optimize Windows for a solid-state drive, we will use the SSD Mini Tweaker utility. You can disable all unnecessary options manually, but in the SSD Mini Tweaker program this can all be done in a few clicks. You will only need to manually disable indexing of files on local drives. First we need to download SSD Mini Tweaker. Download version 2.1 from the link below: There is no need to install the program, just extract it from the archive and run it. Launch the SSD Mini Tweaker utility. You can tick all the boxes, or rather, it’s not possible, but it’s necessary. I have checked all the boxes, except that you can leave only SuperFetch; disabling this service may increase the startup time of programs. Check the boxes for the required services and press the button “Apply changes”. Almost everything, in the same utility there is a “Manual” item, this means that you need to manually disable services. There are two of them, disk defragmentation on a schedule and indexing the contents of files on the disk. If scheduled defragmentation is disabled automatically after the changes we have made, then indexing of files on the disk must be disabled manually on each local partition. Disable indexing of file contents on diskLet's go to "My computer", and right-click on one of the local drives. Select “Properties”. A window will open in which you need to uncheck the item “Allow the contents of files on this drive to be indexed in addition to file properties”. Click “Apply”. We are waiting for the process to complete. When you do this procedure on drive C, you will most likely receive a message stating that you do not have rights to change system files. I just clicked “Skip all”, I think that if you skip a few files, nothing bad will happen. That's all, Windows setup under the solid state drive is completed. You know, many people say that these are different myths, that nothing needs to be turned off, etc. Maybe so, but if they came up with it, then it means it’s necessary and I think that in any case it won’t hurt. It seems that I wrote everything I wanted, if you have additions, comments, or something is not clear, then write in the comments, we’ll figure it out. Good luck! For a long time, the main component that “slows down” the performance of even the most sophisticated home computer, were hard disks. The fact is that spindle HDDs at some point reached the limit of development in terms of speed. This was due to physical laws that did not allow the disk spindle to spin above a certain speed, which affected the data access time, as well as the writing and reading speed. The volume continued to grow, but the performance did not. Next generation hard drives steel SSD drives. An SSD drive is a computer non-mechanical storage device based on memory chips. Simply put, now the hard drive is a large and very fast flash drive on which the operating system and user files are located. Why is it needed? SSD optimization Windows 7? Undoubtedly, the main advantage of an SSD drive is its writing and reading speed, but it also has disadvantages, such as a limited number of write cycles. This disadvantage is especially relevant for outdated versions operating systems that can “kill” the drive ahead of schedule, without taking into account the specifics of working with it. Setting up an SSD driveThe Windows 7 operating system is initially optimized for working with solid-state drives, but to increase reliability you should adhere to the following rules: 1. Use solid state SSD drive(for the operating system and programs) along with a classic HDD on a spindle. In this option you combine speed and reliability. 2. Before you start using the solid-state drive, be sure to go into the BIOS and set the ACHI mode.
3. From any other computer, go to the SSD drive manufacturer’s website and check for more recent device firmware. If possible, update the firmware. 4. When partitioning the disk during Windows installation, leave about 20% of the total disk space unallocated. As the SSD wears out, it will take clusters from this area. Optimizing Windows 7 for SSD1. Disable the system cache Prefetch and Superfetch. They will be of no use when using a solid-state HDD. Most likely, Windows 7 will disable Prefetch on its own, but we will definitely check this. How: Open the registry editor (Start - enter “regedit” in the search bar) HKEY_LOCAL_MACHINE -> SYSTEM -> CurrentControlSet -> Control -> Session Manager -> Memory Management -> PrefetchParameters HKEY_LOCAL_MACHINE -> SYSTEM -> CurrentControlSet -> Control -> Session Manager -> Memory Management -> PrefetchParameters 2. You must disable automatic file defragmentation. It also makes no sense now. She will only cut in vain SSD resource drive. Start - in the search bar enter - Defragmentation. Click on the “Set up schedule” button. Uncheck the “Run as scheduled” checkbox.
3. If you have a 64-bit operating system and a memory capacity of 8GB or more, then it makes sense to disable the page file. 4. Change the Memory Management parameter: HKEY_LOCAL_MACHINE -> SYSTEM -> CurrentControlSet -> Control -> Session Manager -> Memory Management 5. SSD optimization may also include disabling file journaling NTFS systems: 6. Disable sleep mode. The system will already boot very quickly and there will be no need for sleep mode. 7. Disable indexing for the SSD disk:
8. Transfer temporary TEMP folders from SSD to HDD. 9. Finally, all that remains is to transfer the user’s folders (Documents, Videos, Downloads, etc.) from the SSD to the HDD. Now many users are upgrading their personal computers and laptops by installing SSD drives on them - solid state drives. Compared to the already familiar HDDs, solid-state drives actually have a significant advantage in the speed of working in operating systems and working with data. Many people have a completely logical question: is it necessary to make any additional adjustments to personal computers and laptops when installing a new SSD? In our article, we will try to consider in detail how to work with SSDs in the two most popular operating systems – Windows 7 and Windows 10 (the actions that we will perform in the “top ten” can also be used on Windows 8). In the notes, we note some features of SSD manufacturers, as well as some nuances for working with SSDs in laptops. So how do we configure an SSD to get the most out of the modern hardware we buy and install?
To perform its functions, the system requires the SATA controller to operate in AHCI mode. To do this, you need to find the SATA configuration menu in the BIOS (Cohfigure SATA As). Typically these configurations are located in the Main section, and transfer them to AHCI mode. You can check the system in a simple way: “Start Menu” – “Control Panel” – “System” item. Select “Device Manager” and find the item IDE ATA/ATAPI controllers there. If this item is present, then expand it and find controllers with AHCI in the names in the lists. If we find AHCI names there, then our system operates in the mode we need. If there are no such names, then the system is not switched to work in AHCI mode. Naturally, it is necessary that the BIOS itself supports operation in this mode.
After we have made sure that the system is switched to AHCI mode, we need to check whether the TRIM command is enabled. TRIM improves system performance on solid-state drives by telling operating systems which blocks of previously written data are no longer needed because the data in them has been deleted or formatted. Simply put, the TRIM command “removes garbage” and significantly speeds up the operation of an SSD drive, being a replacement for defragmentation on conventional HDDs. Notes: * For SSD operation in the Windows 7 operating system, it is best to combine computers SSD and HDD. This will allow us to combine improved speed performance with HDD reliability. * It is, of course, preferable to install the operating system on an SSD, like all major programs * It is advisable to leave about 20 percent of the total volume of the solid-state drive unallocated when installing the operating system. With natural wear and tear, the SSD will take clusters from there for its work. Optimization in Windows 7 for working with SSD
To limit unnecessary write operations and return available space to the SSD, disable the “System Protection” function as follows: right-click on the “My Computer” icon and select “Properties” from the drop-down menu. In the window that opens, find the “System Protection” tab and go to it. Click the “Configure” button and select “Disable system protection”. Some experts warn that System Protection may degrade the performance of the SSD over time and negatively impact the TRIM function due to its data recording nature.
Due to the high performance of SSDs, the disk indexing function is not useful to us, because Disk indexing was designed specifically to speed up work on HDDs. To do this, on the “My Computer” icon, call up the drop-down menu with the right mouse button and select “Properties” again. In the “General” section, uncheck the box next to “Allow the contents of files on this drive to be indexed in addition to file properties.”
If you have a 64-bit operating system installed and the amount of RAM exceeds 8 Gigabytes, it would be advisable to disable the Paging File function. To do this, call up the drop-down menu again by right-clicking on the “My Computer” icon and select “Properties”. In the “Properties” window, find the “Advanced Settings” tab, then the “Performance” item, then the “Options” item, select the “Advanced” item and find the “Virtual Memory” section. Check the “No paging file” option and click “Set”. When working with the page file, be aware that some applications that use a large amount of RAM resources may experience difficulties when the use of the page file is turned off.
Hibernation was created so that the work you were doing on your computer could be resumed almost instantly. So, when the hibernation function is enabled, the entire contents of the RAM are reset to the hard drive, and then, upon awakening, they are immediately read. When working with an SSD, this function is not necessary, since the resumption of work is already quite fast. This way we save precious space on our SSD. We disable the function like this: in the search bar in the Start Menu, type cmd and call the command line utility. Then in the command line we type the command: powercfg –h off and press the “Enter” key. It is worth noting that it is not always advisable to disable hibernation. For example, on laptops, disabling hibernation will result in the computer having to be restarted every time it is closed.
When enabled, Superfetch caches frequently used data, while Prefetch preloads frequently used applications. In the case of working on an SSD drive, due to the high speed of data access, we will no longer need these functions and we will be able to free up memory and let our drive work only when needed. To disable, perform the following steps: in the “Start Menu” in the search bar, type the command regedit, thereby opening the window for working with the registry. We consistently search for and select registry items: HKEY_LOCAL_MACHINE\SYSTEM\CurrentControlSet\Control\SessionManager\Memory Management\PrefetchParameters. Then, with the right mouse button, call up the submenu on the EnableSuperfetch and EnablePrefetcher items one by one. Select the “Change” item and change the values to zero. In the same way, we change the values to zero in the ClearPageFileAtShutdown and LargeSystemCache parameters. The LargeSystemCache setting specifies the size and frequency of flushing the cached page to disk, and the ClearPageFileAtShutdown setting clears the page file when the PC is shut down, which results in additional writes that we no longer need. Path to parameters: HKEY_LOCAL_MACHINE\SYSTEM\CurrentControlSet\Control\SessionManager\Memory Management. Select the ClearPageFileAtShutdown and LargeSystemCache items, go to their menu with the right mouse button and, selecting “Change” in each item, set the parameter to zero. After this, reboot the computer.
Since SSDs are much faster than traditional HDDs, the enabled write caching function does not give us any special speed advantages, so you can deactivate it. But, in turn, SSD manufacturer Intel warns that the refusal of this function will negatively affect the operation of the solid-state drives they produce. Disable caching feature Windows entries We can do this as follows: in the root folder of Explorer “My Computer”, right-click and select “Device Manager” through the “Properties” item. Select the “Disk devices” item and right-click on our SSD, thereby calling up a submenu. In the submenu, select the “Properties” section and in the properties window on the “Policies” tab, uncheck the “Allow caching of records for this device” checkbox. Then press the OK button.
Windows Search creates indexes of individual files, documents, and folders on your hard drive. The index is stored in a separate Search folder on drive C and takes up to 10% of the volume of indexed documents, so that when searching, it loads part of the index into memory and significantly speeds it up. In the case of an SSD, again, this function will not give us a noticeable increase in speed. But indexes take up space on the solid-state drive, and the enabled this function can really negatively affect the performance of the SSD. Therefore, we disable the function Windows Search as follows: in the search bar in the Start Menu, type services.msc and press Enter to bring up a menu with a list of local services. Find Superfetch in the list and right-click on it to bring up the service menu. In the Startup Type drop-down menu, select Disabled and click OK. Then find the Windows Search service and right-click on it again, select “Properties” and click on the “Stop” button, and then in the “Startup Type” menu, also select the “Disabled” option and click OK.
To free up additional space on the SSD and avoid unnecessary overwriting, we move folders with temporary files to another drive. To do this, go to the “Control Panel”, select the “My Computer” icon, then the “Advanced system settings” section and in the “Advanced” tab go to the “Environment Variables” menu, where we click the change button, and change the final addresses of the folders with temporary storage data for new ones.
To perform the same task as in the previous paragraph, transfer all user folders to another drive (including the “Video”, “Audio”, “Downloads”, “Favorites” and others) folders. We create a separate user folder on another drive and in “Folder Options”, which we call by right-clicking on the selected folder, on the “Location” tab, click the move button and set a new location for the folders to be moved.
You can also disable NTFS system journaling. To do this, in the Start menu, in the search bar, type cmd and open the command line. In the command line, type the command: fsutil usn deletejournal /D C: and press “Enter”.
As mentioned above, the defragmentation function is intended to work with HDDs and we do not need it when working with SSDs. Therefore, we disable it as follows: in the “Start” menu, in the search bar, type the word “defragmentation”, select the found disk defragmentation program, find the “Schedule” tab and uncheck the “Run on a schedule” checkbox.
For best performance your SSD needs to manually configure its power supply. To do this, call the “Control Panel”, find “Power Options” there and set the following parameters: in “Setting up a power plan” in the parameters, select “High performance” and click “Apply”. Go to “Setting the power plan” and in the “Change” Extra options Power”, select the “Hard disk” item, the “Turn off the hard drive after” sub-item and set the “Never” option, that is, “00 minutes”. Optimization in Windows 10 (8) for working with SSDWhen working with the Windows 10 (8) operating system, it is best to complete all the points related to Windows 7. The fact is that “Ten” independently makes some changes when it detects a solid-state drive. Here is a list of standard automatic system optimizations:
All other optimization items will have to be performed manually. You can proceed according to the scheme with the Windows 7 operating system that we proposed above. There is another option. You can download free utility SSD Mini Tweaker, launch it, check the boxes required to complete it and apply the changes. It is recommended to check all the optimization menu options offered by the SSD Mini Tweaker program. Notes: *For maximum performance when using an SSD, it is recommended to connect it to SATA 3 ports operating at 6 Gigabits per second. * Don't forget to periodically check your SSD manufacturer's website for firmware updates and install them. As we can see from the article, optimizing the system for working with a solid-state drive requires some settings. And if Windows 7 has to be carefully configured manually, then in operating Windows systems 10 and 8, some settings are applied automatically when the system detects a solid-state drive during installation, and adjustment to work with an SSD drive in the system can be done using a free software specially designed for this purpose. SSD utility Mini Tweaker. In this article, we will look at the operating system settings for optimal operation of the SSD, features of the operation of Windows services, as well as some “tricks” for more stable operation of the SSD drive and increasing its service life. Introduction: SSD and HDD drivesSolid State Drive (SSD) significantly superior to a classic hard drive ( HDD) in the speed of reading and writing files. Why are classic hard drives (HDDs) slow and what affects their speed?On a hard drive, data is stored on rotating magnetic plates, and the speed of reading information on different parts of the plate is different. In addition, the different arrangement of files on the platters requires constant movement of the read head, which makes copying or writing a large number of (especially small) files very slow. Sometimes one file may be written in parts on different parts of the platter, which will also reduce the speed of reading such a file: the reading head must move to a new position and wait for the magnetic platter to rotate to begin reading the next part of the file. Why is an SSD drive several times faster and what determines the quality of its work?In SSD drives, data is stored on flash memory chips (usually NAND memory is used). The NAND controller is responsible for accessing the cells, whose tasks include performing cell read and write operations, as well as distributing the load. The disadvantage of this technology is that memory cells have a limited rewrite cycle. So the qualitySSD disk depends on the type of flash memory, as well as on the quality of the controller, which must balance the load so that all cells are overwritten evenly, as well as implement other important points on management SSD disk. What operating system settings and services affect the lifespan of an SSD drive.Freezes, freezes and blue screens of death (BSOD) after installing a new SSD drive.If you encounter freezes (second-long computer freezes) or frequent blue screens of death after you started using new SSD disk, then most likely you need:
Why is it so important to leave 10 to 30% of the space on your SSD unallocated or unallocated?It is advisable to always leave at least 20-30% of the space on the SSD free. This is necessary so that the NAND controller, through which all the logic for working with the disk’s flash memory is implemented, has a large number of free blocks. These free blocks can be actively used in the process of garbage collection, wear leveling, and also for replacing flash memory blocks that have failed. You've probably noticed that SSD disk capacities have a strange format: for example, 240GB instead of 256GB. And if you look at the amount of available space, it will be even less, about 222GB. In fact, most likely your disk has a capacity 256GB, and about 8-13% The flash memory of the disk is used as a “reserve zone”. A large volume of the reserve zone is needed for uniform speed of operation of the SSD disk (especially noticeable under heavy load), as well as its uniform wear, regardless of how much space you occupy on it - 25% or 95% . But all manufacturers behave differently: some expensive drives from the company Intel may have up to 30% reserve zone(in excess of the volume, accessible to the user), while other manufacturers, trying to make the cost SSD disk as cheap as possible, cut this area to 6-7%
, or even release firmware that allows users to change its size themselves. Using utilities for testing SSD disk performance, you can independently compare the speed performance of the same disk with a large amount of free space and a small amount when the disk is full 95%
. Which Windows 7 services are useful for an SSD, and which are best disabled?Defragmentation, temporary files, indexing - all this requires a lot of disk access, which is very undesirable for SSDs due to the presence of a limited number of write cycles, which is definitely not the case in HDDs. Windows 7 cannot produce fine tuning services and services in accordance with the operating features of SSD drives. But you can independently disable some services that definitely do not help the operation of the SSD drive (and sometimes are even harmful, such as disk defragmentation). You can also decide to disable some services that are not relevant to you. Further in the article you will find a description of such services in Windows 7 and an algorithm for disabling them. Disabling SSD disk defragmentation in Windows 7An absolutely unnecessary (moreover, wearing out SSD) process, relevant only for a simple hard drive (HDD), transfer fragments files scattered throughout the drive in different areas to speed up reading from the disk. Let's look at how to disable the defragmentation service in Windows 7: Step 1. Disabling the Prefetch Service in Windows 7.This service has a pretty good effect on work hard disk, increasing the loading speed of the OS and user software. The service accumulates data about which files and programs are opened when the OS boots and the first seconds of its operation in order to optimize methods for accessing such files. But the SSD already works extremely quickly and does not need such optimization. That's why " Prefetch "You can safely turn it off, freeing the drive from unnecessary (albeit small) wear and tear. To do this, use the registry editor (regedit):
 Figure 3. Changing the registry key to disable the Prefetch service. Figure 3. Changing the registry key to disable the Prefetch service.Made! Note. Services Superfetch And Readyboot it is not necessary to disable it, because they have virtually no effect on the SSD, sometimes only writing log files of only a few megabytes in size, which help the system work and boot a little better. Now let's move on to controversial functions, disabling which can slightly reduce PC performance, but significantly extend the life of the solid-state drive. Optimizing useful Windows 7 servicesTransferring temporary files to HDDQuite a controversial decision. Further actions will allow you to transfer:
Here the choice is entirely yours. Step 1. Step 2. Save the values and close the window by clicking “ OK
». Disabling indexing in windows 7Indexing speeds up the search process the desired file on disk. On an SSD it is completely disableable, even if you often search for something by typing queries into Explorer. It will take a little more time to search for files, but the disk will no longer be written to logs, which create additional write operations even when the system is idle on the desktop. Indexing is disabled in " Properties » disk. Let's take a closer look:
 Figure 5. Local disk properties window. Figure 5. Local disk properties window.
Now let’s give an example of optimization methods that are found in many sources, but I strongly do not recommend listening to them for the sake of safety system files valuable in case of virus infection or hardware failure. Do not disable the paging file completely - move it to a HDD with a smaller capacity.It is strongly not recommended to disable this file even if there is enough RAM, because mini-dumps are written to it system errors when BSOD (blue screen of death) and other problems with software and hardware. And it is precisely without a paging file that you will not be able to accurately know the full essence of the problem that has arisen if the OS does not boot for some reason. Also, data from programs or services can be written to it during installation. windows updates or when installing software that will be requested after restarting the computer. However, there is a way out– leave a small amount of paging file on the HDD (by default it is written to the SSD, like any other system disk). Step-by-step instructions on how to move the page file to another drive in Windows 7.
 Figure 6. “Advanced” tab for changing settings virtual memory in windows 7. Figure 6. “Advanced” tab for changing settings virtual memory in windows 7.
 Figure 7. Virtual memory settings window in Windows 7. Figure 7. Virtual memory settings window in Windows 7.
Now dumps will be recorded freely, and solid state drive freed from the unnecessary load of this file. Do I need to disable hibernation and sleep modes? Advantages and disadvantages.Disabling hibernation and sleep mode may be relevant in the following situations:
Installing an SSD speeds up the startup and shutdown of the OS several times. Consequently, each time the mode is used, the SSD is forced to write to itself a file that reaches approximately 70% of the RAM capacity. And to save already limited SSD write cycles, you can completely (reversibly) disable hibernation (as well as “Sleep Mode”) using the standard “Shutdown”. This way we will get some advantages: Disadvantages of disabling hibernation and sleep mode. Disadvantage there is a small loss of time while waiting for the OS and programs to fully load, which may be needed instantly, which happens, you see, quite rarely. So, in most cases, “Shutdown” will be the most successful solution when turning off the PC, and without “Hibernation” when using high speed SSD It's quite possible to get by. "Sleep mode" no way does not write files to RAM , but only reduces the consumption of the PC by reducing the power supply to many of its hardware parts (all the data that was in the temporary memory remains there). So you only need to disable it in case of BSOD and other system errors. Prohibition of turning off disks in terms of power supply.Stuck in sleep mode.Sometimes, according to the settings, the power supply board, computer or laptop turns off the hard drives to save resources. This can happen at the same time as sleep mode is turned on, or after sleep mode has already begun. The computer screen goes blank and then, either immediately or over time, windows will turn off the hard drives. Old drivers or firmware for SSD drives may behave incorrectly in this situation, and the computer freezes because... The hard drive does not initialize after turning off the power. This problem can be mistaken for a computer with an SSD drive freezing in sleep mode. To do this you need to go to the menu “ Start
" → enter in the search bar: " power supply
Next click “
» → go to item « Change advanced power settings
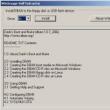
"(Figure 9). Disable sleep mode and/or hibernation.4.5.1 Let's start with sleep mode.As we described above, to do this you need to go to the menu “ Start " → enter in the search bar: " power supply » → select the appropriate item (Figure 8).Next click “ Setting sleep mode " (located approximately in the left middle of the window that appears), and then select the value " Never " in the parameter " Put your computer into sleep mode "(Figure 11). Ready! Sleep mode is disabled. 4.5.2 Let's move on to disabling hibernation.Hibernation is a shutdown mode in which all processes are removed from RAM copied onSSD, forming a file hiberfil.sys which wastes resources (rewrite cycles, in this case) of the solid-state drive. Disabling hibernation is done by entering a specific command in the command line console ( cmd.exe). First you need to open the command line by entering search bar menu " Start " request: " cmd "and run it on behalf of administrator(by pressing RMB and selecting “ Run as administrator »)Now copy (or enter manually) the following into the line: powercfg.exe -h off Attention!  Figure 12. Entering data into the command line to disable hibernation. Figure 12. Entering data into the command line to disable hibernation.Press Enter, wait a couple of seconds, close the command line. After rebooting the PC, the hibernation file will be erased from our SSD, and writing to the disk will not happen again until you enable the function back (in the same command, change “off” to “on”). Done. Hibernation will no longer plague your SSD drive. Why you can't disable Windows restore pointIt will do impossible the simplest correction of system files in case of incorrect installation or removal of software, drivers, etc. The checkpoint sometimes helps a lot, so disabling it is impractical and even harmful. Automatically configure an SSD drive using the free SSD Mini Tweaker programA program that will help you quickly automate some of the actions listed here - SSD Mini Tweaker. This software is portable, i.e. does not require installation, and also free. The window of this optimizer program (V 2.7) with recommended (universal) settings will look like this: ConclusionNow, having become acquainted with the methods windows optimization 7 for fast and durable operation of the SSD drive, you can make a choice in terms of performance and durability SSD services or draw up the balance that is most correct, in your opinion. |


| Read: |
|---|
Popular:
New
- Taking a screenshot on a Samsung Galaxy A7 smartphone
- Reasons for time failure on a laptop and how to fix them The date and time settings on the computer are lost
- Setting up an iPhone after purchase How to set up an iPhone se after purchase
- The keyboard does not print the letters you press Buke the keyboard does not work
- Russian Post tracking of shipments
- Best Ways to Make a Beautiful Background for Your YouTube Channel
- Factory reset Samsung smartphones
- What is Power BI and how to work with it?
- Network adapter - what is it?
- How to add a program to autorun?


